Cluster Management Screen
On the Cluster management screen, you can view a list of the clusters that are registered in GridGain Nebula. On this screen, you can add, remove, activate, and deactivate clusters. Destroyed clusters are removed 24 hours afterwards.

Cluster List
The following information is available in the list of clusters in the upper part of the Cluster management screen:
| Column | Description |
|---|---|
Name |
The name of the cluster. See Cluster Name. |
Status |
Indicates whether the cluster is connected to GridGain Nebula. Here are the possible statuses:
|
Client Nodes |
The number of client nodes. |
Server Nodes |
The number of server nodes. |
Cluster Type |
Attached or Managed. |
Version |
The version of GridGain used by Nebula. |
Secure |
Indicates whether the cluster is secured by authentication. |
Actions |
Contains the View button that opens the current cluster in the My Cluster screen, as well as the context menu for the current cluster. |
Cluster Name
Every cluster is identified by a name. When a cluster starts for the first time, the cluster’s default name is generated automatically.
The name of the current cluster is displayed in the top-right corner:

To change the name of the cluster, click ⋮ and select Rename. In the subsequent dialog, enter the new name of the cluster and click OK.
Cluster Details
The Details section at in the lower part of the screen shows displays the details of the "current" cluster, such as its type, ID, etc.
Cluster Management
Provisioning a New Managed Cluster
To provision a new managed cluster, click Create in the top right corner of the screen, or click + on the main toolbar and select Create managed cluster.
Follow instructions in the wizard that appears - see details in the Getting Started Tutorial.
Attaching a Self-Hosted Cluster
To attach a self-hosted cluster, click Attach in the top right corner of the screen, or click + on the main toolbar and select Attach cluster.
Follow instructions in the wizard that appears - see details in the Getting Started Tutorial.
Switching Between Clusters
If multiple clusters are registered in Nebula, you can switch between clusters by using the Select cluster control at the top of the screen or by selecting the cluster’s radio button in Clusters page.
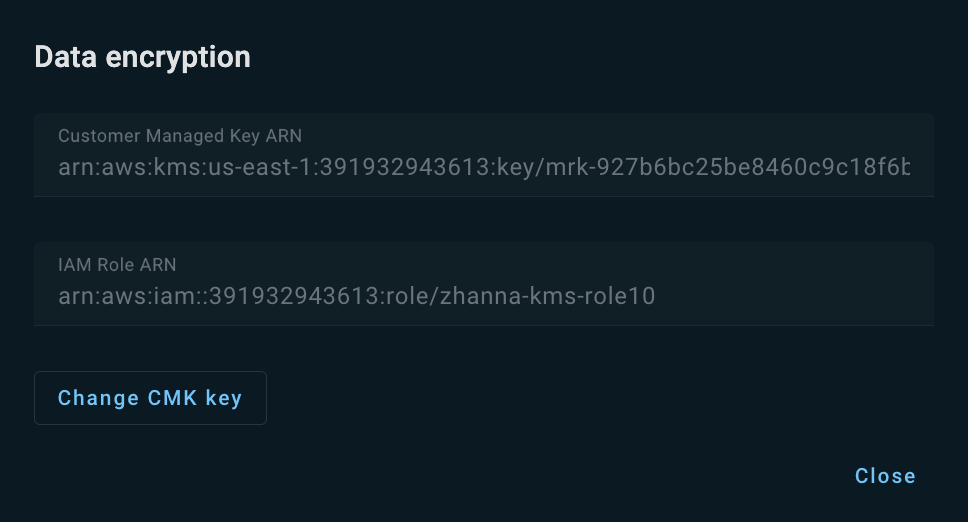
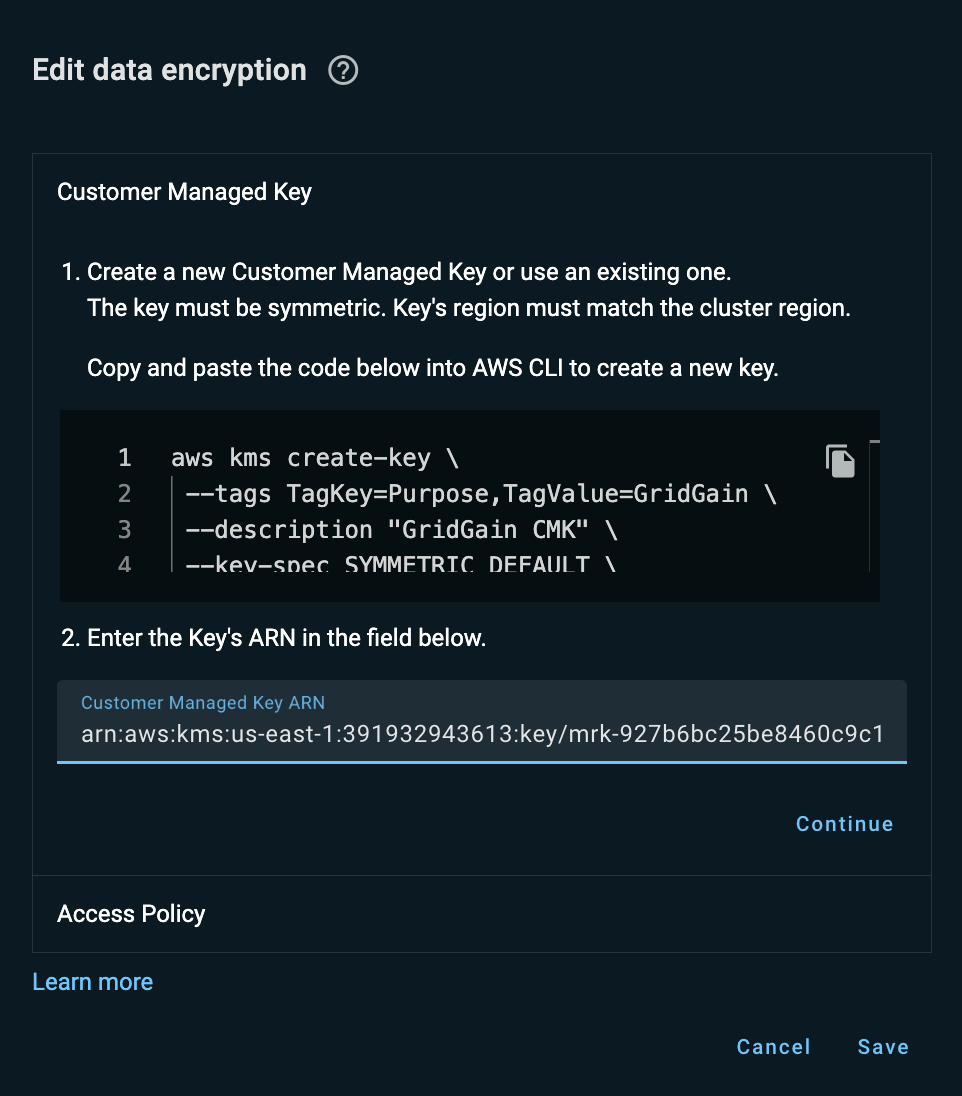
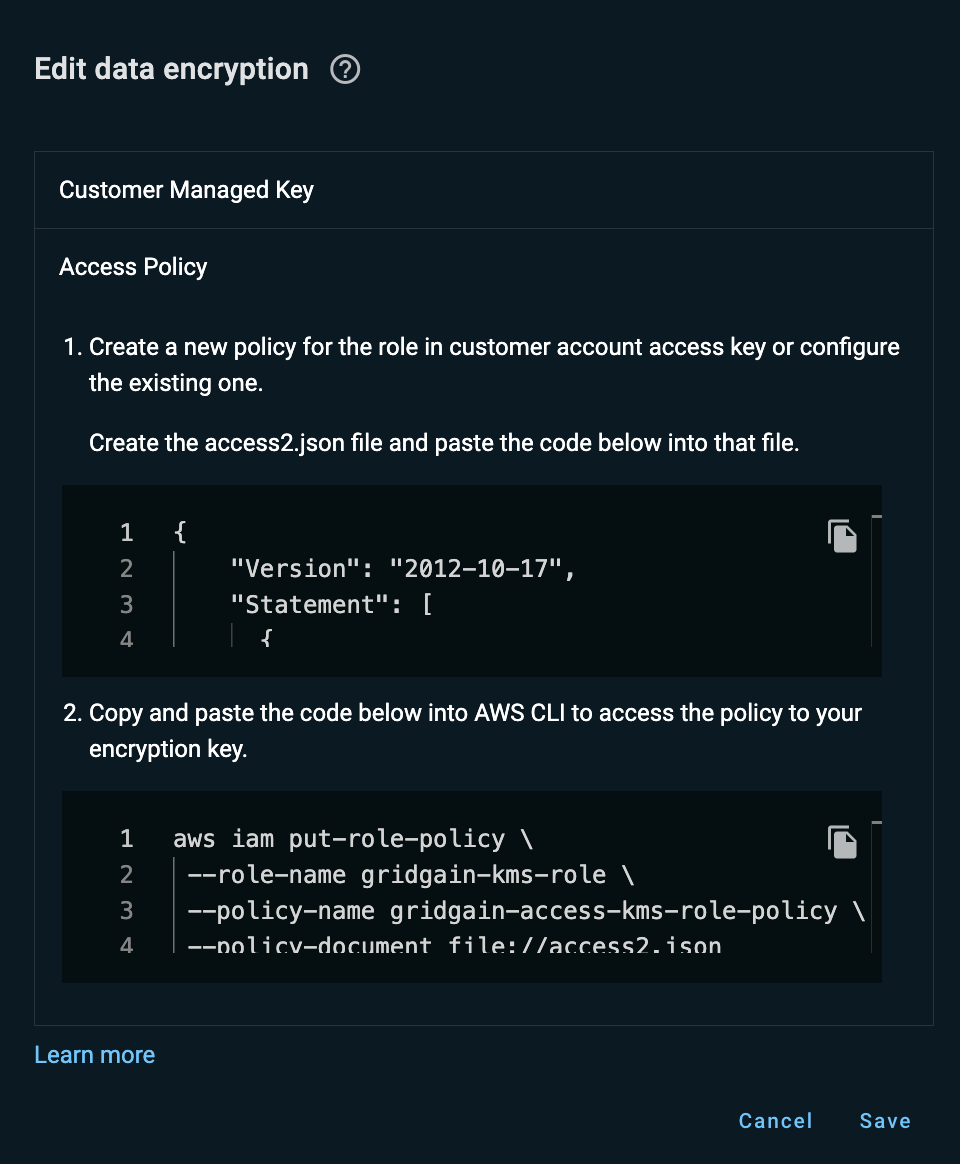
Changing Encryption Definitions
If the cluster has been created with the transparent encryption enabled, you can change its encryption definitions (the CMK and, optionally, the Access policy) after you rotate the CMK in your AWS account or create a new CMK.
To change the encryption definitions:
-
Click ⋮ and select Data encryption.
-
In the Data encryption dialog that opens, click Change CMK key.
-
In the Edit data Encryption dialog that opens, replace the current Customer managed Key ARN with the new KMS ARN value, then click Continue.
-
Optionally, follow instructions in Step 2 to update the access policy, then click Save.
Suspending the Cluster
If you currently do not need a cluster but plan to use it later, you can suspend it.
While your cluster is suspended, you are not billed for any of the services and features associated with it. The cluster data is safely archived (as a snapshot saved to an S3 bucket), to be restored when the cluster is resumed (see Resuming the Cluster).
To suspend a cluster:
-
Make sure no operations run on the cluster (queries, rebalancing, compute jobs, etc.).
-
Click ⋮ and select Suspend.
-
In the confirmation dialog that opens, click Suspend.
Resuming the Cluster
You can resume a previously suspended cluster. When the cluster is resumed, its data is restored to pre-suspension state.
To resume a cluster:
-
Click ⋮ and select Resume.
-
In the confirmation dialog that opens, select Resume.
The Resume operation takes the same time as the initial cluster provisioning plus the time required to restore the data. Billing restarts when the cluster is back online.
Destroying the Cluster
To destroy the cluster, click ⋮ and select Destroy. The cluster will be destroyed alongside all data stored on it. The cluster is removed from UI 24 hours after it is destroyed.
Downloading Cluster Logs
To download cluster logs for a specific date, click ⋮ and select Download logs. In the Cluster logs dialog that opens, select a date and click Get logs.
A progress bar appears. Once the log package is ready, it automatically downloaded to your machine. If the download does not start automatically, click Download io the Cluster logs dialog.
Generating a Token
To generate a token, use the management script:
./management.sh --token./management.bat --tokenManaging Cluster API Credentials
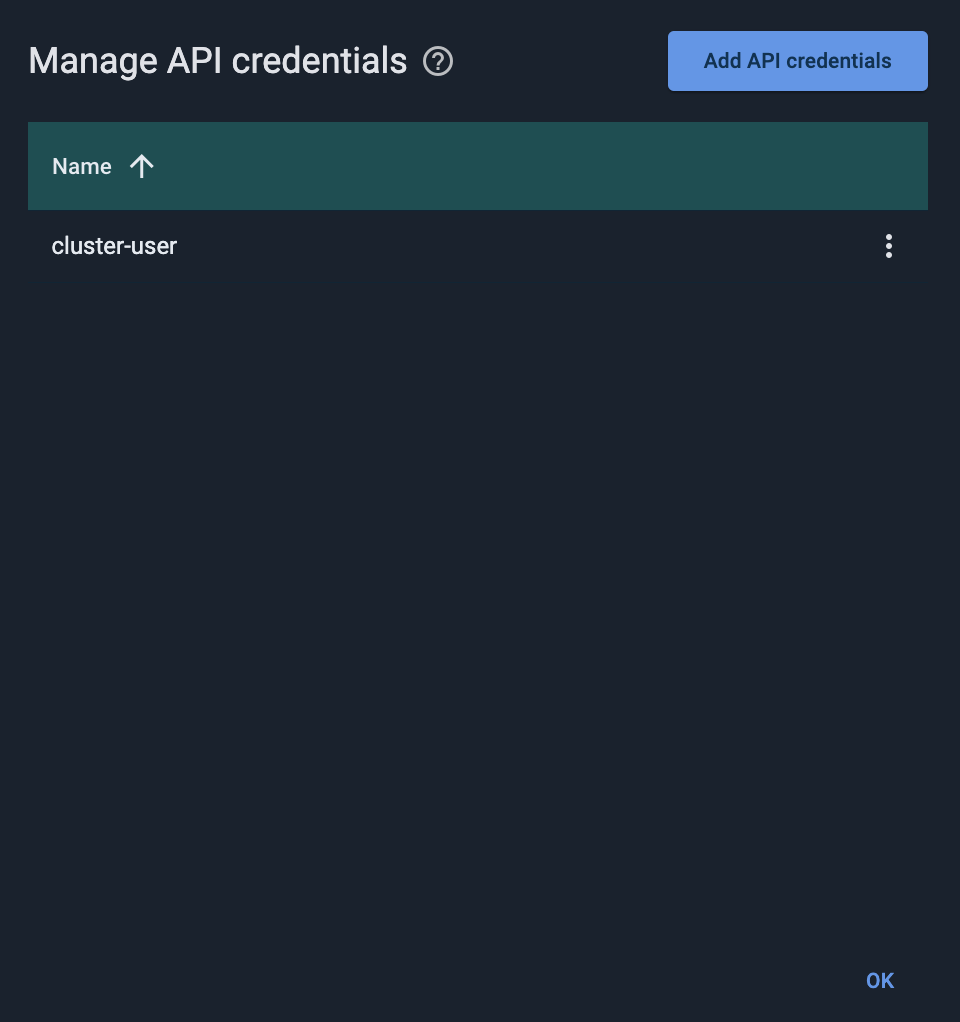
To access a cluster, applications need to authenticate to it using API "user" credentials. When creating a cluster, you specify one set of API credentials. Once the cluster had been provisioned, you can add API credential sets, modify them, and delete the ones that are no longer required.
To manage API credentials:
-
From the cluster’s context menu, select API credentials.
The Manage API credentials dialog opens. It list all API "users" defined for the cluster.
-
To add a "user":
-
Click Add API credentials.
The Add API credentials dialog opens.
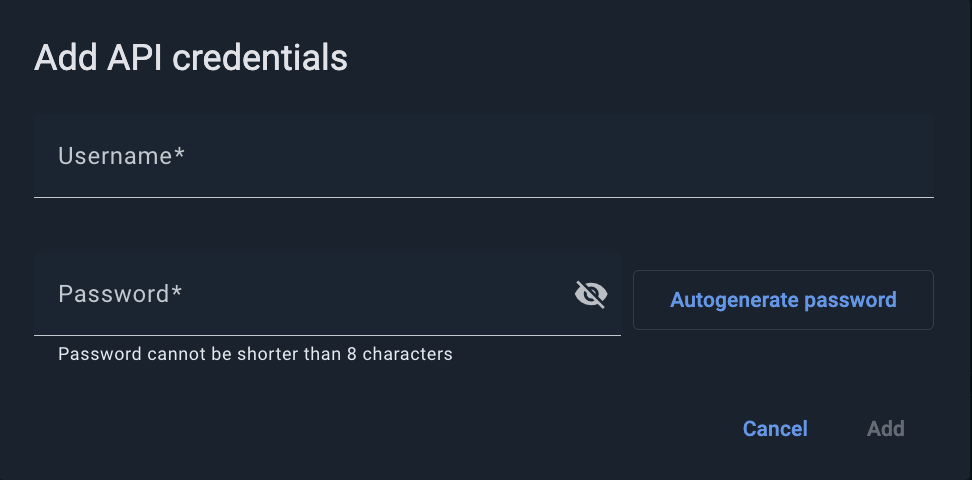
-
Enter the Username and Password values.
-
Click Add.
-
-
To change a "user" password:
-
From the user’s context menu, select Change password.
The Change password for <username> dialog opens.

-
Enter the new Password.
-
Click Change.
-
-
To remove a "user", select Remove from that user’s context menu.
Sharing Clusters
You can have access to a cluster as:
-
User - a regular user who can view the cluster that had been shared with them individually or via a team, as well as utilize the actions that appear in the cluster’s context menu.
-
Owner - the user who had created or attached the cluster. Owners have extended cluster access rights, including sharing the cluster with teams or users, suspension, removal, etc.
As a cluster owner, you can share that cluster with individual users and/or teams. You use the Teams screen to create and manage teams.
Sharing with Users and Teams
To share a cluster you have created or attached with individual users and/or teams, click ⋮ by that cluster’s name on the list and select Share. The Share cluster dialog opens.
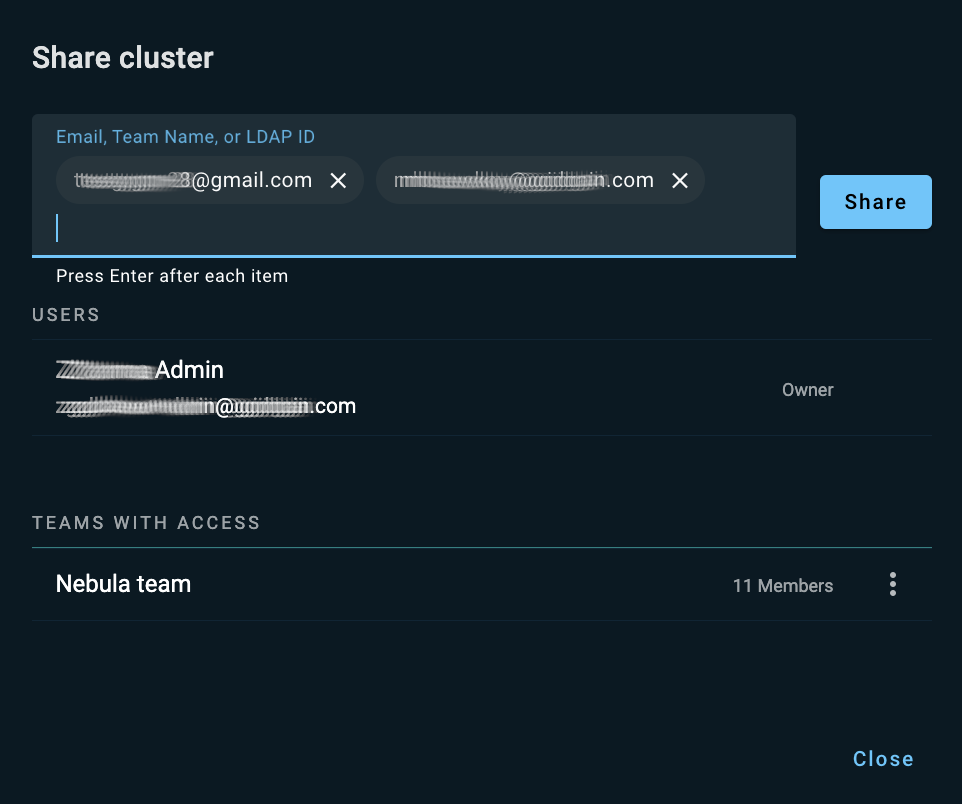
The dialog lists users and teams that already have access to the cluster.
In the entry field across the top of the Share cluster dialog, start typing a GridGain Nebula user’s email, an LDAP ID, or a team name. As you type, the incremental search mechanism displays suggestions in a drop-down list. Select one of the suggested users or teams. Alternatively, type the identifier to the end, then click [Enter]. You can add multiple users and/or teams in a single operation. When done, click Share.
The users and teams you have entered appear in the corresponding sections of the Share cluster dialog. The system notifies the users and team members that a cluster had been shared with them. To close the Share cluster dialog, click Close.
Viewing Team’s Clusters
Any team member can check which clusters had been shared with their team. To see the shared clusters, select the team from the drop-down list to the right of the screen title.
GridGain Nebula remembers what cluster you had selected and displays it next time you open the page. If the cluster had been reassigned to another team, GridGain Nebula opens the cluster in the new team’s context.
Stopping a Cluster Share
As a cluster owner, you can stop sharing your cluster with a team or with an individual user (remove access to the cluster that had been previously granted to that team or user).
You can stop sharing a cluster with a specific team from that team’s list of shared clusters. Select the required team from the drop-down list to the right of the screen title. Click ⋮ next to the cluster you want to stop sharing with the selected team and select Stop sharing. In the confirmation dialog, click Stop sharing.
Alternatively, you can stop sharing a cluster with team(s) and/or user(s) from the Share cluster dialog. Click ⋮ by the cluster’s name on the list and select Share. In the Share cluster dialog that opens, select Stop sharing from the context menu by the required team or user name. In the confirmation dialog, click Stop sharing.
© 2025 GridGain Systems, Inc. All Rights Reserved. Privacy Policy | Legal Notices. GridGain® is a registered trademark of GridGain Systems, Inc.
Apache, Apache Ignite, the Apache feather and the Apache Ignite logo are either registered trademarks or trademarks of The Apache Software Foundation.