Building RESTful Web Service with Spring Boot, Spring Data and Apache Ignite

Apache Ignite Committer and PMC Member
This tutorial walks you through the process of creating a RESTful web service that uses Apache® Ignite™ as a high-performance, in-memory database. The service is a Spring Boot application with an embedded Apache Tomcat® instance that interacts with an Apache Ignite cluster via Spring Data repository abstraction.
You can find a complete implementation of the service in the GitHub repository. Depending on your preference, you can build the application from the ground-up, learning all the nuances, or you can download the GitHub project and jump to the Run the Application section of this guide.
What You Need
-
Apache Ignite 2.14 or later
-
Java Developer Kit, version 8 or later.
-
Apache Maven 3.6 or later
-
Your favorite IDE, such as IntelliJ IDEA, or Eclipse
Start the Apache Ignite Cluster and Load the Sample Database
Before you develop the RESTful service, you’ll start the Apache Ignite cluster and load it with sample data. You can deploy Ignite in the environment of your choice. However, for this tutorial, you bootstrap the cluster in a bare-metal environment such as your personal Linux or Windows machine.
First, you start a 2-node Ignite cluster:
-
Download and unarchive the Apache Ignite 2.14+ binary package to some directory (we will refer to it as
{ignite}or$IGNITE_HOME) -
Open a command-line tool (also known as “a terminal window”) and go to the
{ignite}/binfolder of the Ignite distribution. -
Using the default configuration settings, start the first Ignite cluster node.
./ignite.shignite.bat -
Open another command-line window and use the same command to start the second cluster node:
./ignite.shignite.bat -
After the two nodes form one cluster, look for the following message in the command line output to confirm the cluster is running:
[15:11:35] Topology snapshot [ver=2, locNode=9eed123b, servers=2, clients=0, state=ACTIVE, CPUs=12, offheap=6.4GB, heap=8.0GB]
[15:11:35]   ^-- Baseline [id=0, size=2, online=2, offline=0]
Next, before you initialize a sample database in Ignite, tweak some parameters of the default SQL script that is shipped with the Ignite binary package:
-
In a text editor, open the
{ignite}/examples/sql/world.sqlfile. -
Replace the
VALUE_TYPE=demo.model.Countryparameter of theCREATE TABLE Countrystatement with theVALUE_TYPE=org.gridgain.demo.springdata.model.Country. -
Replace the
KEY_TYPE=demo.model.CityKeyparameter of theCREATE TABLE Citystatement with theKEY_TYPE=org.gridgain.demo.springdata.model.CityKey. -
Replace the
VALUE_TYPE=demo.model.Cityparameter of theCREATE TABLE Citystatement with theVALUE_TYPE=org.gridgain.demo.springdata.model.City. -
Save the changes and close the editor.
You made the parameter changes to link the tables with data POJOs, which will be created later. With these settings, you can use the POJOs throughout the application logic, with Ignite taking care of serialization and deserialization to and from the raw data representation.
Finally, you connect to the Ignite cluster (by using the SQLLine tool that is shipped with the Ignite binary distribution) and instantiate the database:
-
Open another command-line window, and go to the
{ignite}/binfolder. -
Use SQLLine to connect to the cluster:
./sqlline.sh -u jdbc:ignite:thin://127.0.0.1/sqlline.bat -u jdbc:ignite:thin://127.0.0.1/ -
Enter random username and password.
-
Load the sample database:
!run ../examples/sql/world.sql!run ..\examples\sql\world.sql -
After the database is created, quit SQLLine:
!q
You can use following script to perform these steps automatically:
cd $IGNITE_HOME

cd examples/sql \
&& sed 's/demo.model/org.gridgain.demo.springdata.model/g' world.sql > new-world.sql \
&& grep -H '=[a-z.]*model' world.sql new-world.sql \
&& ../../bin/sqlline.sh -u "jdbc:ignite:thin://127.0.0.1/" -n ignite -p ignite --run=new-world.sql
Create the Spring Boot Application
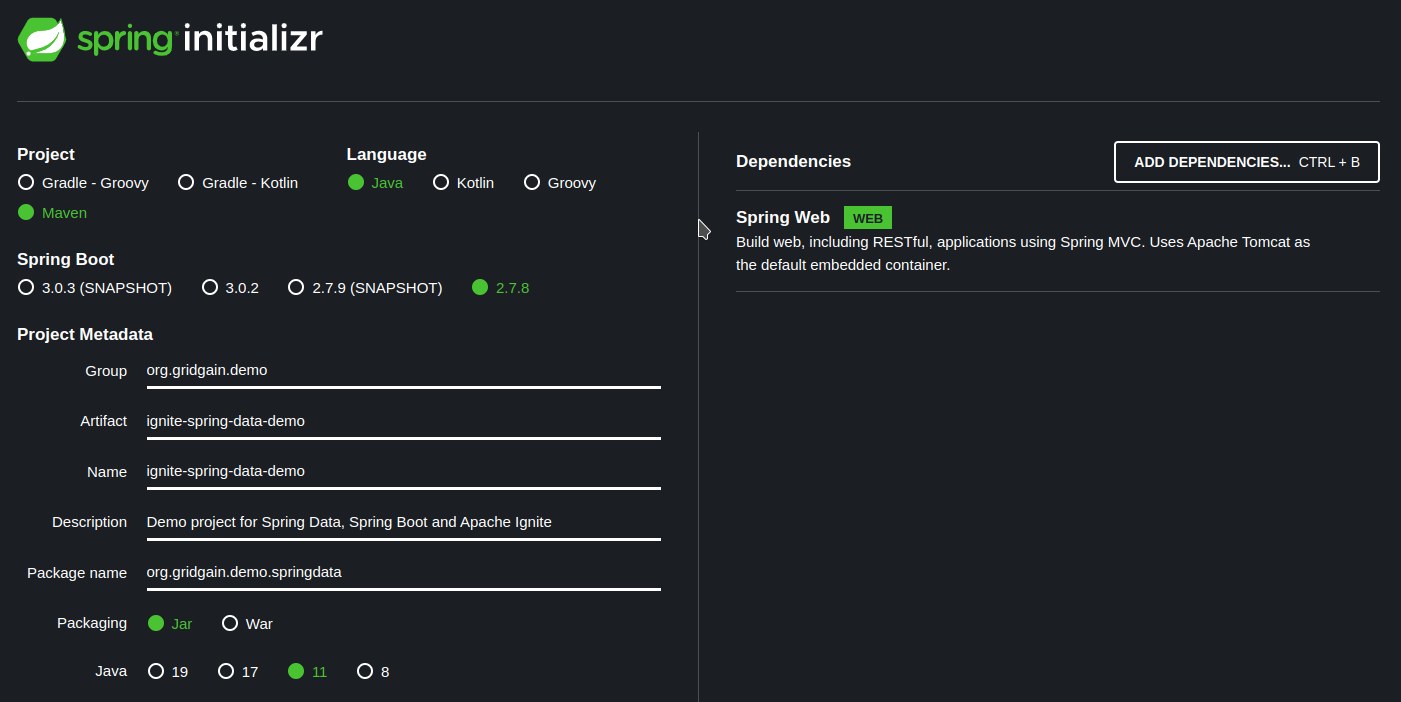
Once the cluster is running, you can proceed with development of the RESTful application. Take advantage of the Spring Initializr tool that generates a Spring Boot project with predefined settings. Go to https://start.spring.io and generate a project with the following parameters:
-
Project: Maven project for Java
-
Spring Boot: the latest stable Spring version, such as
2.7.8 -
Group:
org.gridgain.demo -
Artifact:
ignite-spring-data-demo -
Project name:
ignite-spring-data-demo -
Package name:
org.gridgain.demo.springdata -
Packaging: Jar
-
Java: 8+
-
Dependencies: Spring Web.
After you generate and download the project, you open it with your favorite IDE and add additional dependencies to the pom.xml file:
-
Add Ignite and Spring-specific dependencies:
<properties>
    <ignite.version>2.14.0</ignite.version>
    <ignite-autoconfigure.version>1.0.0</ignite-autoconfigure.version>
    <ignite-spring-data.version>2.0.0</ignite-spring-data.version>

    <!--
    By default, Spring pulls in a version of H2 that is not supported by Ignite,
    So we pin appropriate H2 version explicitly
    -->
    <h2.version>1.4.197</h2.version>
</properties>

<dependencies>

    <!-- Apache Ignite -->
    <dependency>
        <groupId>org.apache.ignite</groupId>
        <artifactId>ignite-core</artifactId>
        <version>${ignite.version}</version>
    </dependency>
    <dependency>
        <groupId>org.apache.ignite</groupId>
        <artifactId>ignite-indexing</artifactId>
        <version>${ignite.version}</version>
    </dependency>
    <dependency>
        <groupId>org.apache.ignite</groupId>
        <artifactId>ignite-spring-boot-autoconfigure-ext</artifactId>
        <version>${ignite-autoconfigure.version}</version>
    </dependency>
    <dependency>
        <groupId>org.apache.ignite</groupId>
        <artifactId>ignite-spring-data-ext</artifactId>
        <version>${ignite-spring-data.version}</version>
    </dependency>

    <!-- Spring -->
    <dependency>
        <groupId>org.springframework.boot</groupId>
        <artifactId>spring-boot-starter-web</artifactId>
    </dependency>
    <dependency>
        <groupId>org.springframework.data</groupId>
        <artifactId>spring-data-commons</artifactId>
    </dependency>
    <dependency>
        <groupId>org.springframework</groupId>
        <artifactId>spring-tx</artifactId>
    </dependency>

</dependencies>
Do a final configuration change, by requesting Spring to start an embedded Tomcat instance on port number 9000:
-
Open the
src/main/resources/application.propertiesfile. -
Add
server.port=9000to the file.
Define Data Model POJOs
Apache Ignite stores application records and entries in a cross-platform, language-neutral binary format. With this format, applications can query individual object fields. The applications can use SQL as well as use key-value APIs to read a full object entry that can be automatically deserialized to an associated POJO class instance.
In this tutorial, you define two types of POJOs. The first type, which represents the business objects of the RESTful service, is used internally throughout the application logic. The second type, which is called "[data transfer objects (DTO), window="_blank"]", is used by Spring Boot controllers to exchange the data via the external RESTful APIs.
Business Objects
In your project, create the org.gridgain.demo.springdata.model package for both business objects and DTO classes.
Add the org.gridgain.demo.springdata.model.Country class that is associated with the Country table
(check the VALUE_TYPE parameter of the CREATE TABLE Country statement from the {ignite}/examples/sql/world.sql script):
package org.gridgain.demo.springdata.model;

import java.math.BigDecimal;

public class Country {
    private String name;

    private String continent;

    private String region;

    private int population;

    private BigDecimal surfaceArea;

    private short indepYear;

    private BigDecimal lifeExpectancy;

    private BigDecimal gnp;

    private BigDecimal gnpOld;

    private String localName;

    private String governmentForm;

    private String headOfState;

    private int capital;

    private String code2;

    public String getName() {
        return name;
    }

    public void setName(String name) {
        this.name = name;
    }

    public String getContinent() {
        return continent;
    }

    public void setContinent(String continent) {
        this.continent = continent;
    }

    public String getRegion() {
        return region;
    }

    public void setRegion(String region) {
        this.region = region;
    }

    public int getPopulation() {
        return population;
    }

    public void setPopulation(int population) {
        this.population = population;
    }

    public BigDecimal getSurfaceArea() {
        return surfaceArea;
    }

    public void setSurfaceArea(BigDecimal surfaceArea) {
        this.surfaceArea = surfaceArea;
    }

    public short getIndepYear() {
        return indepYear;
    }

    public void setIndepYear(short indepYear) {
        this.indepYear = indepYear;
    }

    public BigDecimal getLifeExpectancy() {
        return lifeExpectancy;
    }

    public void setLifeExpectancy(BigDecimal lifeExpectancy) {
        this.lifeExpectancy = lifeExpectancy;
    }

    public BigDecimal getGnp() {
        return gnp;
    }

    public void setGnp(BigDecimal gnp) {
        this.gnp = gnp;
    }

    public BigDecimal getGnpOld() {
        return gnpOld;
    }

    public void setGnpOld(BigDecimal gnpOld) {
        this.gnpOld = gnpOld;
    }

    public String getLocalName() {
        return localName;
    }

    public void setLocalName(String localName) {
        this.localName = localName;
    }

    public String getGovernmentForm() {
        return governmentForm;
    }

    public void setGovernmentForm(String governmentForm) {
        this.governmentForm = governmentForm;
    }

    public String getHeadOfState() {
        return headOfState;
    }

    public void setHeadOfState(String headOfState) {
        this.headOfState = headOfState;
    }

    public int getCapital() {
        return capital;
    }

    public void setCapital(int capital) {
        this.capital = capital;
    }

    public String getCode2() {
        return code2;
    }

    public void setCode2(String code2) {
        this.code2 = code2;
    }
}
Observations about the POJO class:
-
The names of the POJO fields and the names of the columns of the
Countrytable need to correspond so that Ignite can transform the internal object representation to an instance of the POJO class. -
The POJO includes all the fields of the
Countrytable, except the primary key. TheCodefield is a primary key of theCountrytable, thus, it’s not added to this POJO class. On the physical level, Ignite stores application records as key-value pairs, and yourCountryPOJO should hold only the fields that belong to the value of a key-value pair. To retrieve a full key-value entry via a Spring Data repository, you can always use theCache.Entry<KeyType,ValueType>notation, as shown later in the tutorial.
Define the business object classes by creating a POJO that is associated with the City table - org.gridgain.demo.springdata.model.City:
package org.gridgain.demo.springdata.model;

public class City {
    private String name;

    private String district;

    private int population;

    public String getName() {
        return name;
    }

    public void setName(String name) {
        this.name = name;
    }

    public String getDistrict() {
        return district;
    }

    public void setDistrict(String district) {
        this.district = district;
    }

    public int getPopulation() {
        return population;
    }

    public void setPopulation(int population) {
        this.population = population;
    }
}
The City table defines a compound primary key (PRIMARY KEY (ID, CountryCode)) and you need a custom POJO class that
encapsulates the fields of the key. Add the org.gridgain.demo.springdata.model.CityKey class:
package org.gridgain.demo.springdata.model;

import java.io.Serializable;
import java.util.Objects;
import org.apache.ignite.cache.affinity.AffinityKeyMapped;

public class CityKey implements Serializable {
    private int ID;

    @AffinityKeyMapped
    private String COUNTRYCODE;

    public CityKey(int id, String countryCode) {
        this.ID = id;
        this.COUNTRYCODE = countryCode;
    }

    public int getId() {
        return ID;
    }

    public String getCountryCode() {
        return COUNTRYCODE;
    }

    @Override public boolean equals(Object o) {
        if (this == o)
            return true;
        if (o == null || getClass() != o.getClass())
            return false;
        CityKey key = (CityKey)o;
        return ID == key.ID &&
            COUNTRYCODE.equals(key.COUNTRYCODE);
    }

    @Override public int hashCode() {
        return Objects.hash(ID, COUNTRYCODE);
    }
}
Some observations about the POJO:
-
COUNTRYCODEfield is annotated with@AffinityKeyMapped. This field is defined as the affinity key in theCitytable, and it must be annotated accordingly in the POJO class. -
The names of the key fields are capitalized (
COUNTRYCODEandID). That is a workaround for a limitation that existed when this tutorial was written.
Data Transfer Objects
Create the org.gridgain.demo.springdata.model.CityDTO class that will be used by the Spring REST controllers.
The DTO encapsulates the fields of the internally used org.gridgain.demo.springdata.model.City and org.gridgain.demo.springdata.model.CityKey classes:
package org.gridgain.demo.springdata.model;

public class CityDTO {
    private int id;

    private String countryCode;

    private String name;

    private String district;

    private int population;

    public CityDTO() {
    }

    public CityDTO(CityKey key, City value) {
        this.id = key.getId();
        this.countryCode = key.getCountryCode();
        this.name = value.getName();
        this.district = value.getDistrict();
        this.population = value.getPopulation();
    }

    public int getId() {
        return id;
    }

    public String getCountryCode() {
        return countryCode;
    }

    public String getName() {
        return name;
    }

    public String getDistrict() {
        return district;
    }

    public int getPopulation() {
        return population;
    }
}
Add another DTO to hold all the fields of the Country table.
org.gridgain.demo.springdata.model.CountryDTO encapsulates the fields that are presented in the internally used
org.gridgain.demo.springdata.model.Country POJO that you added previously, as well as the Code field, which is the table’s primary key:
package org.gridgain.demo.springdata.model;

public class CountryDTO {
    private String code;

    private String name;

    private String continent;

    private String region;

    private int population;

    public CountryDTO() {
    }

    public CountryDTO(String key, Country value) {
        this.code = key;
        this.name = value.getName();
        this.continent = value.getContinent();
        this.region = value.getRegion();
        this.population = value.getPopulation();
    }

    public String getCode() {
        return code;
    }

    public String getName() {
        return name;
    }

    public String getContinent() {
        return continent;
    }

    public String getRegion() {
        return region;
    }

    public int getPopulation() {
        return population;
    }
}
Create Spring Data Repositories
The Spring Data repositories will be located under the org.gridgain.demo.springdata.dao package.
Add the org.gridgain.demo.springdata.dao.CountryRepository repository class that will work with the data from the Country table:
package org.gridgain.demo.springdata.dao;

import java.util.List;
import javax.cache.Cache;
import org.apache.ignite.springdata22.repository.IgniteRepository;
import org.apache.ignite.springdata22.repository.config.RepositoryConfig;
import org.gridgain.demo.springdata.model.Country;
import org.springframework.stereotype.Repository;

@RepositoryConfig (cacheName = "Country")
@Repository
public interface CountryRepository extends IgniteRepository<Country, String> {

    public List<Cache.Entry<String,Country>> findByPopulationGreaterThanEqualOrderByPopulationDesc(int population);
}-
This repository is associated with the
Countrytable via the@RepositoryConfig (cacheName = "Country")annotation. The cache name is predefined in the{ignite}/examples/sql/world.sqlscript via theCACHE_NAME=Countryparameter of theCREATE TABLE Countrystatement. Check this documentation page to discover why thecacheandtableterms co-exist in Ignite. -
The repository implements a method that returns all countries that have a population equal to or greater than the requested value. The
Cache.Entry<String,Country>object is used to retrieve a full key-value pair from Ignite. Here,Stringis the type of key (Codecolumn, in the case of theCountrytable), andCountryis the custom business objects that hold the fields of the value.
Create a repository that is named org.gridgain.demo.springdata.dao.CityRepository and that is associated with the City table:
package org.gridgain.demo.springdata.dao;

import java.util.List;
import javax.cache.Cache;
import org.apache.ignite.springdata22.repository.IgniteRepository;
import org.apache.ignite.springdata22.repository.config.Query;
import org.apache.ignite.springdata22.repository.config.RepositoryConfig;
import org.gridgain.demo.springdata.model.City;
import org.gridgain.demo.springdata.model.CityKey;
import org.springframework.stereotype.Repository;

@RepositoryConfig(cacheName = "City")
@Repository
public interface CityRepository extends IgniteRepository<City, CityKey> {

    public List<Cache.Entry<CityKey, City>> findAllByPopulationGreaterThanEqualOrderByPopulation(int population);

    @Query("SELECT city.name, MAX(city.population), country.name, country.GovernmentForm FROM country " +
        "JOIN city ON city.countrycode = country.code " +
        "GROUP BY city.name, country.name, country.GovernmentForm, city.population " +
        "ORDER BY city.population DESC LIMIT ?")
    public List<List<?>> findMostPopulatedCities(int limit);

    public Cache.Entry<CityKey, City> findById(int id);
}
In the repository, three methods demonstrate various usage patterns of the Ignite Spring Data integration:
-
The
findAllByPopulationGreaterThanEqualOrderByPopulationmethod shows how to use Spring’s query auto-generation feature to get a list of key-value pairs (Cache.Entry<CityKey, City>). -
The
findMostPopulatedCitiesmethod demonstrates how to pass in a direct query to Ignite to join the records of two tables. The method returns individual fields, rather than business model POJOs. -
The
findByIdmethod shows how to get key-value pairs if you need to filter the records by the value of a primary key field or fields.
Introduce Spring Service Abstraction
Instead of having the Spring REST controller work with the Spring repositories directly, you create a Spring service abstraction that takes care of the business-related logic and performs all necessary transformations between the internal business objects and the DTO classes.
In your project, create the org.gridgain.demo.springdata.service package and place the
org.gridgain.demo.springdata.service.WorldDatabaseService class in it:
package org.gridgain.demo.springdata.service;

import java.util.ArrayList;
import java.util.List;
import javax.cache.Cache;
import org.gridgain.demo.springdata.dao.CityRepository;
import org.gridgain.demo.springdata.dao.CountryRepository;
import org.gridgain.demo.springdata.model.City;
import org.gridgain.demo.springdata.model.CityKey;
import org.gridgain.demo.springdata.model.Country;
import org.gridgain.demo.springdata.model.CityDTO;
import org.gridgain.demo.springdata.model.CountryDTO;
import org.springframework.beans.factory.annotation.Autowired;
import org.springframework.stereotype.Service;

@Service
public class WorldDatabaseService {
    @Autowired CountryRepository countryDao;

    @Autowired CityRepository cityDao;

    public List<CountryDTO> getCountriesByPopulation(int population) {
        List<CountryDTO> countries = new ArrayList<>();

        for (Cache.Entry<String, Country> entry: countryDao.findByPopulationGreaterThanEqualOrderByPopulationDesc(population))
            countries.add(new CountryDTO(entry.getKey(), entry.getValue()));

        return countries;
    }

    public List<CityDTO> getCitiesByPopulation(int population) {
        List<CityDTO> cities = new ArrayList<>();

        for (Cache.Entry<CityKey, City> entry: cityDao.findAllByPopulationGreaterThanEqualOrderByPopulation(population))
            cities.add(new CityDTO(entry.getKey(), entry.getValue()));

        return cities;
    }

    public List<List<?>> getMostPopulatedCities(Integer limit) {
        return cityDao.findMostPopulatedCities(limit == null ? 5 : limit);
    }

    public CityDTO updateCityPopulation(int cityId, int population) {
        Cache.Entry<CityKey, City> entry = cityDao.findById(cityId);

        entry.getValue().setPopulation(population);

        cityDao.save(entry.getKey(), entry.getValue());

        return new CityDTO(entry.getKey(), entry.getValue());
    }
}
In addition to the methods that read data from the repositories upon controller request, the service implements the
updateCityPopulation method, which shows how to update a record in Spring Data fashion. With the cityDao.findById(cityId) call,
the method reads a record that needs to be updated. The method then adjusts the value of the population and writes the
record back through the IgniteRepository.save(key, value) interface (see cityDao.save(entry.getKey(), entry.getValue()).
Develop the Spring REST Controller
Add the REST controller to your application, so the application will be capable of processing several HTTP-based API calls.
Create the org.gridgain.demo.springdata.controller package in your project and add the
org.gridgain.demo.springdata.service.WorldDatabaseController class to it:
package org.gridgain.demo.springdata.controller;

import java.util.List;
import org.gridgain.demo.springdata.model.CityDTO;
import org.gridgain.demo.springdata.model.CountryDTO;
import org.gridgain.demo.springdata.service.WorldDatabaseService;
import org.springframework.beans.factory.annotation.Autowired;
import org.springframework.web.bind.annotation.GetMapping;
import org.springframework.web.bind.annotation.PathVariable;
import org.springframework.web.bind.annotation.PutMapping;
import org.springframework.web.bind.annotation.RequestBody;
import org.springframework.web.bind.annotation.RequestParam;
import org.springframework.web.bind.annotation.RestController;

@RestController
public class WorldDatabaseController {
    @Autowired WorldDatabaseService service;

    @GetMapping("/api/countries")
    public List<CountryDTO> getCountriesByPopulation(@RequestParam (value = "population", required = true) int population) {
        return service.getCountriesByPopulation(population);
    }

    @GetMapping("/api/cities")
    public List<CityDTO> getCitiesByPopulation(@RequestParam (value = "population", required = true) int population) {
        return service.getCitiesByPopulation(population);
    }

    @GetMapping("/api/cities/mostPopulated")
    public List<List<?>> getMostPopulatedCities(@RequestParam (value = "limit", required = false) Integer limit) {
        return service.getMostPopulatedCities(limit);
    }

    @PutMapping("/api/cities/{id}")
    public CityDTO updateCityPopulation(@PathVariable Integer id, @RequestBody CityDTO cityDTO) {
        return service.updateCityPopulation(id, cityDTO.getPopulation());
    }

}
The controller intercepts a handful of GET and PUT requests that delegate the business logic execution to the Spring service abstraction.
Configure the Ignite Client
Next, you need to provide the Ignite Spring Boot Auto-Configurer with a custom configuration that launches the Apache Ignite thick client.
Place the class under the org.gridgain.demo.springdata package and name it org.gridgain.demo.springdata.DemoConfig:
package org.gridgain.demo.springdata;

import org.apache.ignite.Ignite;
import org.apache.ignite.configuration.IgniteConfiguration;
import org.apache.ignite.springframework.boot.autoconfigure.IgniteConfigurer;
import org.springframework.context.annotation.Bean;
import org.springframework.context.annotation.Configuration;

@Configuration
public class DemoConfig {
    @Bean(name = "igniteInstance")
    public Ignite igniteInstance(Ignite ignite) {
        return ignite;
    }

    @Bean
    public IgniteConfigurer configurer() {
        return igniteConfiguration -> {
            igniteConfiguration.setClientMode(true);
        };
    }
}
Finally, update the auto-generated org.gridgain.demo.springdata.IgniteSpringDataDemoApplication class by adding the @EnableIgniteRepositories
annotation to enable Ignite Spring Data repositories.
package org.gridgain.demo.springdata;

import org.apache.ignite.springdata22.repository.config.EnableIgniteRepositories;
import org.springframework.boot.SpringApplication;
import org.springframework.boot.autoconfigure.SpringBootApplication;

@SpringBootApplication
@EnableIgniteRepositories
public class IgniteSpringDataDemoApplication {

	public static void main(String[] args) {
		SpringApplication.run(IgniteSpringDataDemoApplication.class, args);
	}
}
Run the Application
You can build the project and start the application from your IDE or open a command-line window and execute the following Maven command from the project root folder:
mvn spring-boot:runNext, use the curl command-line tool to send HTTP requests, which will be intercepted and processed by your Spring controller.
First, get all the cities with a population equal to or larger than 8 million:
curl http://localhost:9000/api/cities?population=8000000The response is as follows:
[{"id":3793,"countryCode":"USA","name":"New York","district":"New York","population":8008278},
{"id":3580,"countryCode":"RUS","name":"Moscow","district":"Moscow (City)","population":8389200},
{"id":2515,"countryCode":"MEX","name":"Ciudad de México","district":"Distrito Federal","population":8591309},
{"id":3357,"countryCode":"TUR","name":"Istanbul","district":"Istanbul","population":8787958},
{"id":2822,"countryCode":"PAK","name":"Karachi","district":"Sindh","population":9269265},
{"id":939,"countryCode":"IDN","name":"Jakarta","district":"Jakarta Raya","population":9604900},
{"id":1890,"countryCode":"CHN","name":"Shanghai","district":"Shanghai","population":9696300},
{"id":206,"countryCode":"BRA","name":"São Paulo","district":"São Paulo","population":9968485},
{"id":2331,"countryCode":"KOR","name":"Seoul","district":"Seoul","population":9981619},
{"id":1024,"countryCode":"IND","name":"Mumbai (Bombay)","district":"Maharashtra","population":10500000}]
Second, get the top 10 most populated cities:
curl http://localhost:9000/api/cities/mostPopulated?limit=10In response, the application joins the City and Country tables to produce the following result:
[["Mumbai (Bombay)",10500000,"India","Federal Republic"],
["Seoul",9981619,"South Korea","Republic"],
["São Paulo",9968485,"Brazil","Federal Republic"],
["Shanghai",9696300,"China","PeoplesRepublic"],
["Jakarta",9604900,"Indonesia","Republic"],
["Karachi",9269265,"Pakistan","Republic"],
["Istanbul",8787958,"Turkey","Republic"],
["Ciudad de México",8591309,"Mexico","Federal Republic"],
["Moscow",8389200,"Russian Federation","Federal Republic"],
["New York",8008278,"United States","Federal Republic"]]
Finally, update the population value for the city with id 3507:
curl -X PUT -H 'Content-Type: application/json' -d '{"population":5000}' http://localhost:9000/api/cities/3507curl -X PUT -H "Content-Type: application/json" -d "{\"population\":5000}" http://localhost:9000/api/cities/3507The data is updated, and the controller sends back the modified version of the specified city’s record:
{"id":3507,"countryCode":"UZB","name":"Buhoro","district":"Buhoro","population":5000}Congratulations! You’ve completed the tutorial and learned how to use Apache Ignite with Spring Boot and Spring Data to build high-performance RESTful services.
Learn More
-
Attend the Complimentary Developer Training - Apache Ignite for Spring Boot and Spring Data.
-
Visit Ignite Spring Data documentation to learn more about the integration.
-
Check Spring Boot documentation for details on how to use the Spring auto-starter with Ignite.
© 2026 GridGain Systems, Inc. All Rights Reserved. Privacy Policy | Legal Notices. GridGain® is a registered trademark of GridGain Systems, Inc.
Apache, Apache Ignite, the Apache feather and the Apache Ignite logo are either registered trademarks or trademarks of The Apache Software Foundation.