Deploying Private Managed Clusters

This tutorial walks you through the process of creating a managed cluster with access via VPC, which stands for virtual private cloud, using the AWS PrivateLink service. The same process can be applied to both GridGain 8 and GridGain 9 clusters.
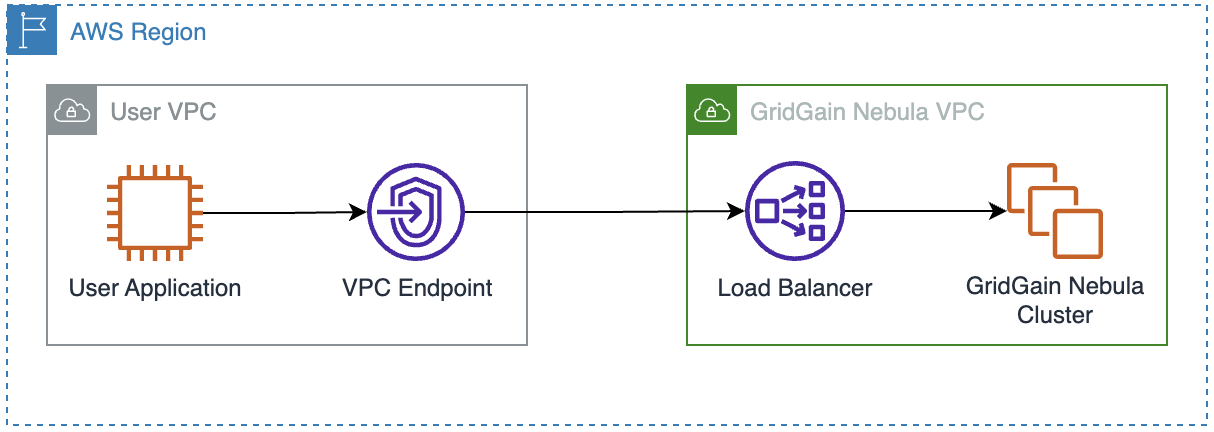
The diagram below shows how your consumer VPC connects to GridGain’s provider VPC to provide access to your cluster from your AWS account.
Create and Configure an AWS Account
Create an Account
-
Follow the AWS instructions for creating and activation an account. AWS automatically creates a default VPC for your account. You can use this default VPC to enable connection to GridGain’s VPC via PrivateLink. Alternatively, you can create a custom VPC.
-
Write down the account number - you will use it when creating a managed cluster.
Create a Security Group
You need to define a security group that will be applied to your cluster’s VPC endpoint. This security group must contain the rules that open only specific ports to inbound TCP traffic.
-
Log into your account in the AWS console.
-
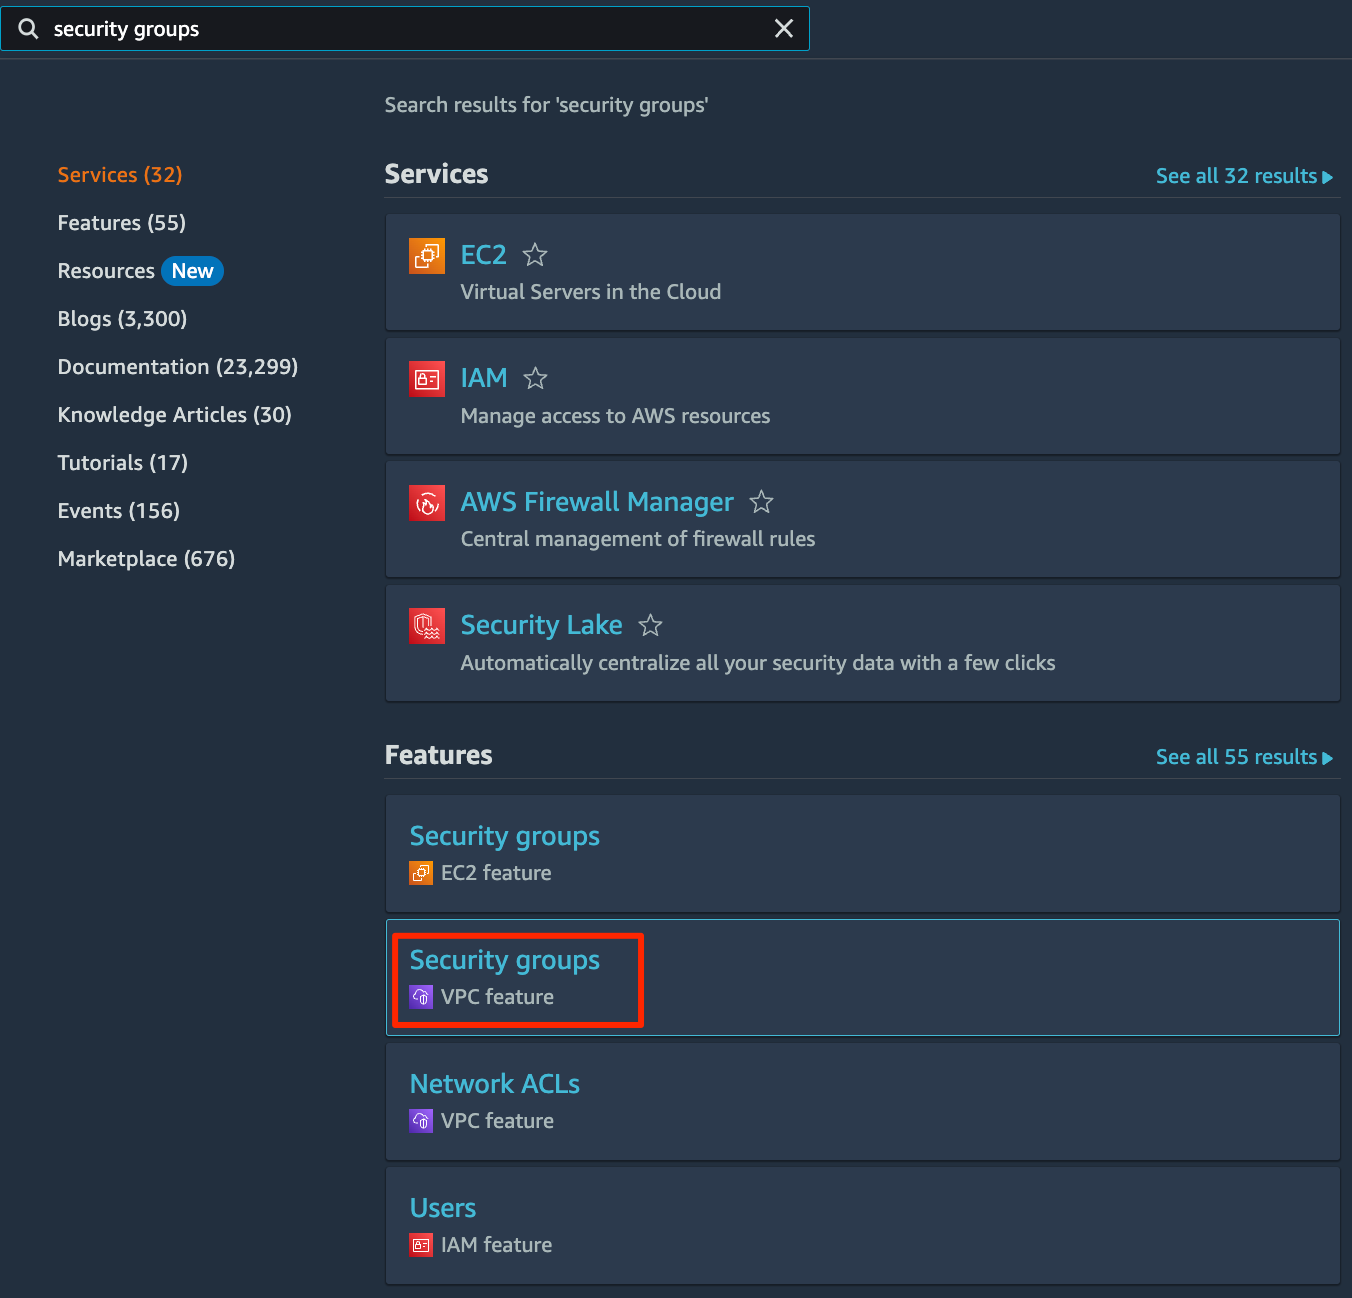
Search for "security group".
-
Click the Security group / VPC feature tile.
-
On the page that opens, click Create security group in the top right corner.
-
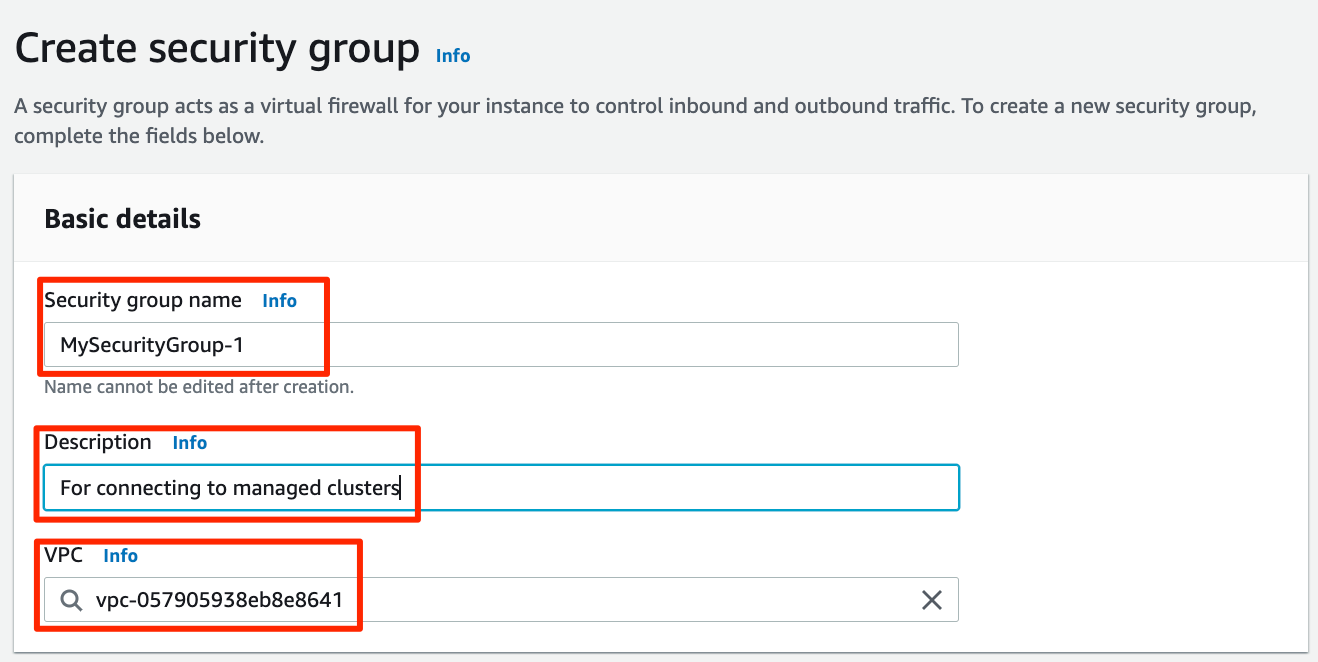
On the Create security group page that opens, fill out the fields as shown below.
-
Security group name - enter a name that reflects the nature of the group
-
Description - optionally, enter a description that will help you visually identify this group in the UI
-
VPC - select the default VPC (or the VPC you have created)
-
-
Scroll down and add Inbound rules as shown below.
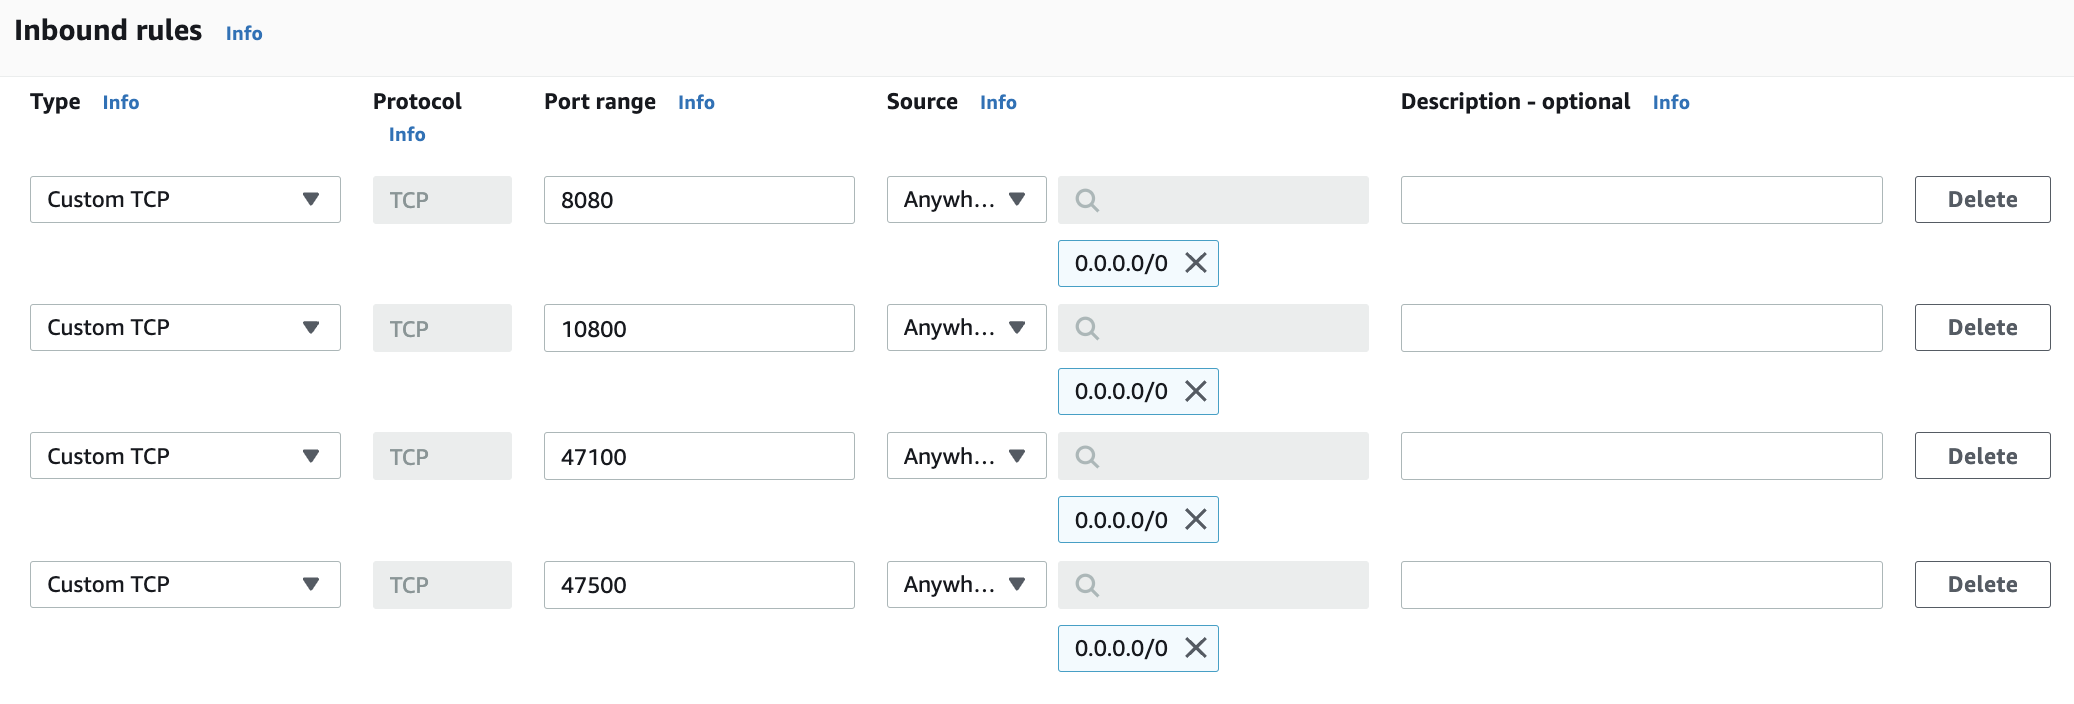
Each rule opens a specific port for inbound custom TCP traffic:
-
10800 - thin clients
-
8080 - REST API
-
47100 - communications
-
47500 - discovery
-
-
Click Create security group. The "success" page opens.
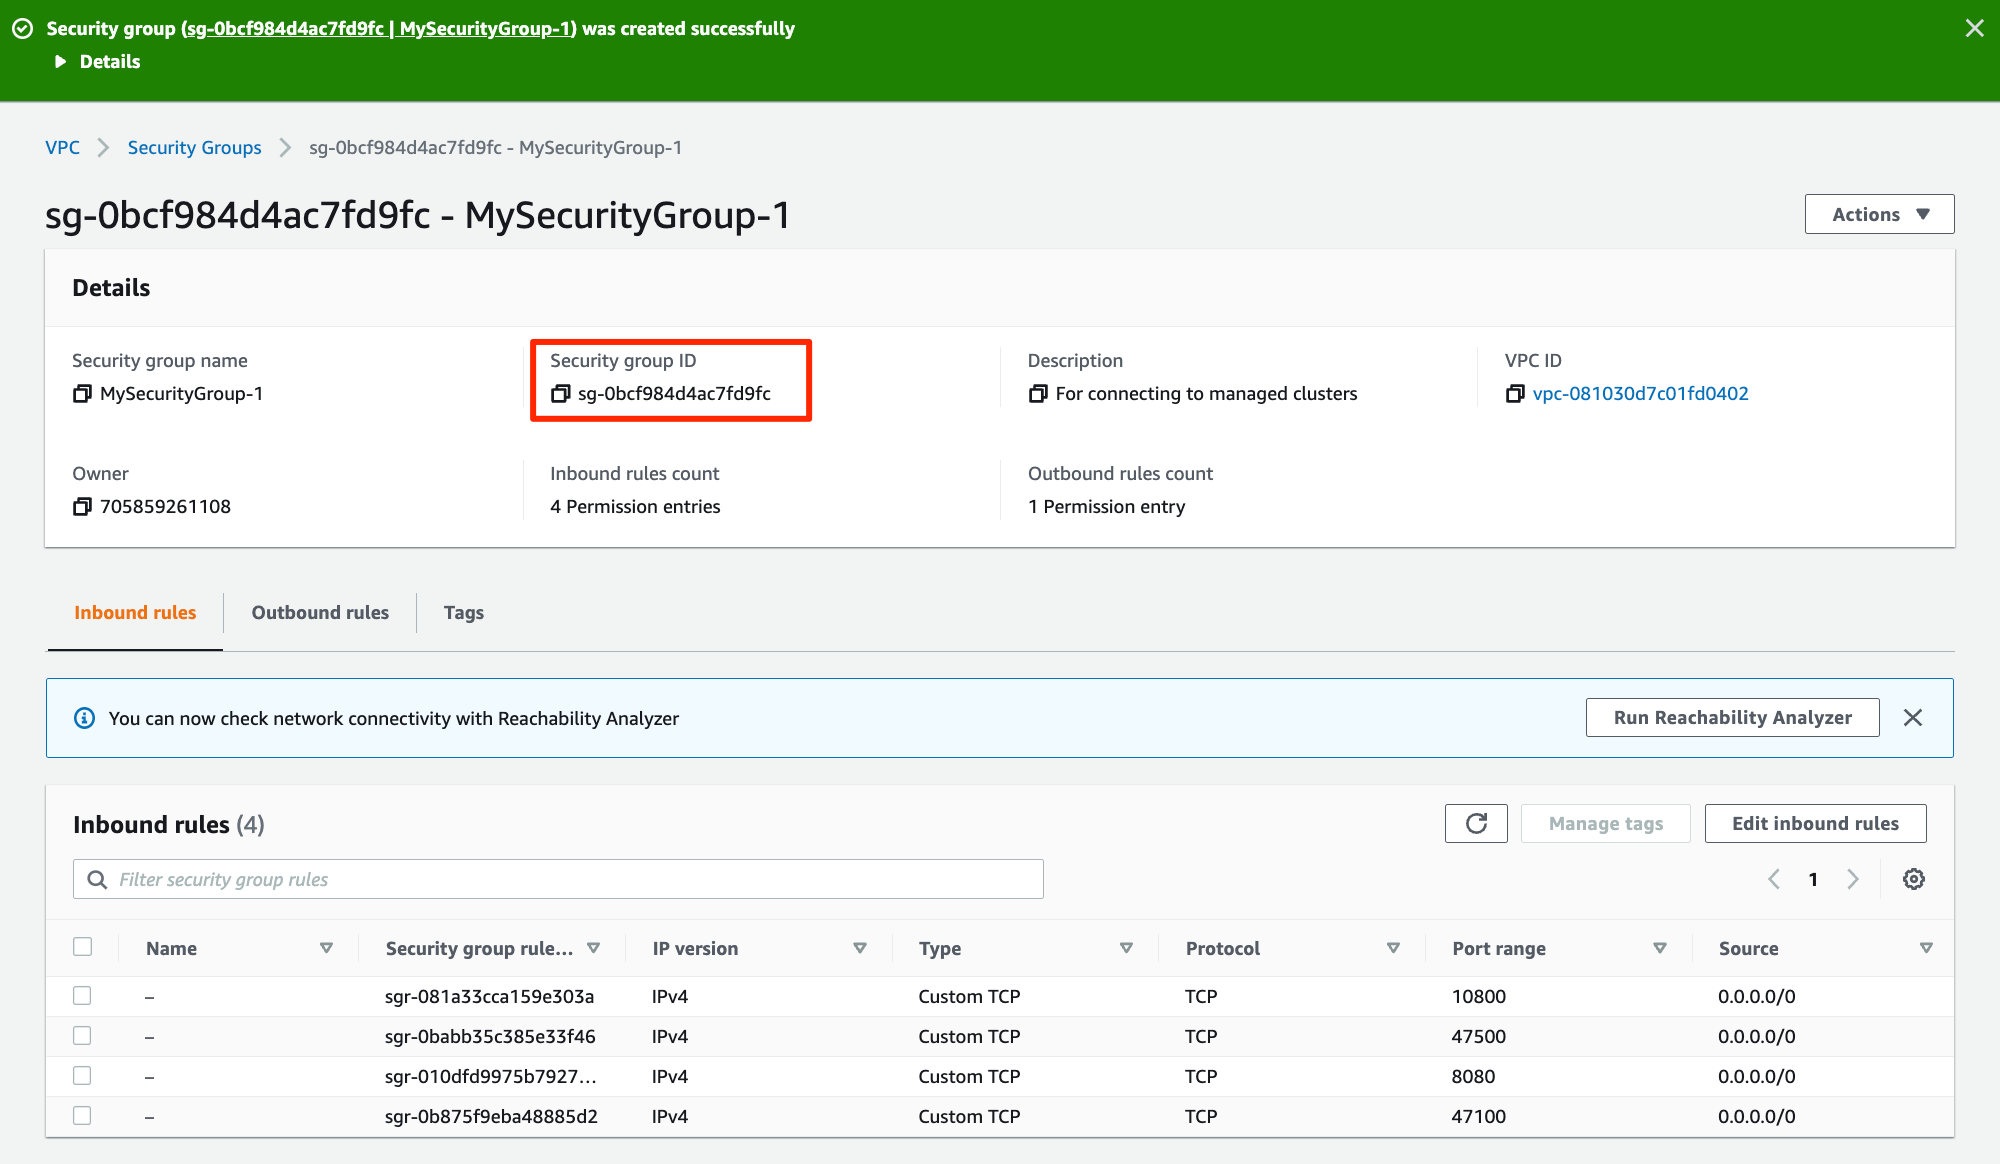
-
Write down the Security group ID: you will need to select it from the list when creating a VPC endpoint.
Create a Managed Cluster
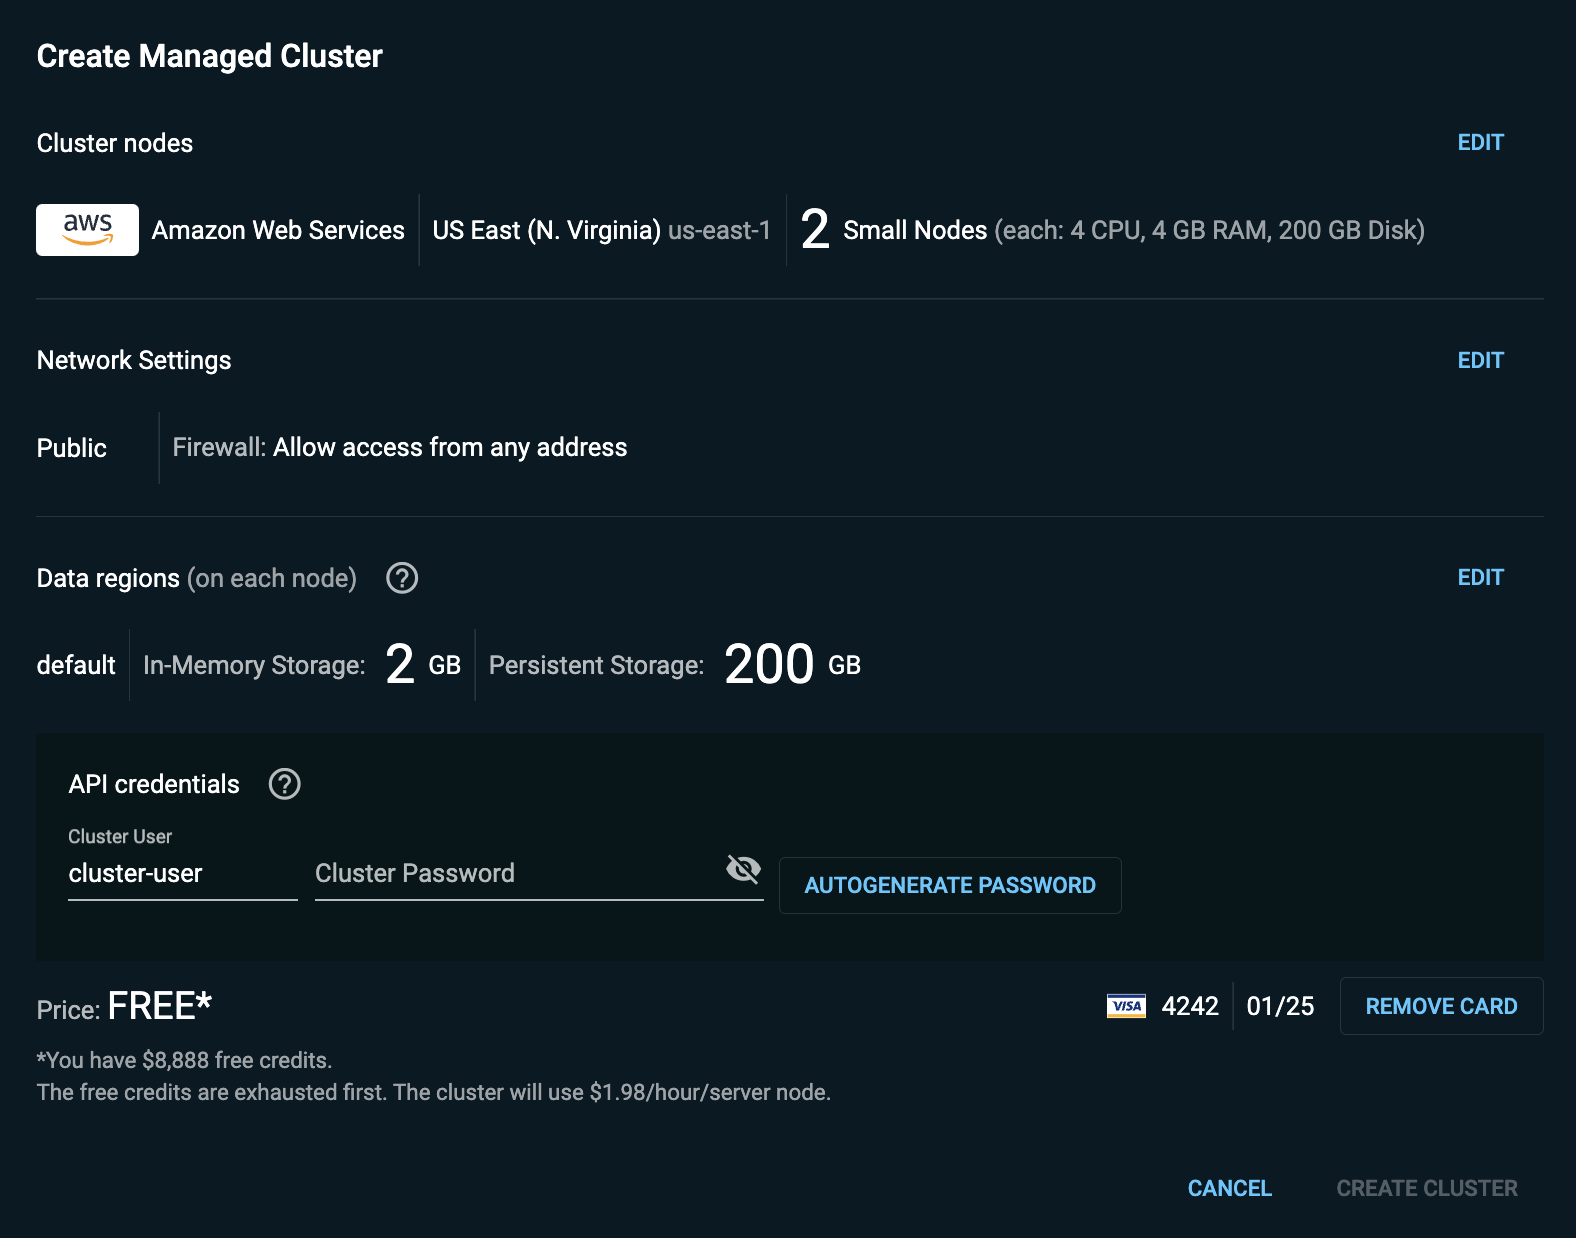
You create your managed cluster in GridGain Nebula.
-
Initiate creation of a managed cluster and follow fill out the relevant fields in the Create Managed Cluster dialog.
-
Click Edit in the Network Settings section, then select the Private option button in the Edit Network Settings dialog that opens.
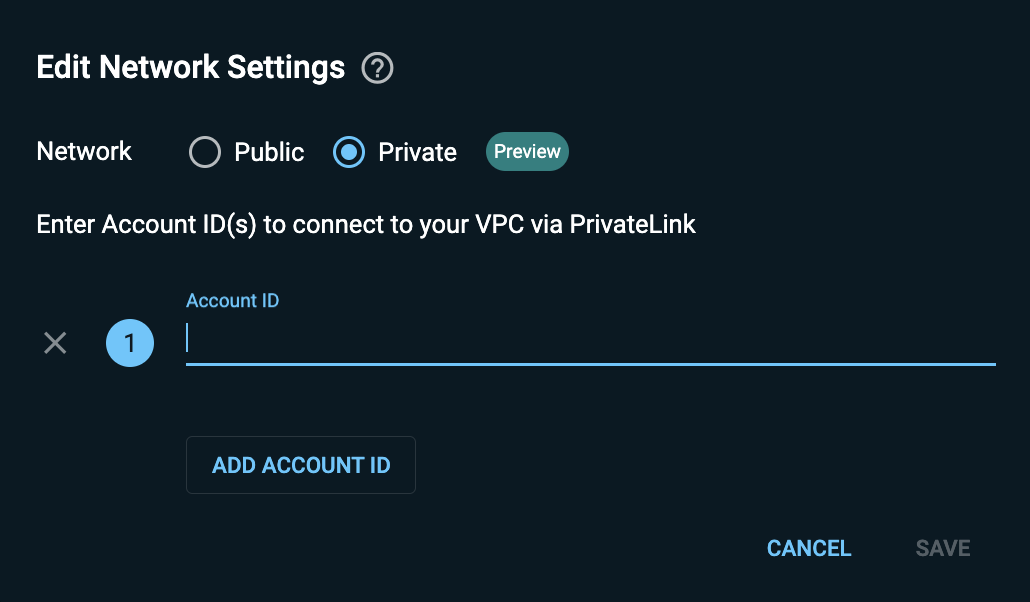
-
In the Account ID field, enter the ID of the AWS account you have created - see Create an Account.
-
Click Save when done.
-
Click Create Cluster. GridGain Nebula starts provisioning the cluster you have requested. Clusters take about 9 minutes to provision.
-
After your cluster had been provisioned, find the
service namevalue in the operation output.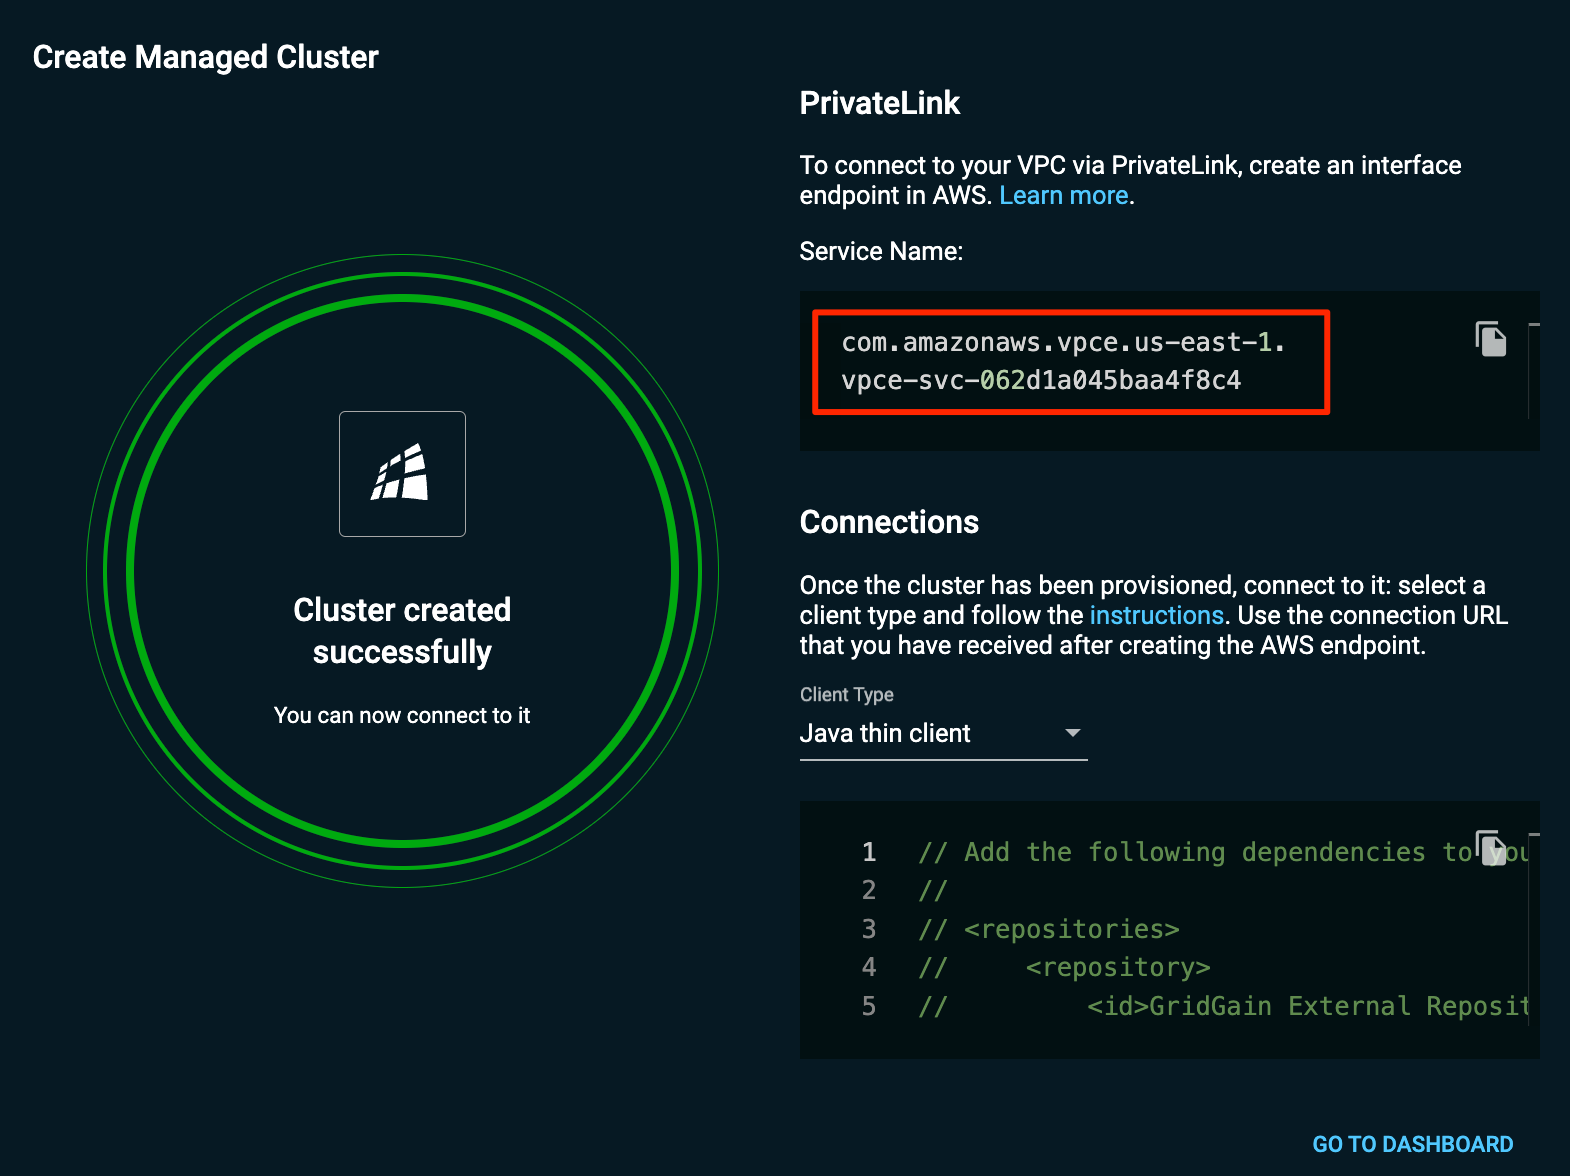
-
Write down this value as you will need it in the next step.
Create a VPC Interface Endpoint
You need to create an endpoint for the VPC service in your AWS account. This endpoint will enable your account’s VPC to connect as a consumer to the GridGain account’s VPC that will act as a provider.
-
Log into your account in the AWS console.
-
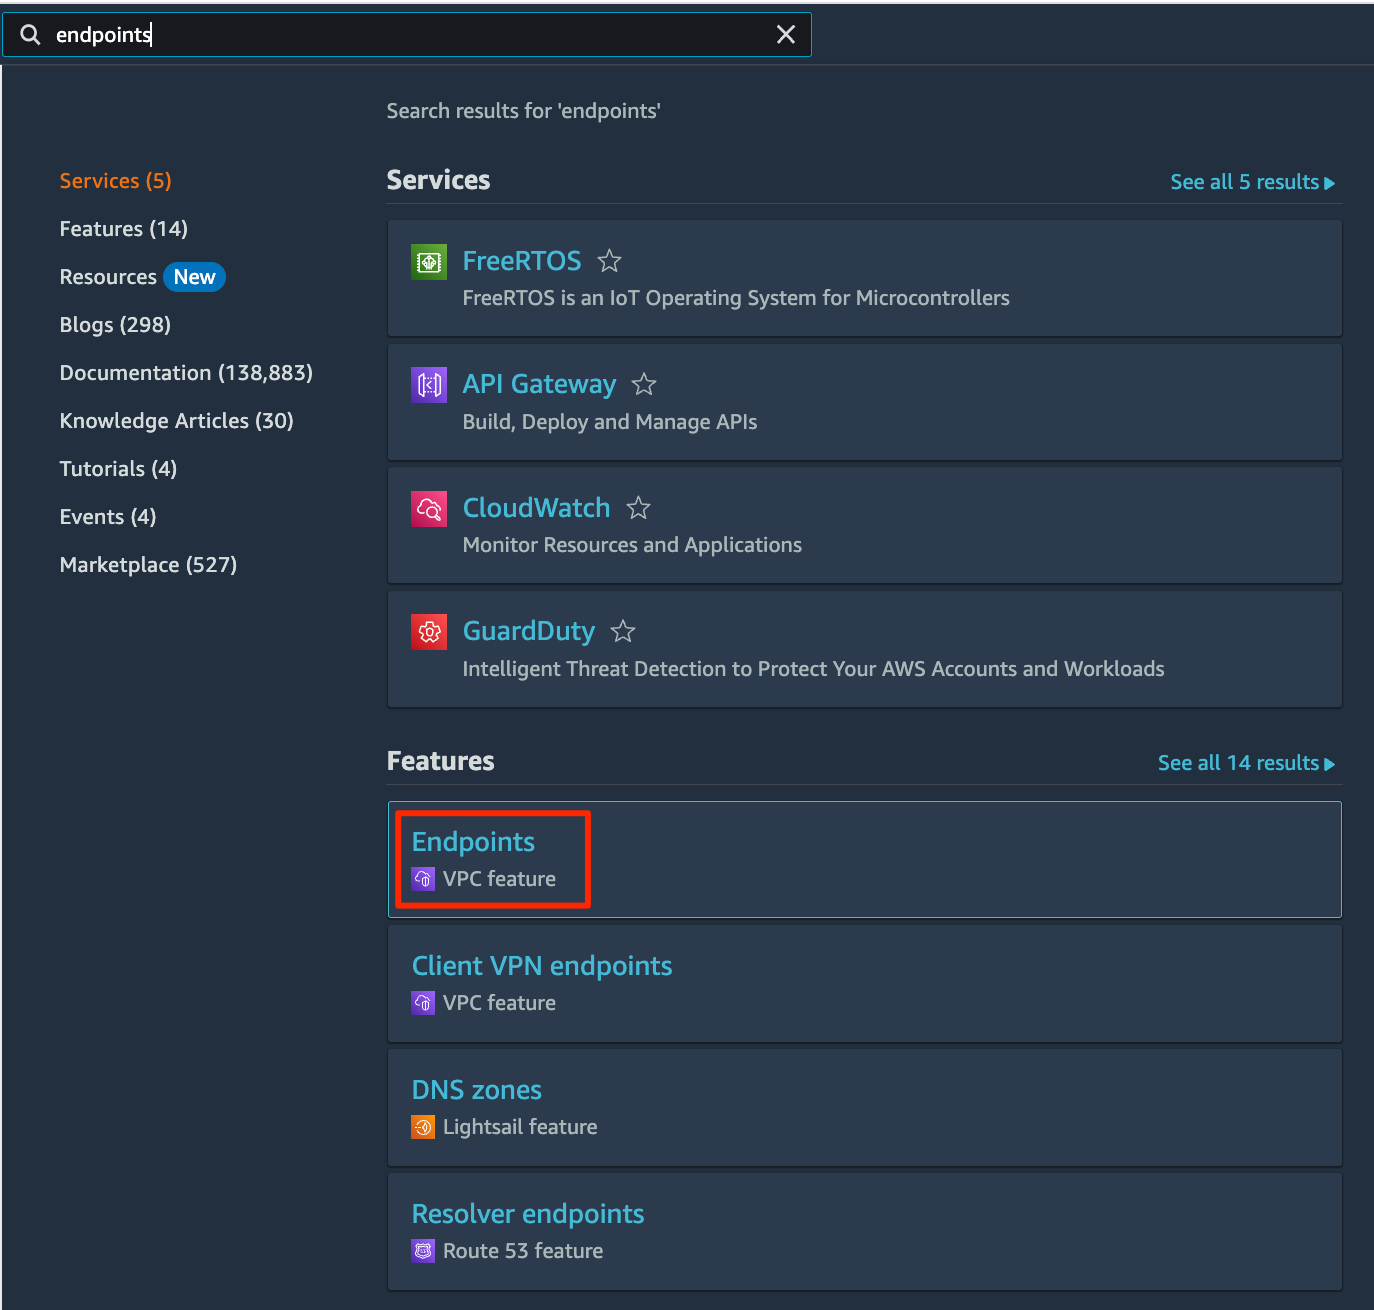
Search for "endpoint".
-
Click the Endpoints tile.
-
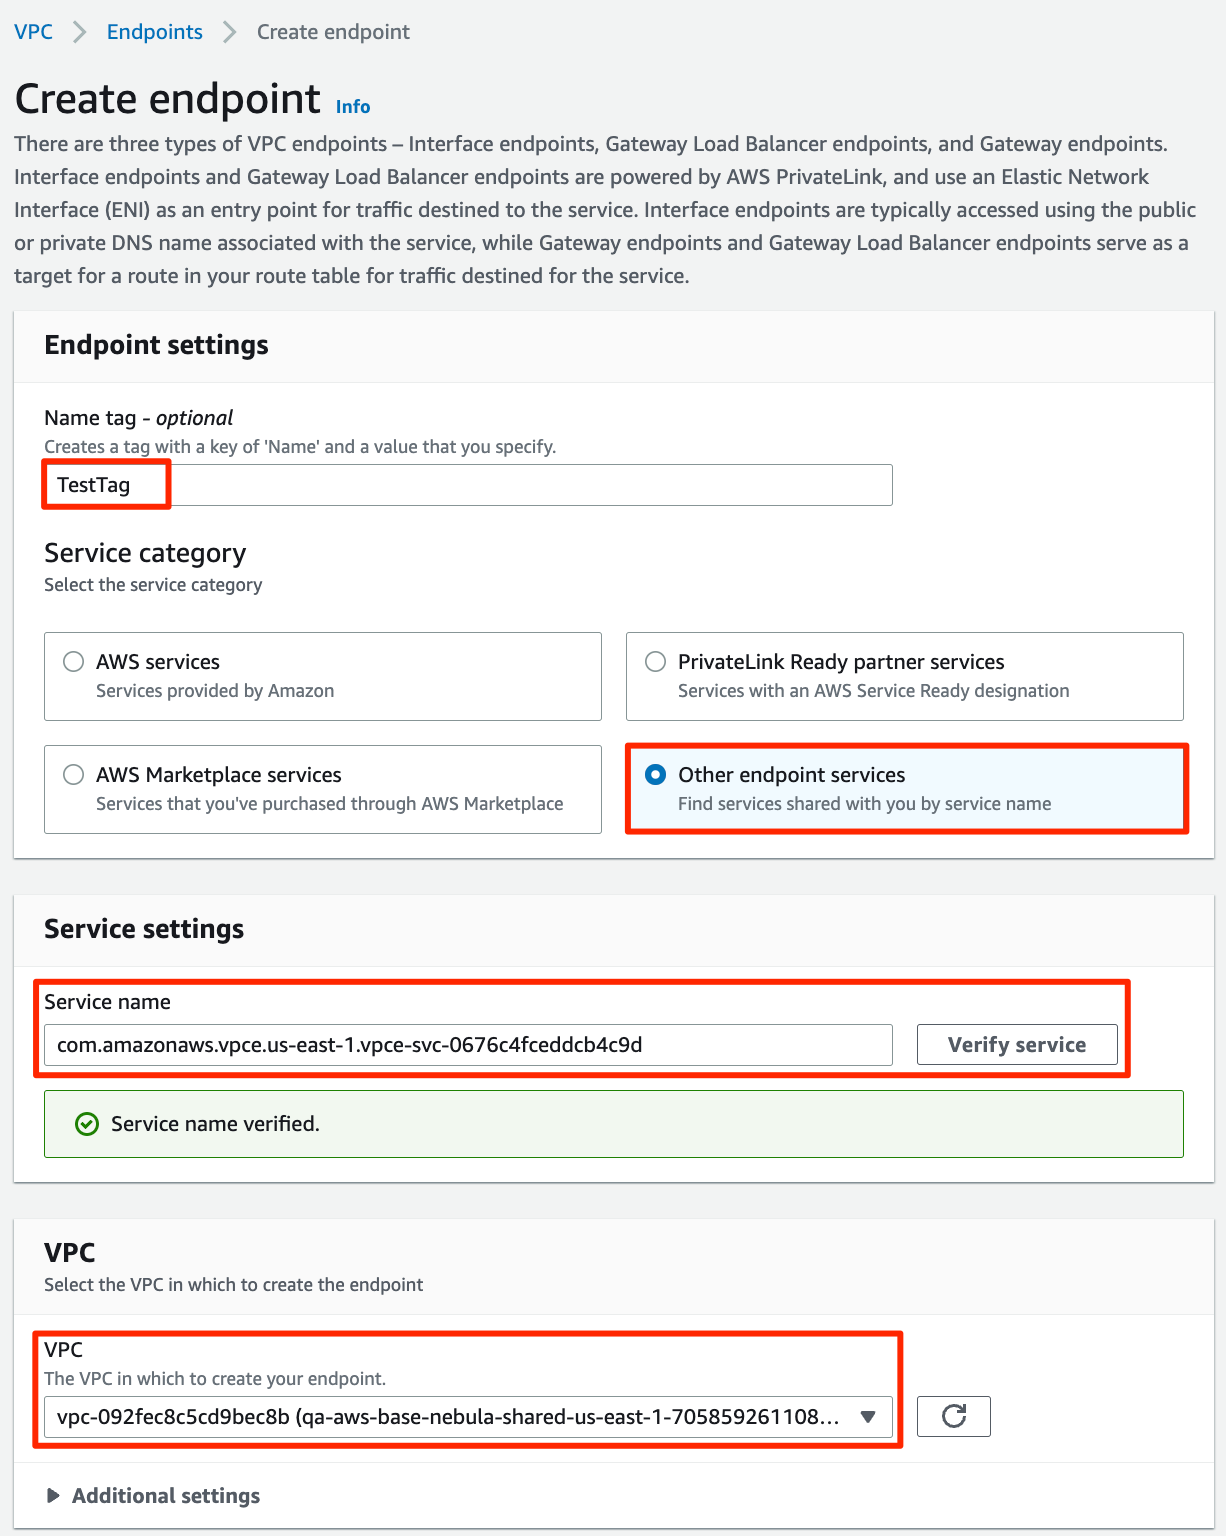
On the Endpoints page that opens, click Create endpoint in the top right corner.
-
On the Create endpoint page that opens, select the Other endpoint services tile under Service categories.
-
Fill out the fields as shown below.
-
Name tag - optionally, enter a tag to simplify visual identification of the endpoint in the UI
-
Service name - enter the value you have copied from the cluster creation output in GridGain Nebula, then click Verify service
-
VPC - select the default VPC (or the VPC you have created)
-
-
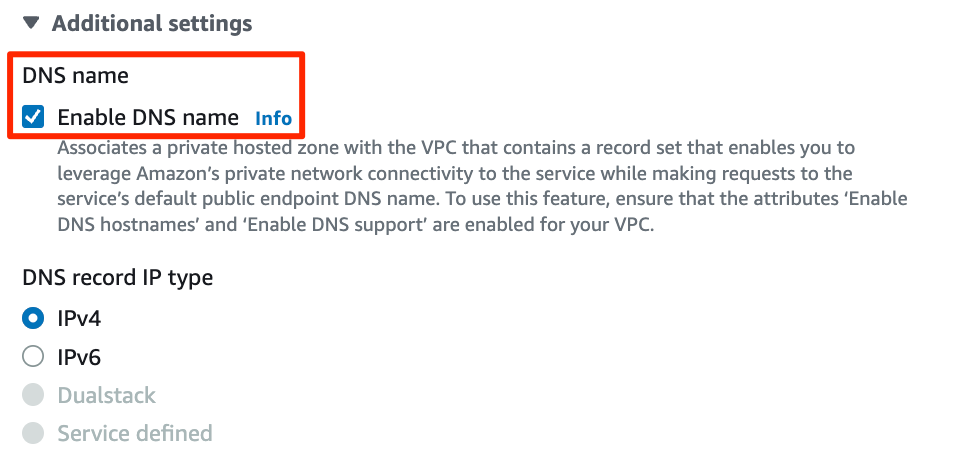
Click Additional settings.
-
In the section that opens, select the Enable DNS name check box.
-
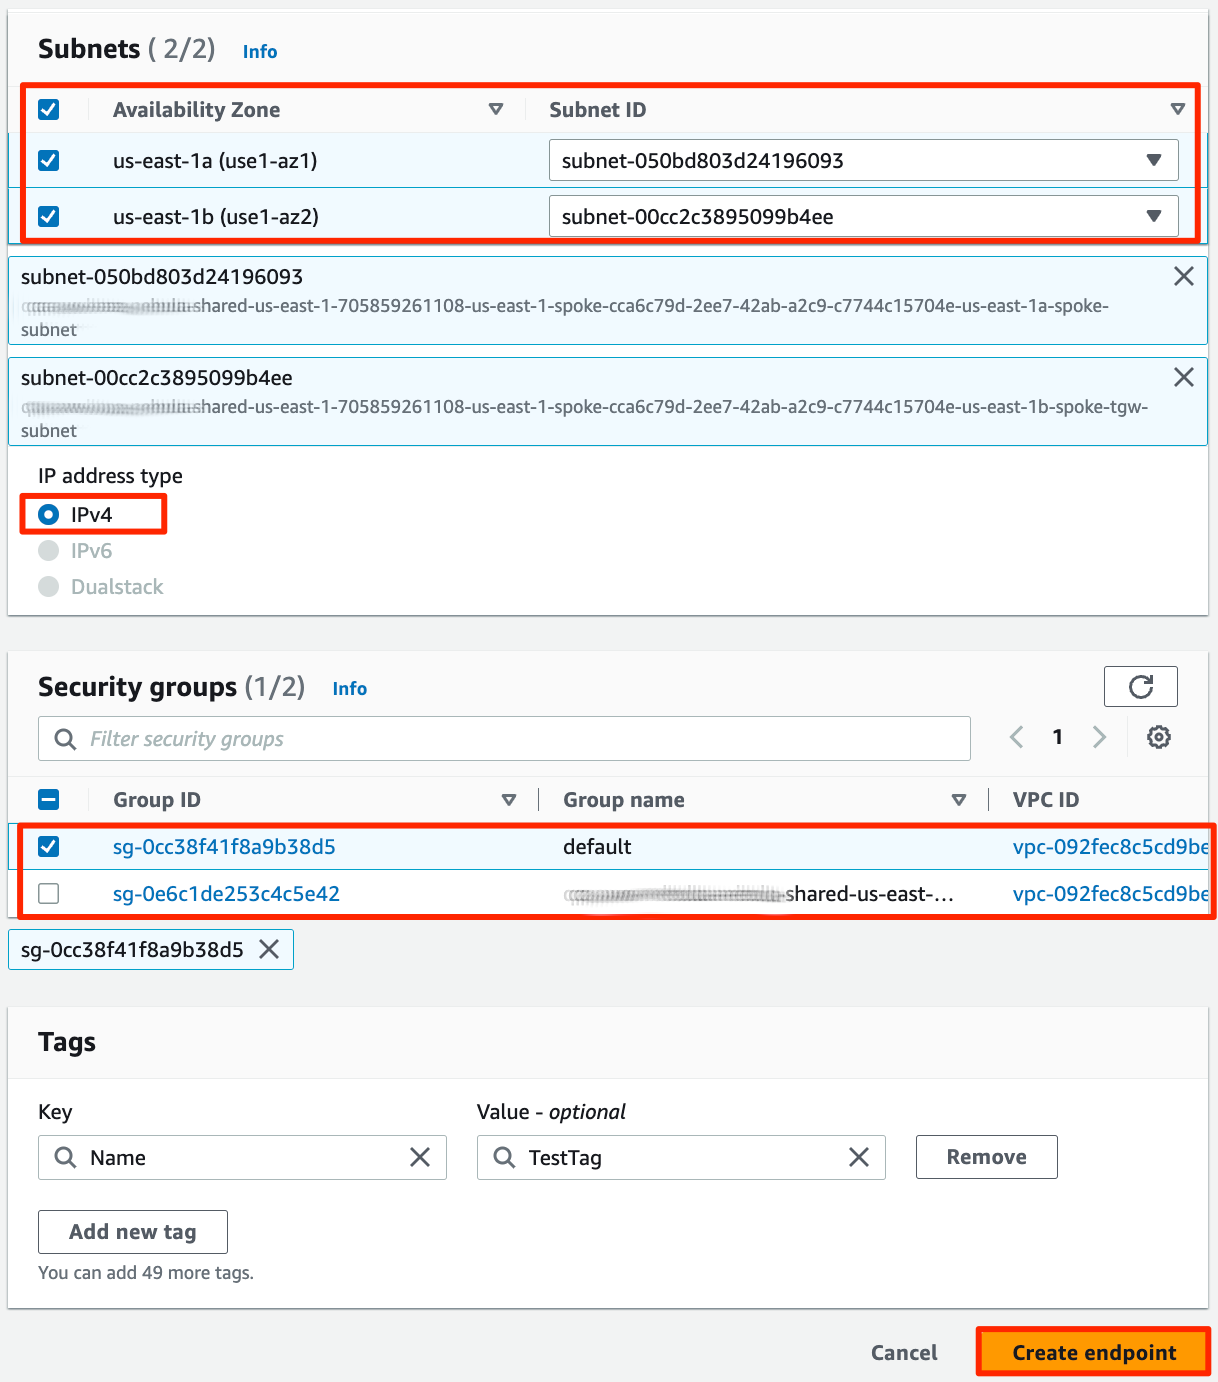
Scroll down and fill out the remaining fields.
-
Subnets - select availability zone(s) and subnet ID(s) based on your needs
-
Security groups - select the security group you have created - see Create a Security Group
-
-
Click Create endpoint. The Successfully created VPC endpoint page opens.
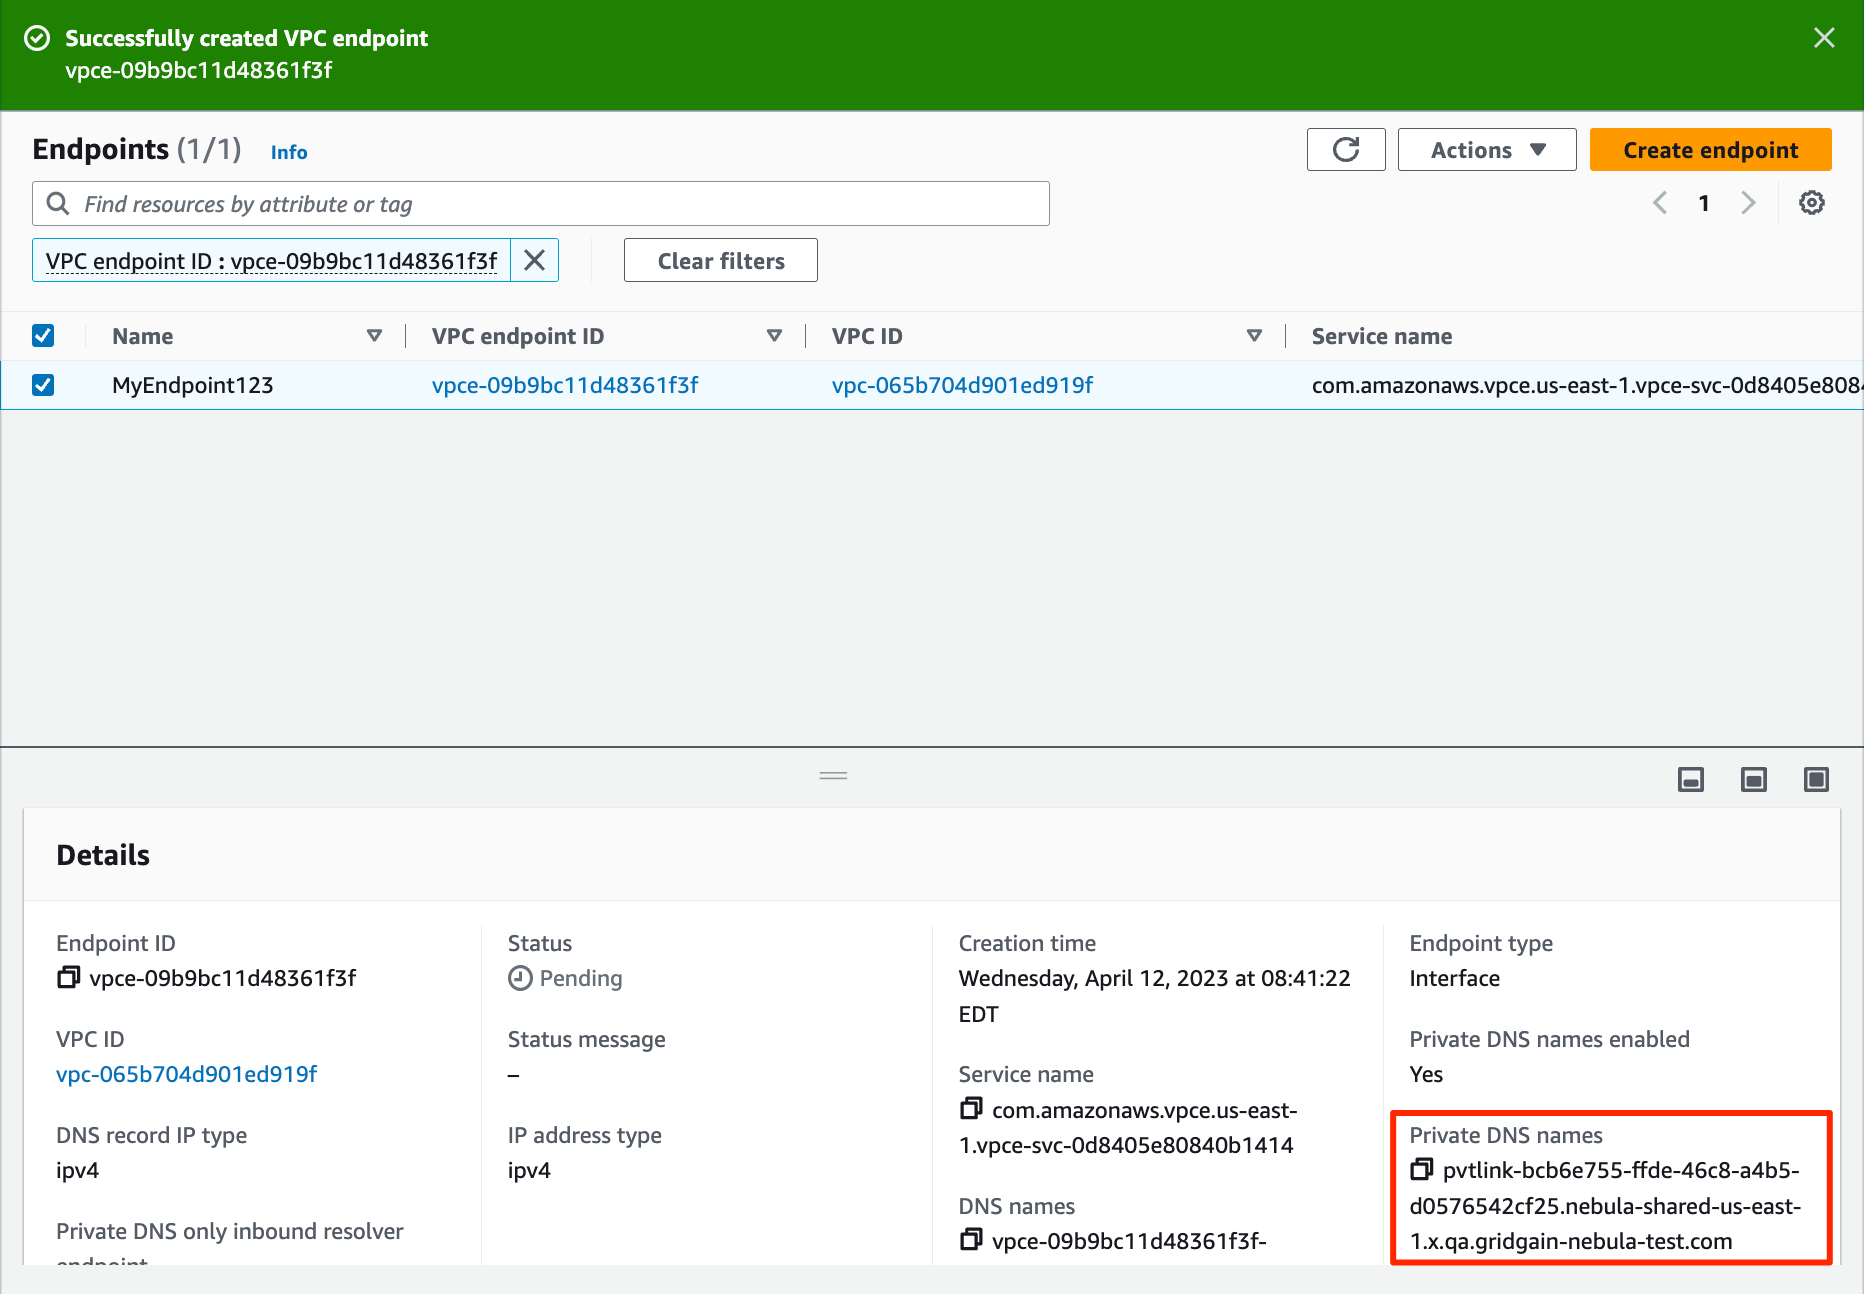
-
In the lower section of the page, select the Details tab and write down the Private DNS name value (starts with "pvtlink") - you will use these to connect to your cluster.
Connect to Your Cluster
Launch an EC2 Instance
-
Log into your account in the AWS console.
-
Search for "instances".
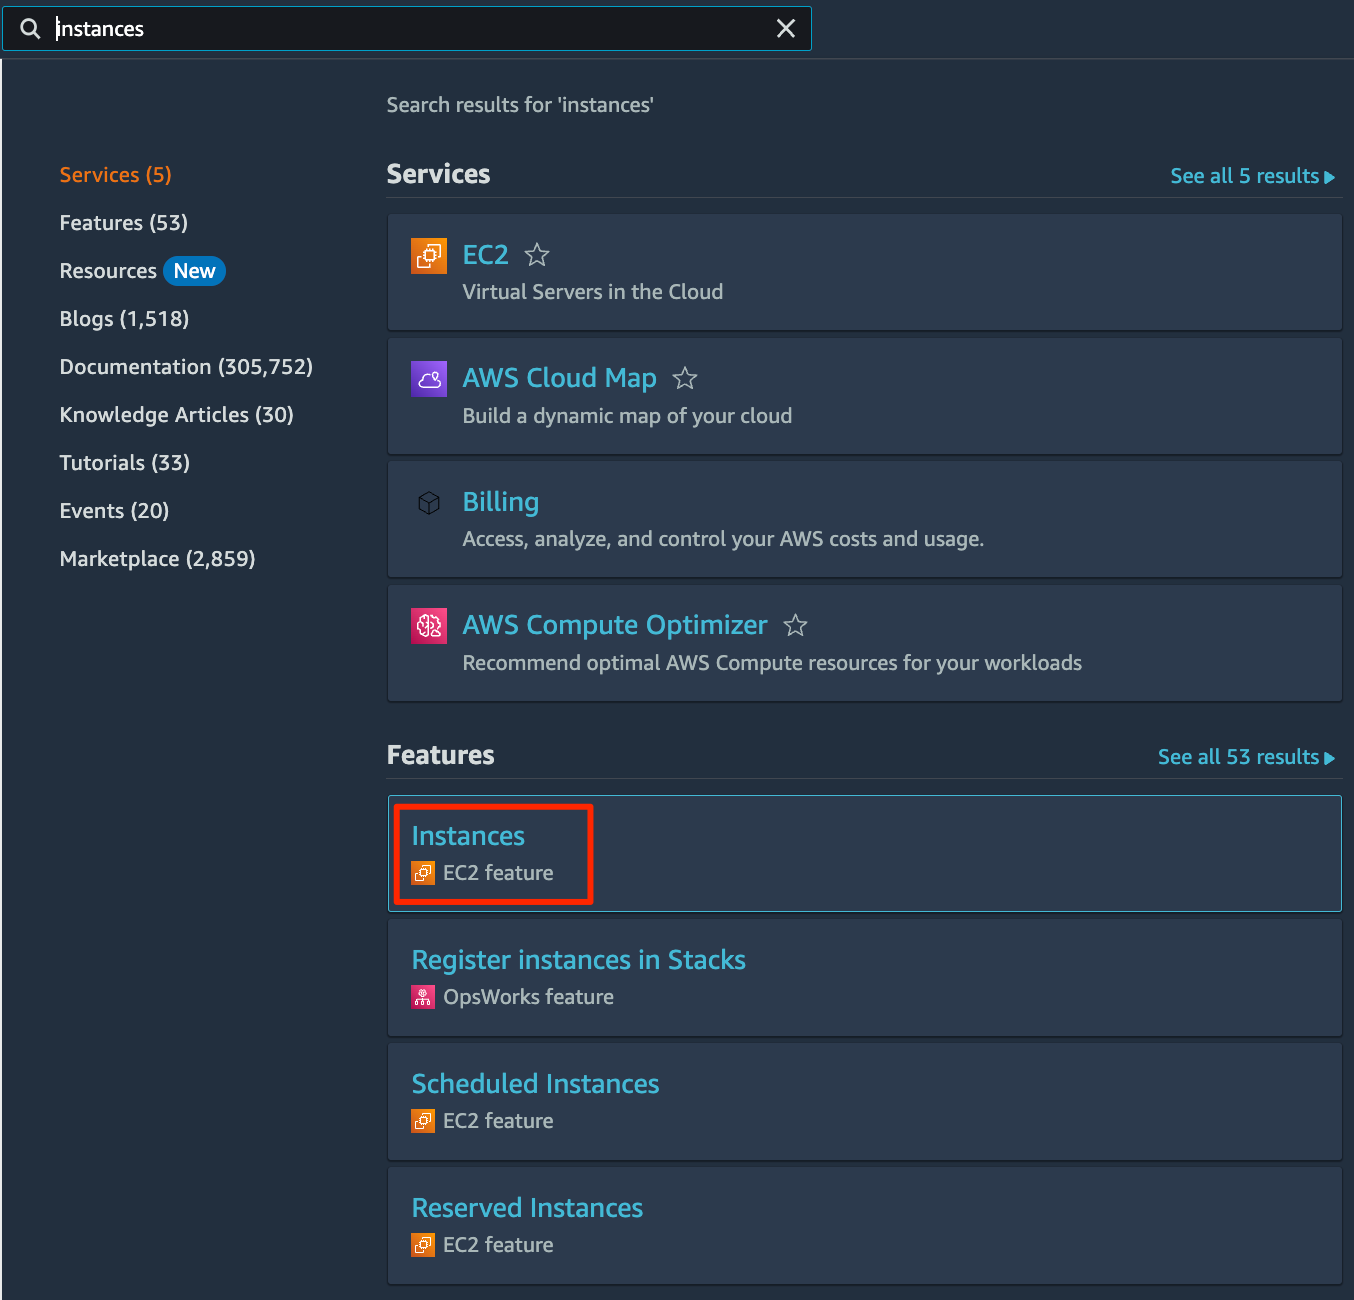
-
Click the Instances / EC2 tile.
-
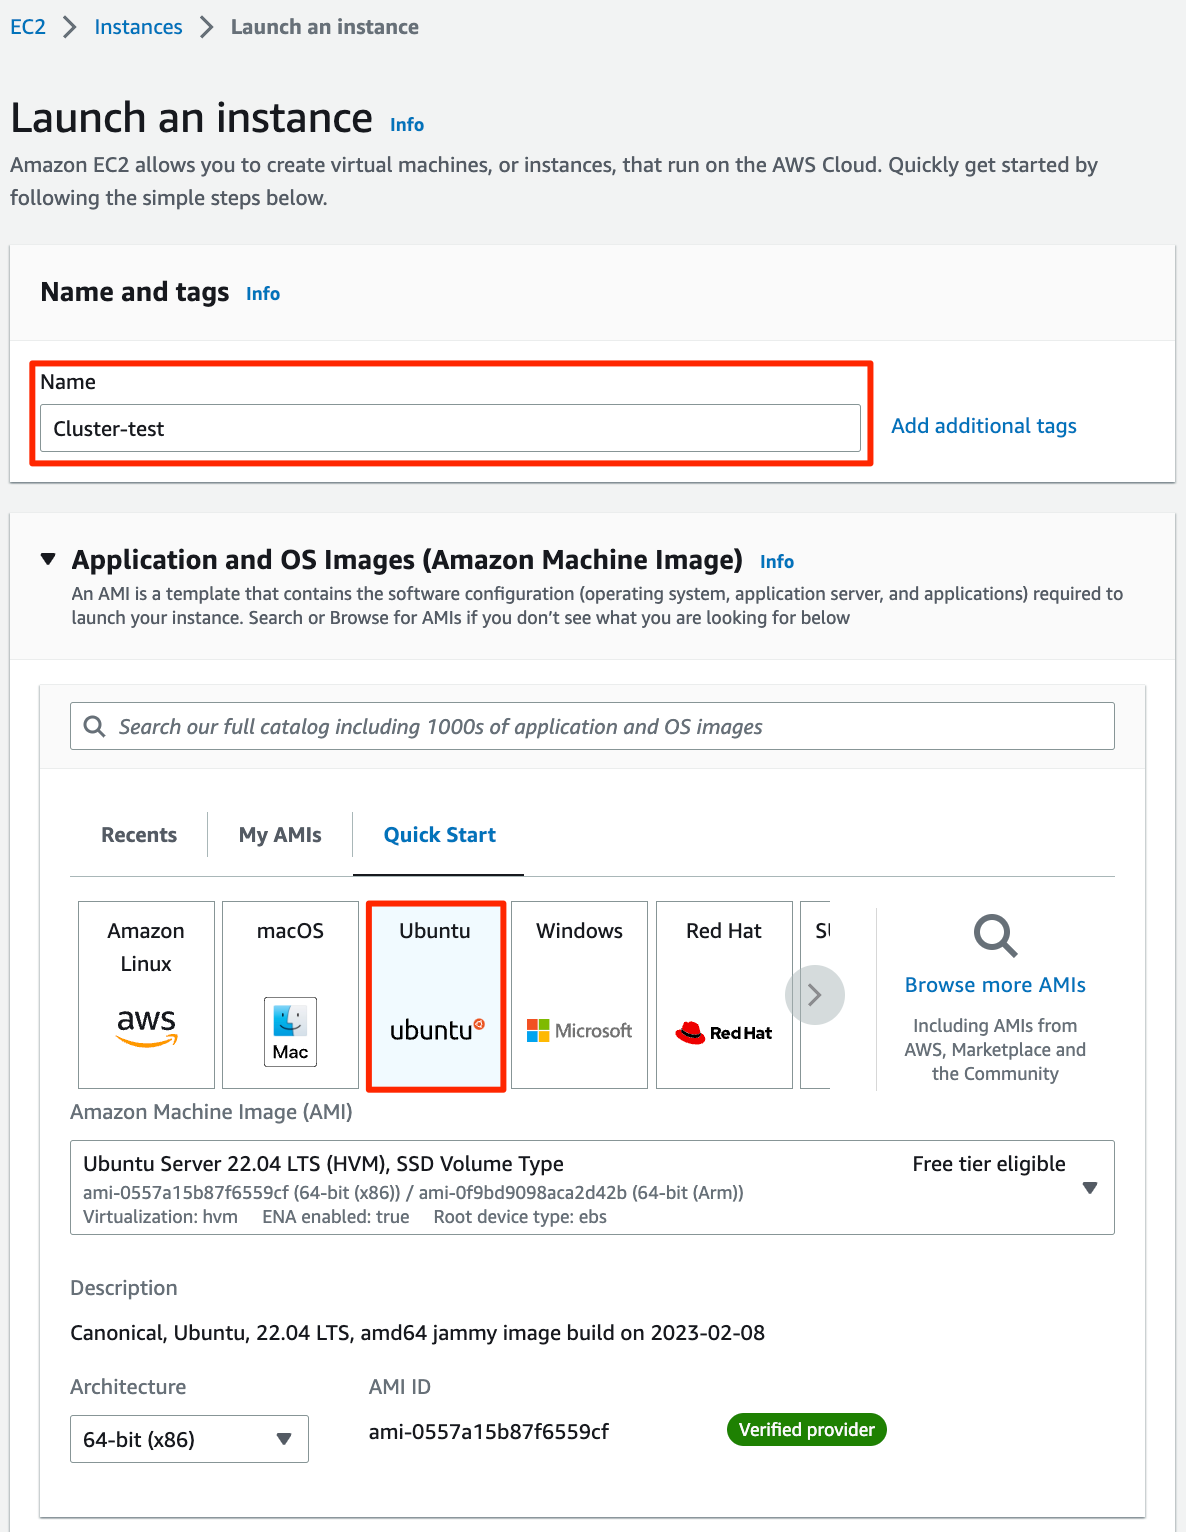
On the Instances page that opens, click Launch instances in the top right corner. The Launch an instance page opens.
-
Fill out the fields as shown below.
-
Name tag - enter a recognizable name for the instance
-
Application and OS Images - select the Ubuntu server
-
-
Scroll down.
-
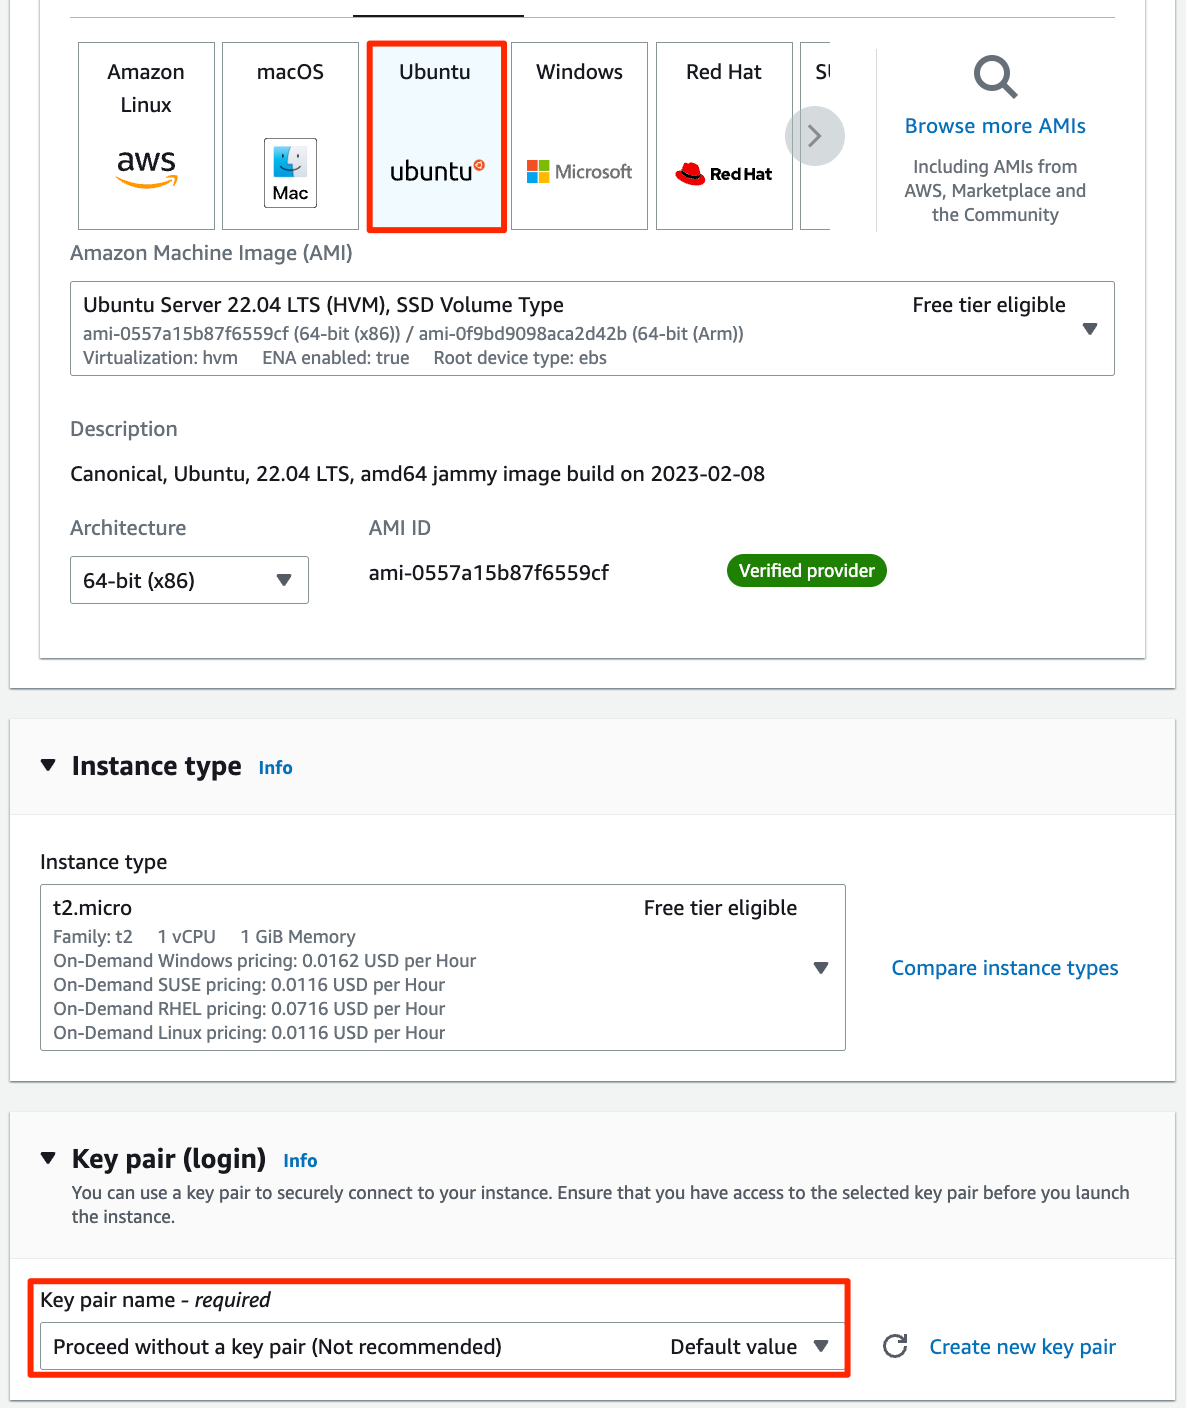
In the Key pair section, select the Proceed without a key pair option.
-
In the Summary section, click Launch instance. The "success" page opens.
Connect Your EC2 Instance
-
In the AWS console, navigate back to the Instances page.
-
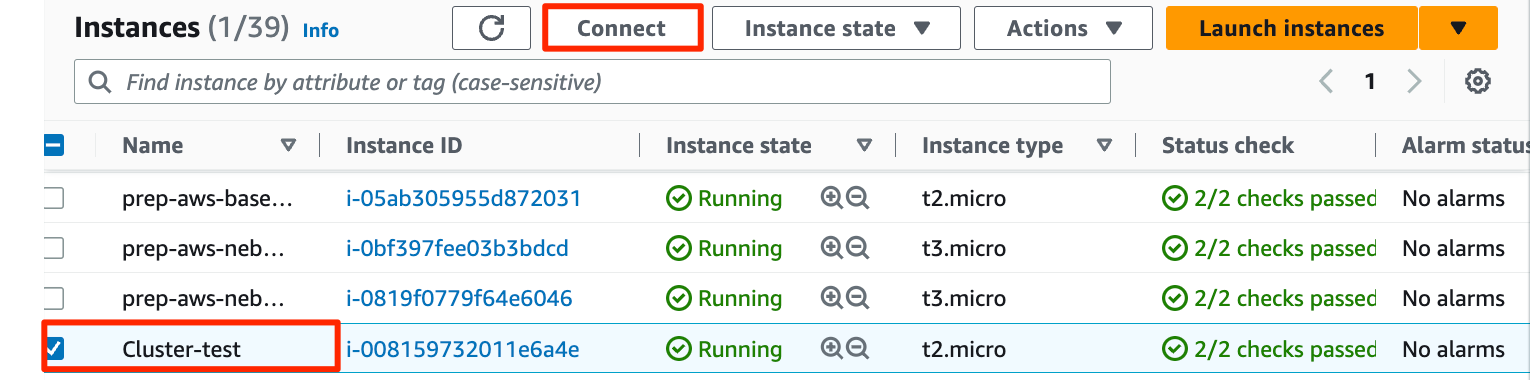
Select the check box by your instance’s name.
-
Click Connect on the top bar.
-
On the Connect instance page that opens, click Connect. Once your instance has been successfully connected, you get access to that instance’s SSH terminal.
Verify Access to Your Cluster
In your EC2 instance’s SSH terminal, run the following command (replace {PRIVATE_DNS_NAME} with your endpoint’s DNS name.
curl 'https://{PRIVATE_DNS_NAME}:8080/ignite?cmd=version'The response includes the Apache Ignite version, which the above command has retrieved from your cluster. For example:
{"successStatus":0,"error":null,"sessionToken":null,"response":8.8.25-p1}Learn More
Now that you have created a managed cluster securely accessible via AWS PrivateLink, you can connect to this cluster via a thin client.
© 2026 GridGain Systems, Inc. All Rights Reserved. Privacy Policy | Legal Notices. GridGain® is a registered trademark of GridGain Systems, Inc.
Apache, Apache Ignite, the Apache feather and the Apache Ignite logo are either registered trademarks or trademarks of The Apache Software Foundation.