Creating a GridGain 8 Managed Cluster
To provision a GridGain 8 managed cluster:
-
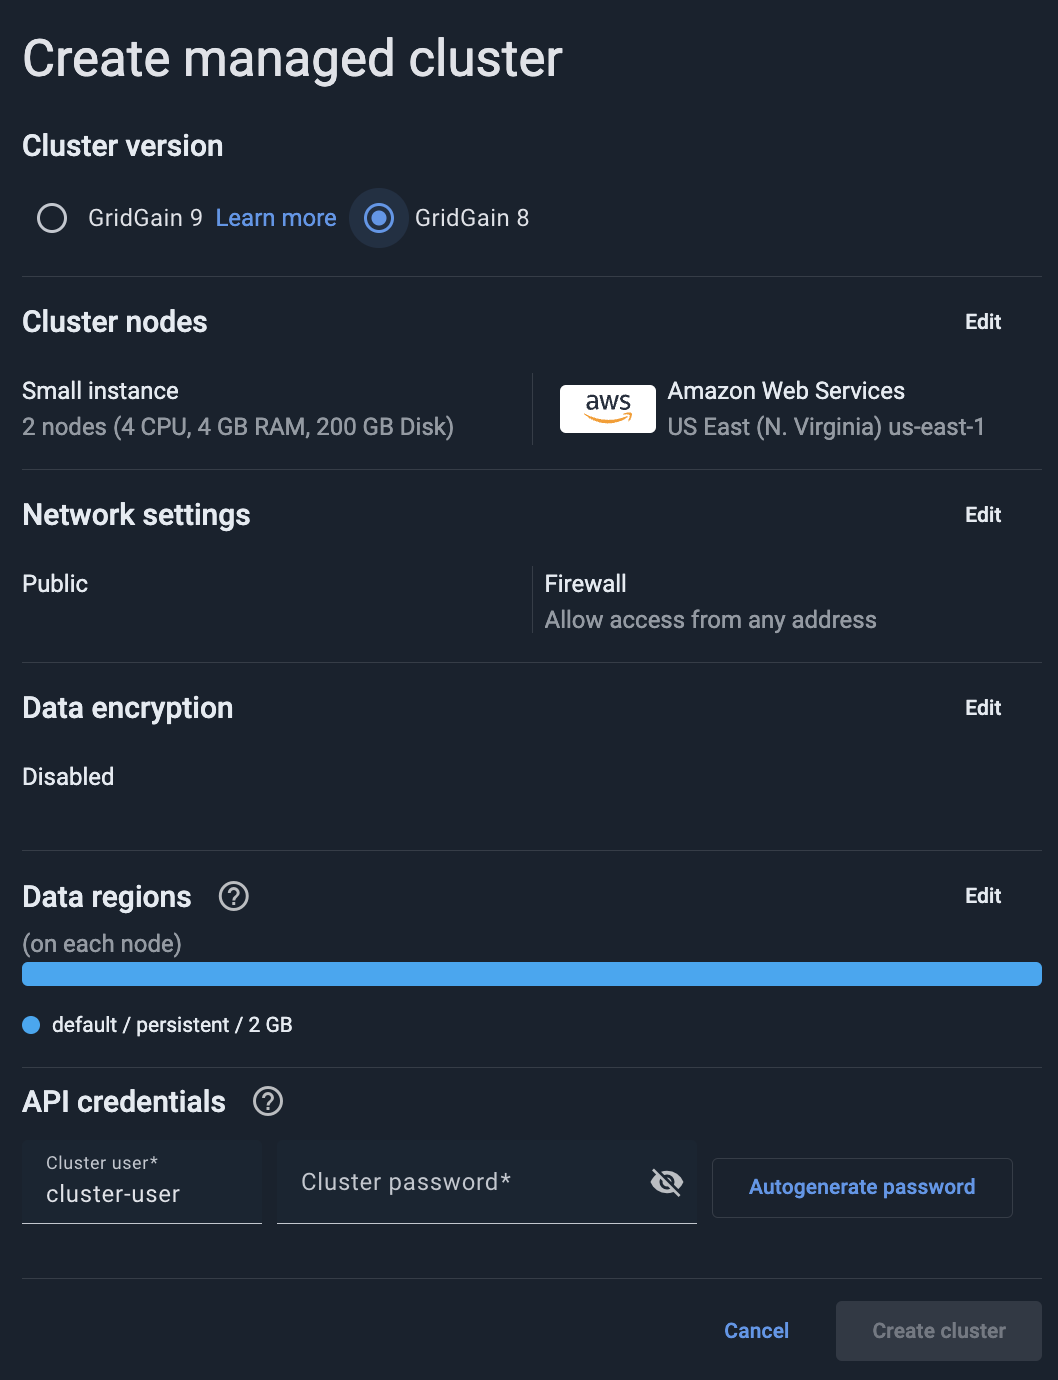
Click + on the main GridGain Nebula toolbar and select Create Managed Cluster.
The Create Managed cluster dialog opens.
-
In Cluster version, select "GridGain 8".
-
Optionally, Select Cluster Size and Location.
-
Optionally, Configure Data Regions.
-
Optionally, Define Network Settings.
-
Optionally, Define Data Encryption.
-
In the API credentials section, enter the initial user’s name and password. After the cluster had been provisioned, you can create additional users (API credential sets) in the Cluster management screen or in the My cluster screen.
-
Click Create cluster.
GridGain Nebula starts provisioning the cluster you have requested.
Select Cluster Size and Location
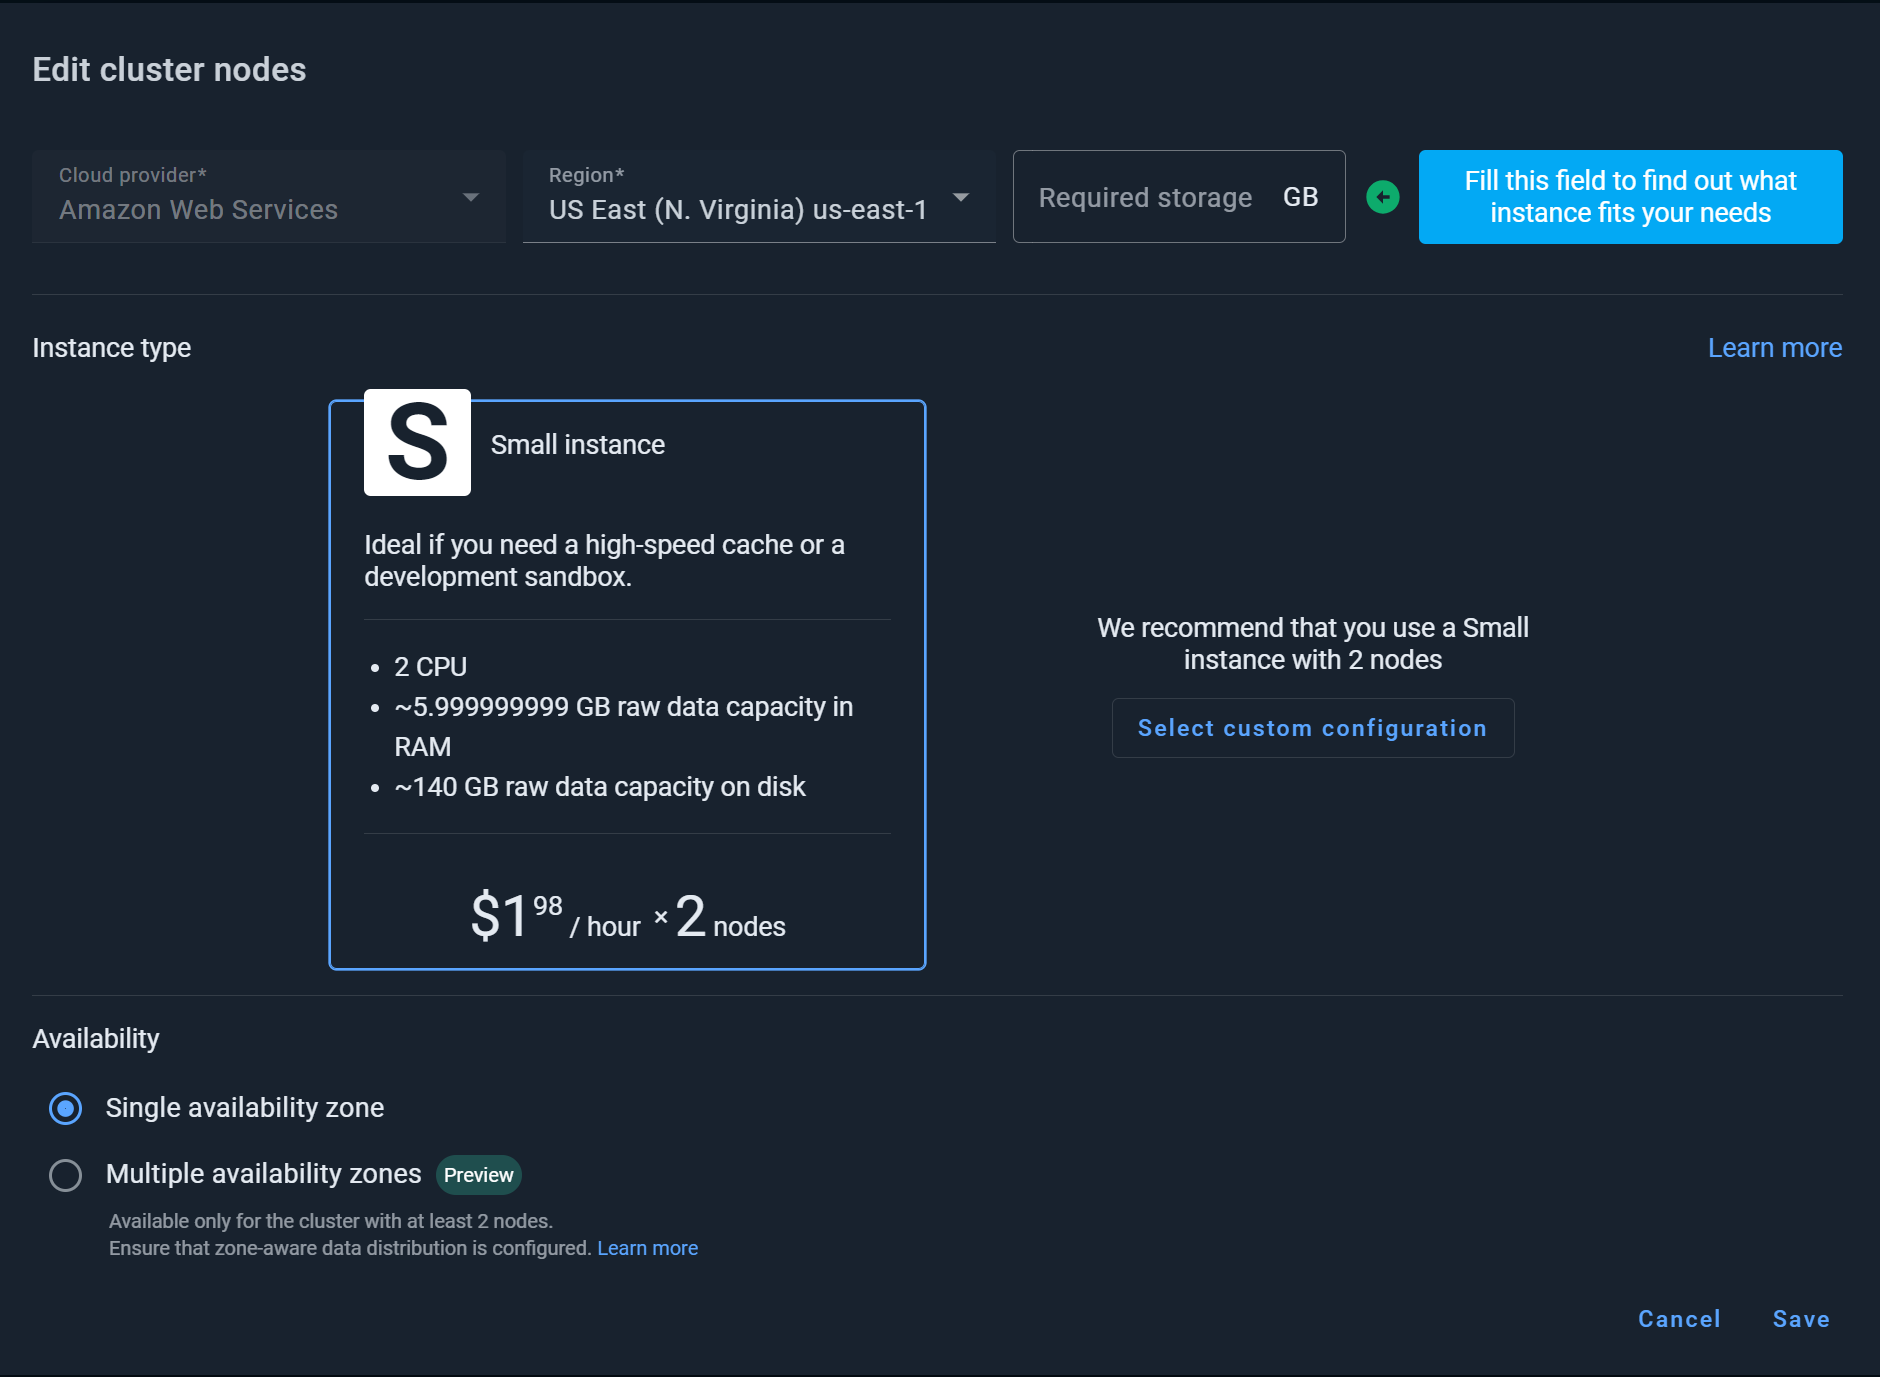
This step is optional. By default, the cluster will be provisioned in the US-East-1 region, in a single availability zone, with 2 small nodes.

-
Click Edit in the Cluster nodes section.
The Edit cluster nodes dialog opens.
-
Select the cloud provider and region. For latency purposes, we recommend selecting a region that is closest to your customers. Regions in different parts of the world can lead to high latency.
-
Optionally, select the Multiple availability zones option to improve the your cluster’s availability.
-
Select the amount of data you plan to store in your Nebula cluster. The wizard will suggest the recommended configuration. Alternatively, click Select custom configuration to configure the number of instances manually.
We recommend starting with two or three of small instances if you are testing the product.
If you are not sure about the size or number instances you need for your environment, contact our support team to calculate the optimal configuration.
-
Click Save.
Configure Data Regions
By default, you only have one data region with persistence enabled, but you can add more data regions that will use in-memory caches for improved performance.
Click Edit in the Data regions section to configure node data regions.
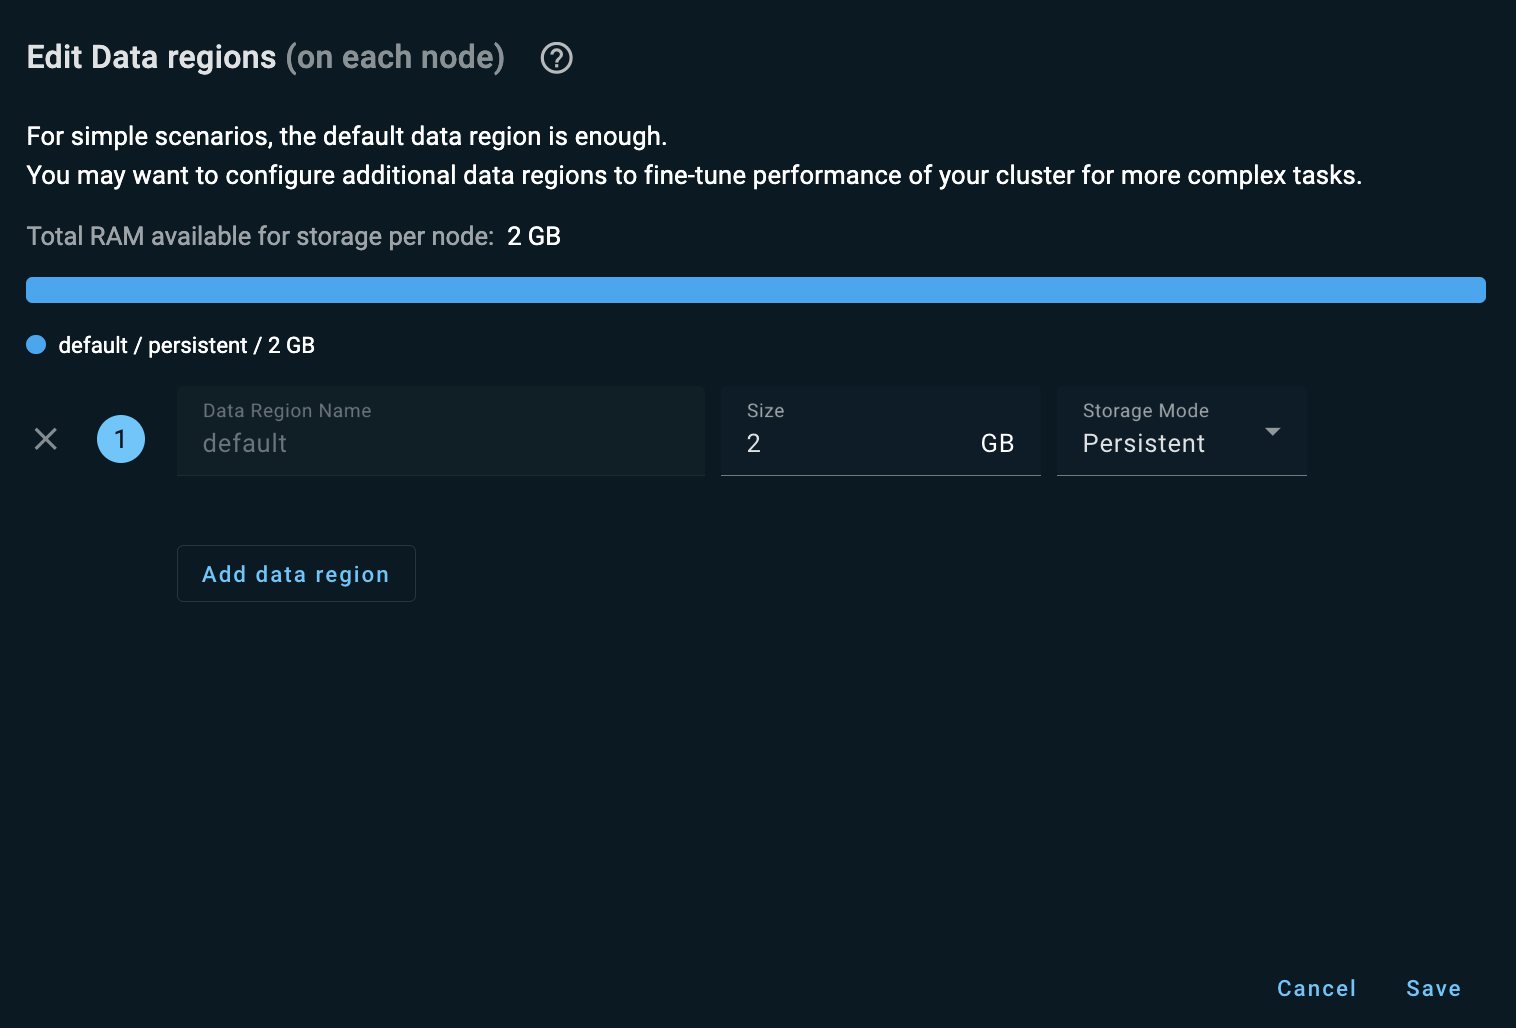
In the above dialog, you can add any number of data regions with the following rules:
-
Total size of all data regions must be the same as your instance.
-
At least 1 GB must remain allocated to the default data region.
Optimal region sizes for production environment will depend on your data model. If you have doubts or questions, contact our support team.
When you have configured the data regions, click Continue.
Define Network Settings
You can define your cluster’s network settings as:
-
Public - the cluster is accessible over the Internet. You can protect it with a firewall that allows access only from specific IP addresses.
-
Private - the cluster is accessible only through AWS PrivateLink, from a Virtual Private Connection (VPC).
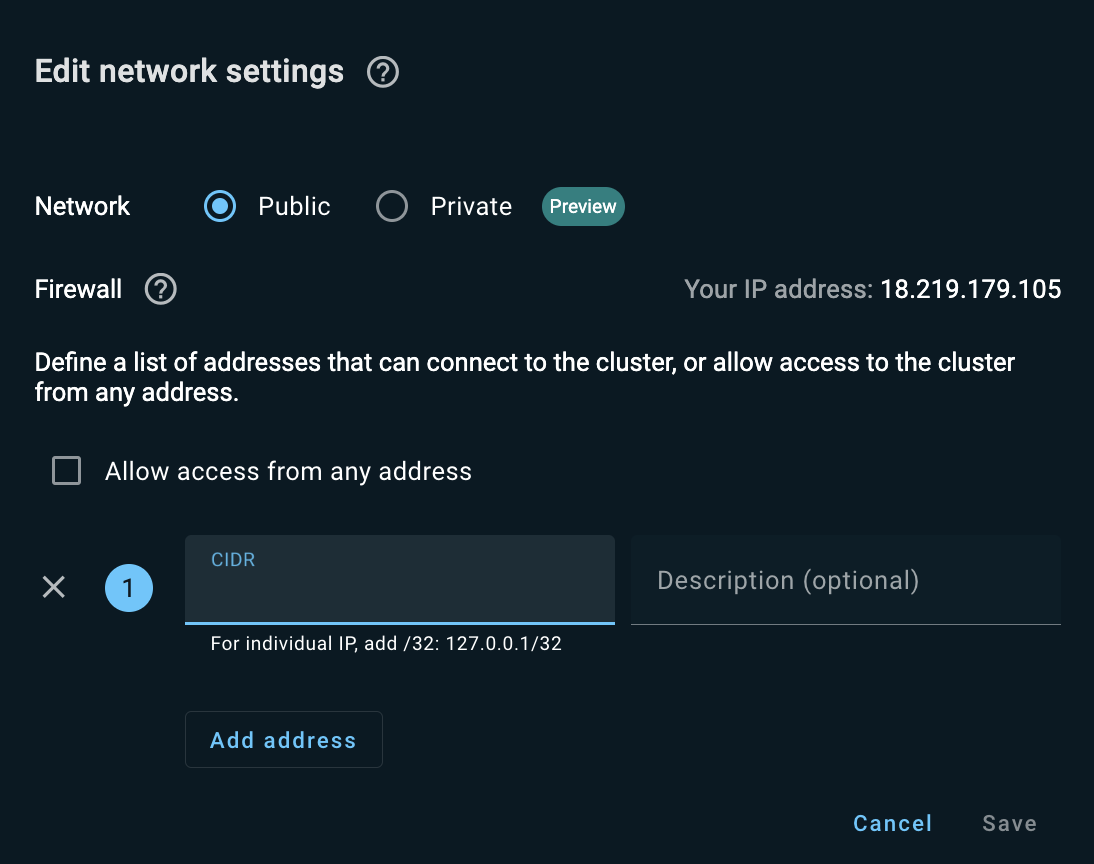
Public Networking
To define your cluster as public, click Edit in the Network Settings section, then select the Public option button in the Edit network settings dialog that opens.
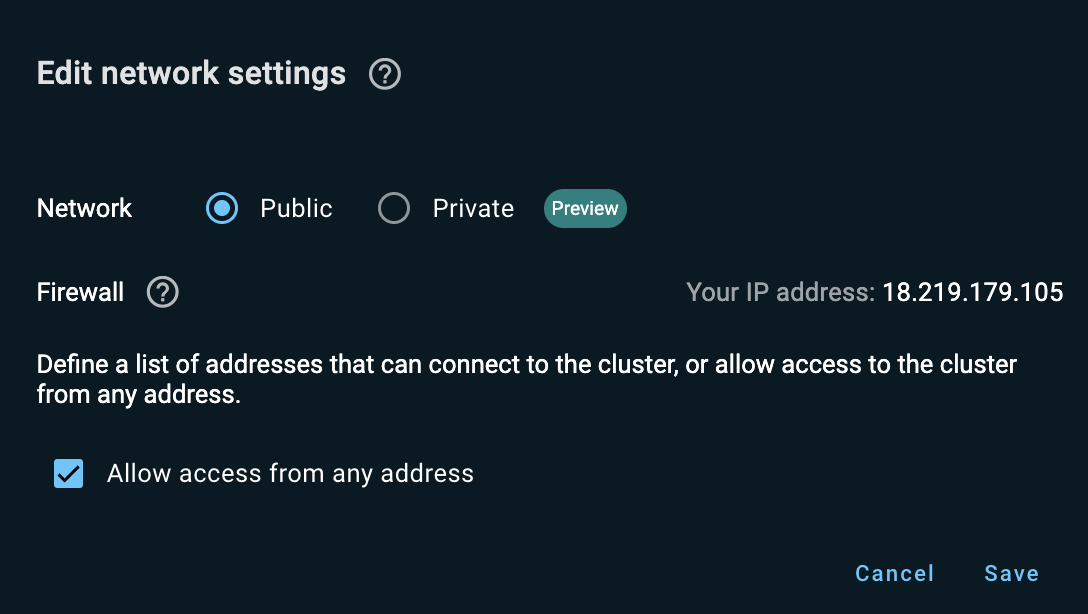
By default, the Allow access from any address check box is selected - this enables access to your cluster from any IP address, even if the real IP address is hidden from GridGain Nebula.
To restrict access to your cluster, clear the Allow access from any address check box and add the "whitelisted" IP addresses in the CIDR field. Click Add address for each additional CIDR.
Private Networking
Make sure you have a valid AWS account.
Click Edit in the Network Settings section, then select the Private option button in the Edit network settings dialog that opens.
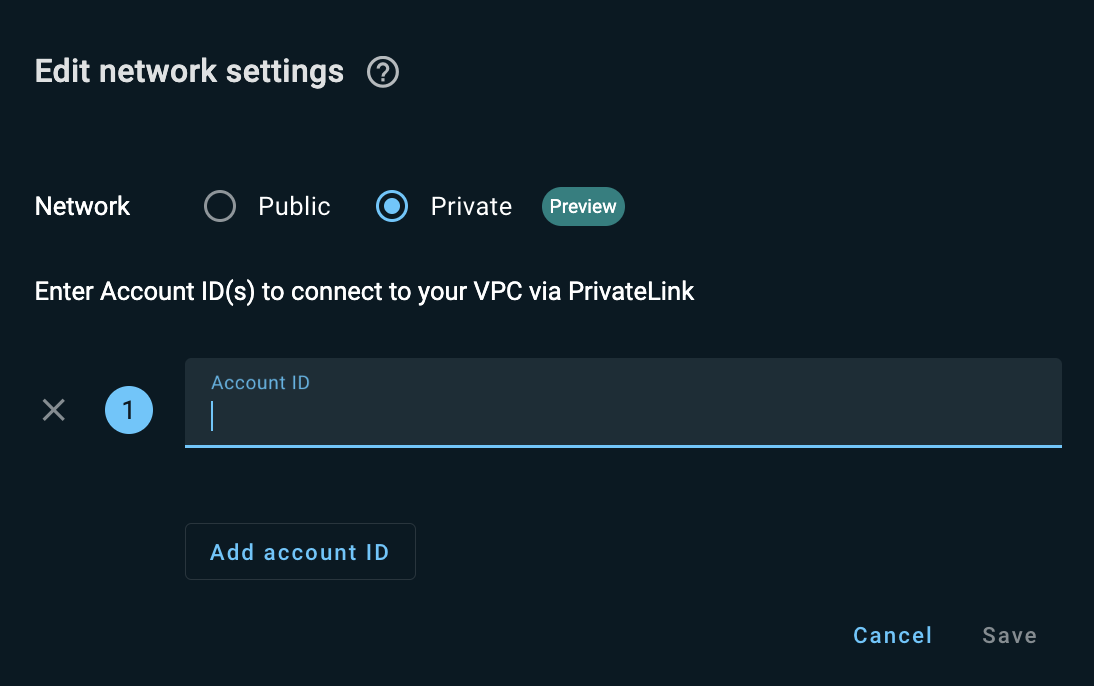
In the Account ID field, add IDs of the accounts to connect to your cluster’s VPC via PrivateLink. Click Add account for each additional account (up to 3). Click Save when done.
After you have provisioned your cluster, run the following command in AWS CLI (replace the placeholders with your values):
aws ec2 create-vpc-endpoint --vpc-id {VPC-ID} \
--region {REGION} --service-name {SERVICE-NAME} \
--security-group-ids {SG-IDS} --private-dns-enabled \
--vpc-endpoint-type Interface --subnet-ids {SUBNET-IDS}
The placeholders are as follows.
| Placeholder | Description |
|---|---|
{VPC-ID} |
A unique string that identifies the peer AWS VPC. Find this value on the VPC dashboard in your AWS account. |
{REGION} |
An AWS region in which your database deployment resides. |
{SERVICE-NAME} |
A unique string identifying the private endpoint service. Copy that string from the cluster details that appear in the GridGain Nebula UI after you have provisioned the cluster. |
{SG-IDS} |
The ID of the security group to use. The security group used for the cluster must allow inbound connections for ports |
{SUBNET-IDS} |
A unique string that identifies the subnets that your AWS VPC uses. Find these values on the Subnet dashboard in your AWS account. You must specify at least one subnet. If you don’t, AWS won’t provision an interface endpoint in your VPC. An interface endpoint is required for clients in your VPC to send traffic to the private endpoint. |
Define Data Encryption
In GridGain Nebula, your data is always encrypted:
-
In transit with the use of SSL/TLS
-
At rest at the volume level (the EBS volumes on AWS are encrypted)
However, for real-life, industry standard-compliant cluster operations, we recommend that you encrypt your data at the database level.
GridGain Nebula supports transparent database-level encryption that follows the envelope strategy. The key-encrypting key (a.k.a. the "main" key) is a Customer Managed Key (CMK). You fully control the CMK; GridGain Nebula cannot access this key’s cryptographic data. The CMK GridGain Nebula uses on AWS is provided by the AWS Key Management Service (KMS).
To define transparent data encryption in your cluster:
-
Make sure you have a valid AWS account.
-
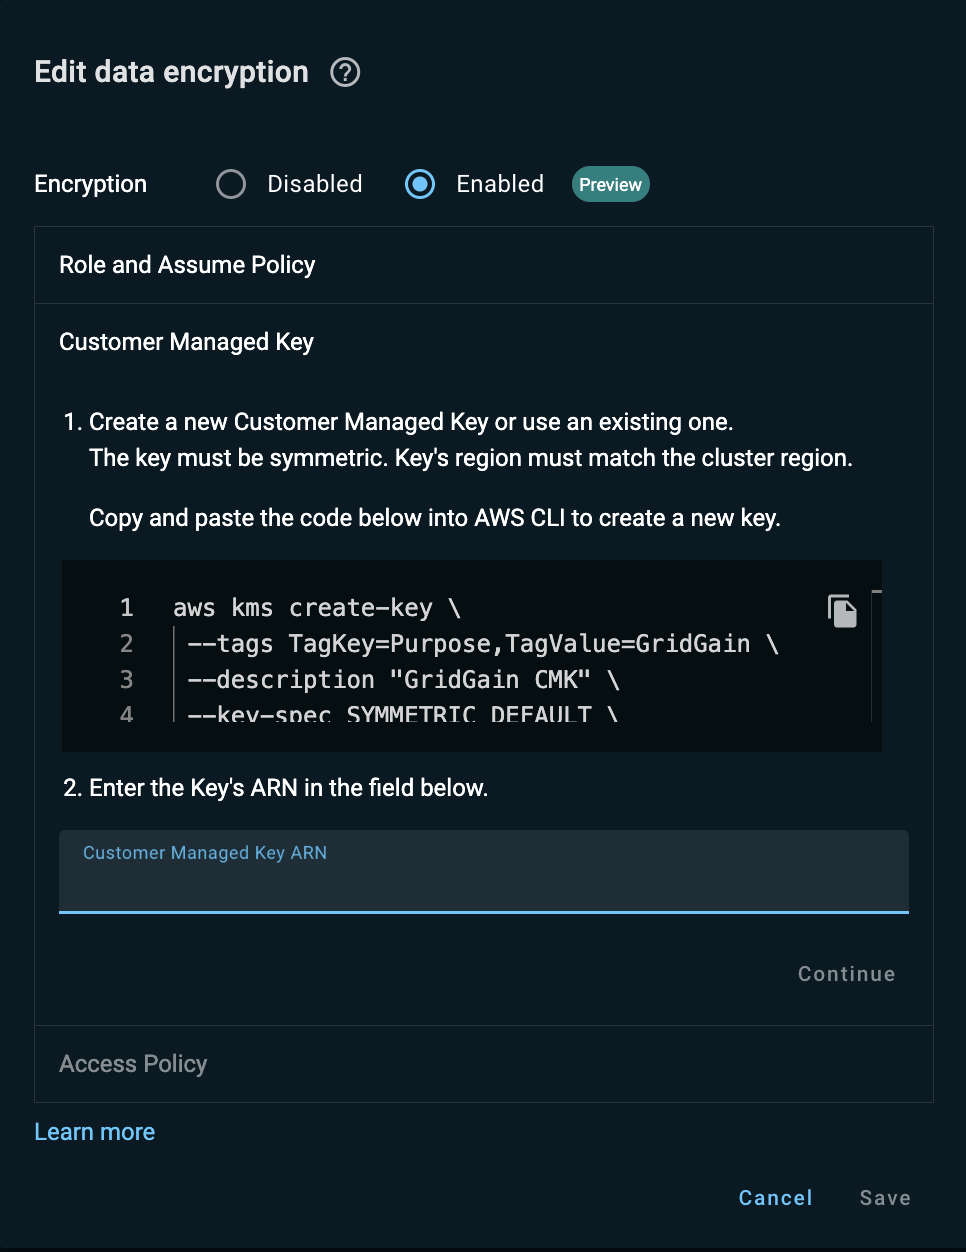
Under your AWS account, create a CMK (Customer Managed Key). The key must be symmetric, multi-regional, without auto-rotation.
In the AWS CLI, run the following command:
aws kms create-key \ --tags TagKey=Purpose,TagValue=GridGain \ --description "GridGain CMK" \ --key-spec SYMMETRIC_DEFAULT \ --key-usage ENCRYPT_DECRYPT \ --multi-region \ --region us-west-2 -
Save the key ARN that appears in the command output.
-
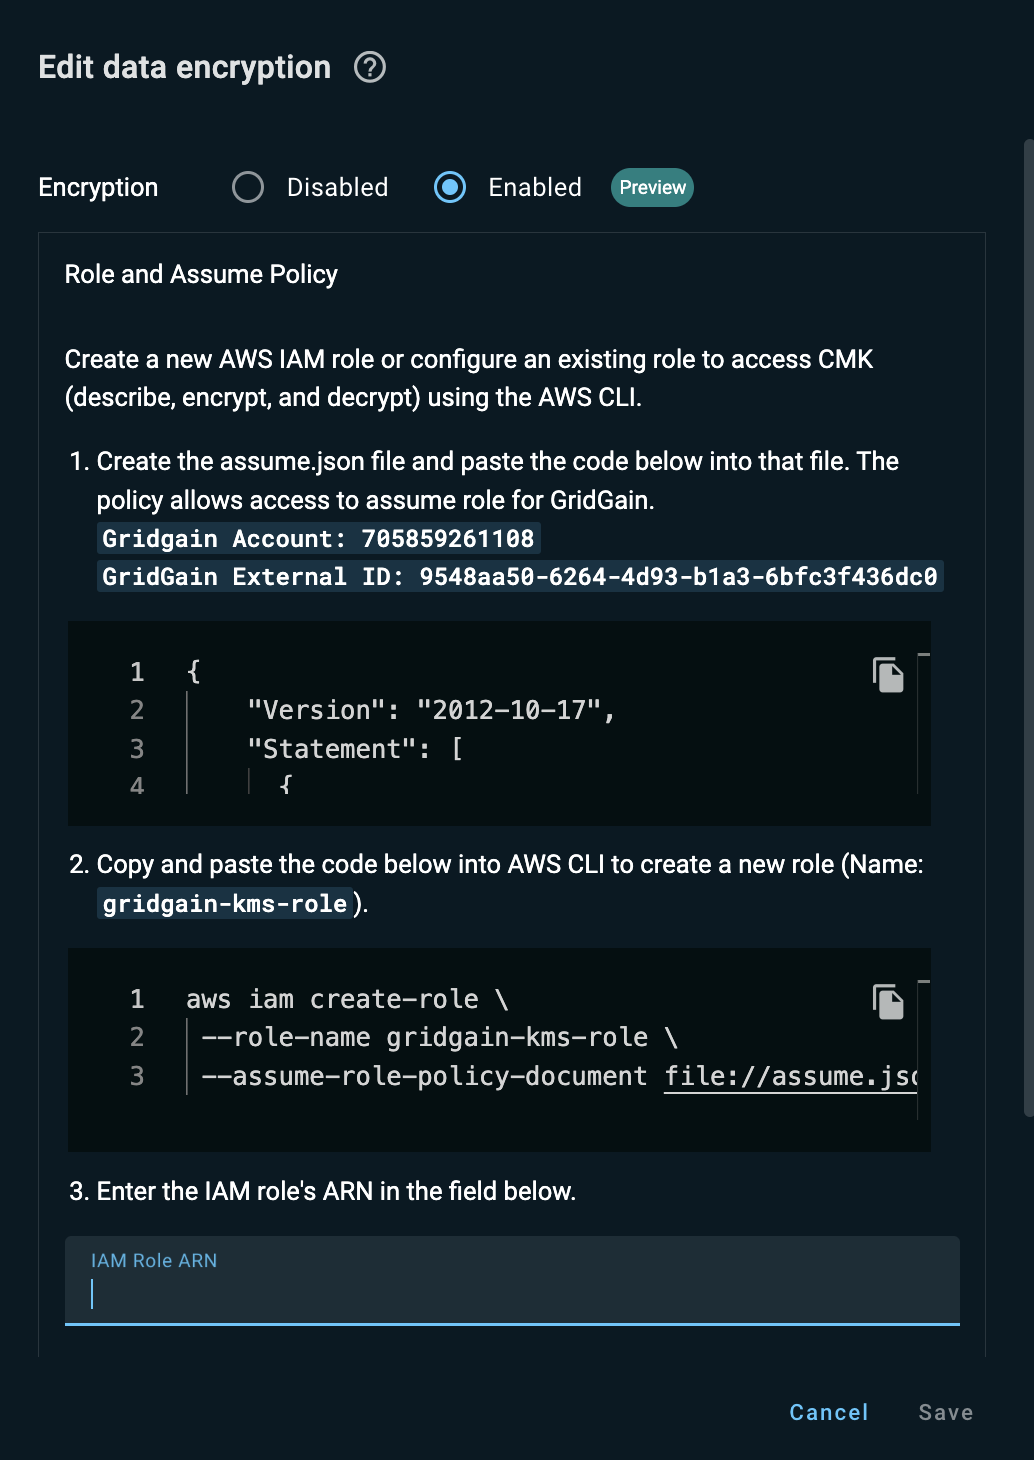
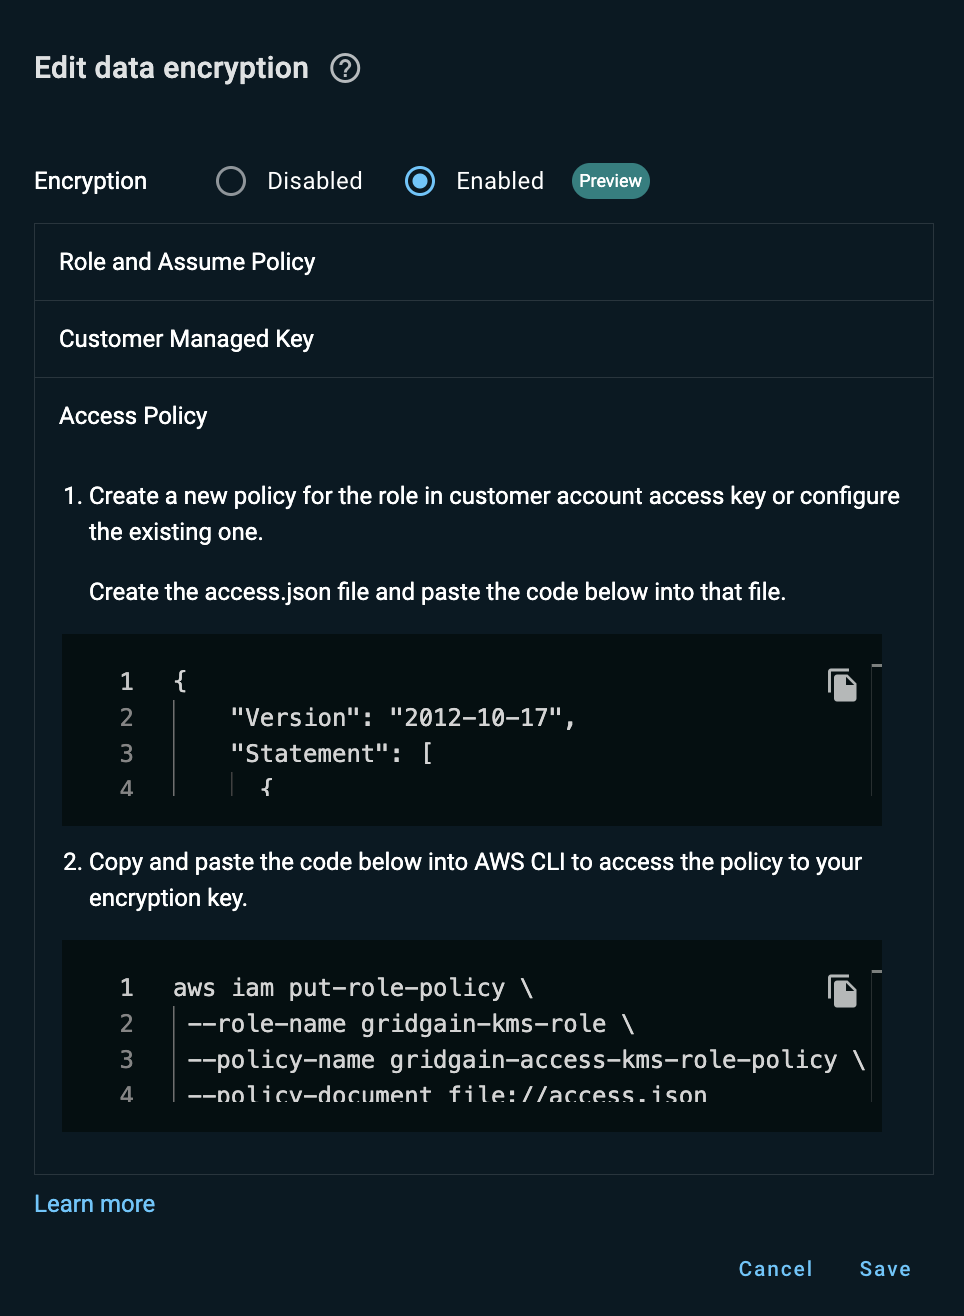
In the GridGain Nebula UI, in the Edit data encryption dialog, select Enabled.
-
Create a role for GridGain Nebula in your AWS account and a policy that enables the GridGain AWS account to assume the role you have created:
-
Copy the JSON content that appears in the top field.
-
On your machine, create the
assume.jsonfile and paste the copied content into that file. -
Upload the
assume.jsonfile to your AWS account using the Upload file option from the Actions pulldown menu in the AWS CLI window. -
Create the
gridgain-kms-roleAWS IAM role for accessing CMK (describe, encrypt, and decrypt) by running the following command in the AWS CLI:aws iam create-role \ --role-name gridgain-kms-role \ --assume-role-policy-document file://assume.json -
Save the role ARN that appears in the command output.
-
-
In the Edit data encryption dialog, paste the role ARN into the IAM role ARN field. Click Continue.
-
Paste the key ARN into the Customer Managed Key ARN field that opens.
-
Click Continue.
-
Update the previously created GridGain role with a policy that enables the GridGain AWS account to access the CMK for the managed cluster in your AWS account:
-
Copy the JSON content that appears in field 1 under the Update policy section.
-
On your machine, create the
access.jsonfile and paste the copied content into that file. -
Upload the
access.jsonfile to your AWS account using the Upload File option from the Actions pulldown menu in the AWS CLI window. -
Update the previously created
gridgain-kms-roleAWS IAM role by running the following command in the AWS CLI:aws iam put-role-policy \ --role-name gridgain-kms-role \ --policy-name gridgain-access-kms-role-policy \ --policy-document file://access.json
-
-
In the Edit data encryption dialog, click Save.
Next Steps - Connect to Cluster
Once your cluster had been provisioned, you can connect a sample application.
© 2026 GridGain Systems, Inc. All Rights Reserved. Privacy Policy | Legal Notices. GridGain® is a registered trademark of GridGain Systems, Inc.
Apache, Apache Ignite, the Apache feather and the Apache Ignite logo are either registered trademarks or trademarks of The Apache Software Foundation.