Attaching a GridGain 8 Cluster
This page explains how to attach a GridGain 8 cluster to Nebula. You can attach as many clusters as you want. GridGain Nebula allows you to switch between clusters at will.
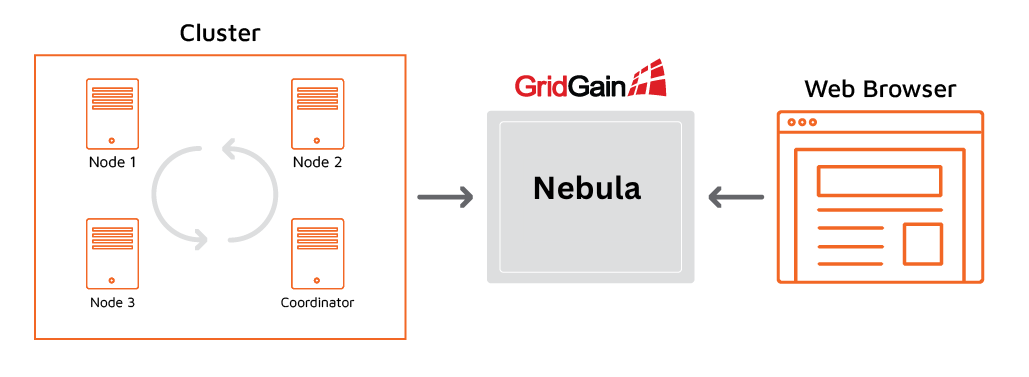
The following diagram illustrates how Nebula interacts with the cluster and the web browser.
Enabling the Control Center Module
The connection between the cluster and Nebula is initiated from the cluster side.
For this to happen, you need to enable the control-center-agent module in the cluster.
The module must be enabled on all server nodes.
If you plan to connect client nodes to your cluster, enable the module on the client nodes as well.
Otherwise, you will get the following exception on the client node:
java.lang.ClassNotFoundException: org.gridgain.control.agent.configuration.ControlCenterAgentConfigurationDepending on how you deploy your cluster, you can enable the module in different ways:
-
If you start nodes from the distribution package by executing
ignite.sh, copy the{GRIDGAIN_HOME}/libs/optional/control-center-agentfolder to{GRIDGAIN_HOME}/libs/. -
If you start nodes using Maven, see this section for the information on how to enable modules.
-
If you use a GridGain Docker image, see Enabling Modules.
When you start your cluster with the Control Center Agent enabled, you can use the management.sh script to enable and disable management capabilities.
The management script is located in the bin directory of the distribution package and you. Detailed descriptions are available in the Command Line Options page.
As the cluster tries to connect to Nebula, you should see the following messages in the console output of the coordinator node (the oldest node in the cluster):

You can copy the link and open it in your browser.
Alternatively, copy the connection token and perform the Attaching the Cluster to Nebula procedure.
Attaching the Cluster to Nebula
To attach the cluster to Nebula:
-
Click the + icon on the Nebula toolbar and select Attach GridGain
-
In the Attach cluster dialog that opens, select the GridGain 8 tab.
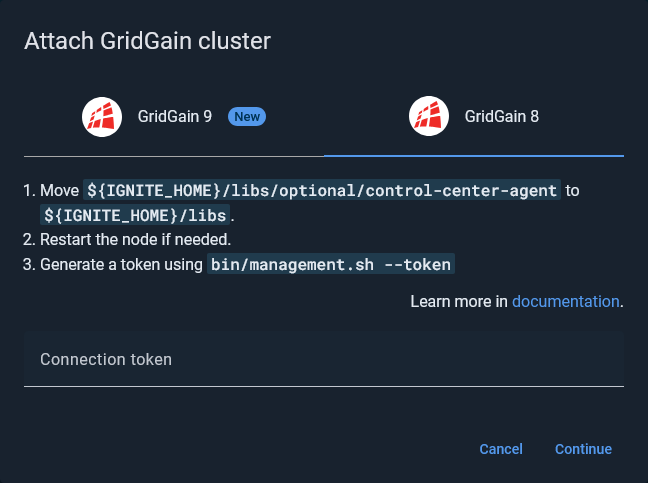
-
In the Connection token field, enter the token you have generated while Enabling the Control Center Module .
-
Click Continue.
If the cluster is found and the token is successfully validated, the success notification appears in the dialog.
-
Click Attach.
The attached cluster displays in the My cluster screen.
Configuring Your Cluster
The following procedures are optional.
Enabling Metrics
Nebula collects metrics from the clusters that are running. Most metrics are available by default, but some metrics must be enabled in the cluster before you can view them in Nebula.
You can enable metrics in two ways:
-
In the cluster configuration, or
-
Via JMX Beans at runtime
Refer to this page for details.
Enabling Tracing
You can enable tracing capabilities and view traces in Nebula in two ways:
Assigning Cluster Name
You can assign a user-friendly name to your cluster. The name is displayed in Nebula. Use the following command to assign a name:
{IGNITE_HOME}/bin/control.sh --change-tag newTagValue [--yes]If you don’t set the cluster name, the auto-generated cluster name is displayed instead.
© 2026 GridGain Systems, Inc. All Rights Reserved. Privacy Policy | Legal Notices. GridGain® is a registered trademark of GridGain Systems, Inc.
Apache, Apache Ignite, the Apache feather and the Apache Ignite logo are either registered trademarks or trademarks of The Apache Software Foundation.