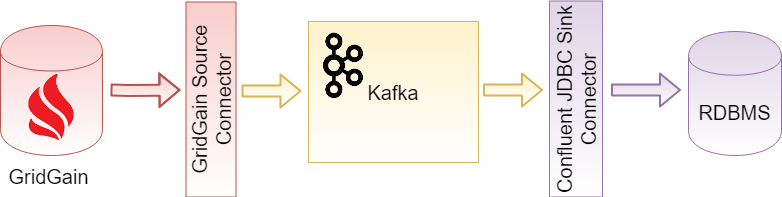
Example: Persisting Ignite Data in Relational Database with Kafka Connector
The example demonstrates one-way GridGain-to-RDBMS data replication. GridGain Source Connector streams data from GridGain into Kafka with the data schema attached. JDBC Sink Connector streams the data from Kafka into relational tables using attached data schema.
Prerequisites
-
GridGain Enterprise or Ultimate version 8.8.31 or later is installed. The
IGNITE_HOMEenvironment variable points to GridGain installation directory on every GridGain node. -
Kafka 3.5.0 is installed. The
KAFKA_HOMEenvironment variable points to Kafka installation directory on every node. -
MySQL Server 8 is installed and running.
-
DBeaver is used as a database management tool.
Step 1: Install GridGain Source Connector
1.1. Prepare GridGain Connector Package
The connector is in the $IGNITE_HOME/integration/gridgain-kafka-connect directory. Execute this scripts on one of GridGain nodes to pull missing connector dependencies into the package:
cd $IGNITE_HOME/integration/gridgain-kafka-connect
./copy-dependencies.sh
1.2. Register GridGain Connector with Kafka
In this example we assume /opt/kafka/connect is the Kafka connectors installation directory.
For every Kafka Connect worker:
-
Copy GridGain Connector package directory you prepared on the previous step from the GridGain node to
/opt/kafka/connecton the Kafka Connect worker. -
Edit Kafka Connect Worker configuration (
$KAFKA_HOME/config/connect-standalone.propertiesfor single-worker Kafka Connect cluster or$KAFKA_HOME/config/connect-distributed.propertiesfor multiple node Kafka Connect cluster) to register the connector on the plugin path:plugin.path=/opt/kafka/connect/gridgain-kafka-connect
Step 2: Install JDBC Sink Connector
-
Download Confluent JDBC Connector package.
-
Unzip the package and rename the extracted directory to
confluentinc-kafka-connect-jdbc. -
In this example we use MySQL Server 8 as the RDBMS. Download the MySQL Server JDBC Driver and copy the driver JAR into the
confluentinc-kafka-connect-jdbc/libdirectory.For every Kafka Connect worker:
-
Copy the JDBC Connector package directory
/opt/kafka/connectto the Kafka Connect worker. -
Edit Kafka Connect Worker configuration (
$KAFKA_HOME/config/connect-standalone.propertiesfor single-worker Kafka Connect cluster or$KAFKA_HOME/config/connect-distributed.propertiesfor multiple node Kafka Connect cluster) to register the connector on the plugin path:plugin.path=/opt/kafka/connect/gridgain-kafka-connect,/opt/kafka/connect/confluentinc-kafka-connect-jdbc
Step 3: Configure and Start GridGain Cluster
In this example we will start only one GridGain server node.
-
Create the
ignite-server.xmlconfiguration file:<?xml version="1.0" encoding="UTF-8"?> <beans xmlns="http://www.springframework.org/schema/beans" xmlns:xsi="http://www.w3.org/2001/XMLSchema-instance" xmlns:util="http://www.springframework.org/schema/util" xsi:schemaLocation=" http://www.springframework.org/schema/beans http://www.springframework.org/schema/beans/spring-beans.xsd http://www.springframework.org/schema/util http://www.springframework.org/schema/util/spring-util.xsd"> <bean id="ignite.cfg" class="org.apache.ignite.configuration.IgniteConfiguration"> <property name="discoverySpi"> <bean class="org.apache.ignite.spi.discovery.tcp.TcpDiscoverySpi"> <property name="ipFinder"> <bean class="org.apache.ignite.spi.discovery.tcp.ipfinder.vm.TcpDiscoveryVmIpFinder"> <property name="addresses"> <list> <value>127.0.0.1:47500..47502</value> </list> </property> </bean> </property> </bean> </property> </bean> </beans> -
Start GridGain node (the below command assumes you are in the directory where ignite-server.xml is located):
$IGNITE_HOME/bin/ignite.sh ignite-server.xml

...
[18:21:36] Ignite node started OK (id=8a01e443)
[18:21:36] Topology snapshot [ver=1, servers=1, clients=0, CPUs=4, offheap=3.1GB, heap=1.0GB]
Step 4: Create GridGain Tables and Add Some Data
In GridGain Nebula, go to the Queries page, create a table called Person, and add some data to the table:
CREATE TABLE IF NOT EXISTS Person (id int, city_id int, name varchar, PRIMARY KEY (id));
INSERT INTO Person (id, name, city_id) VALUES (1, 'John Doe', 3);
INSERT INTO Person (id, name, city_id) VALUES (2, 'John Smith', 4);
Step 5: Initialize MySQL Database
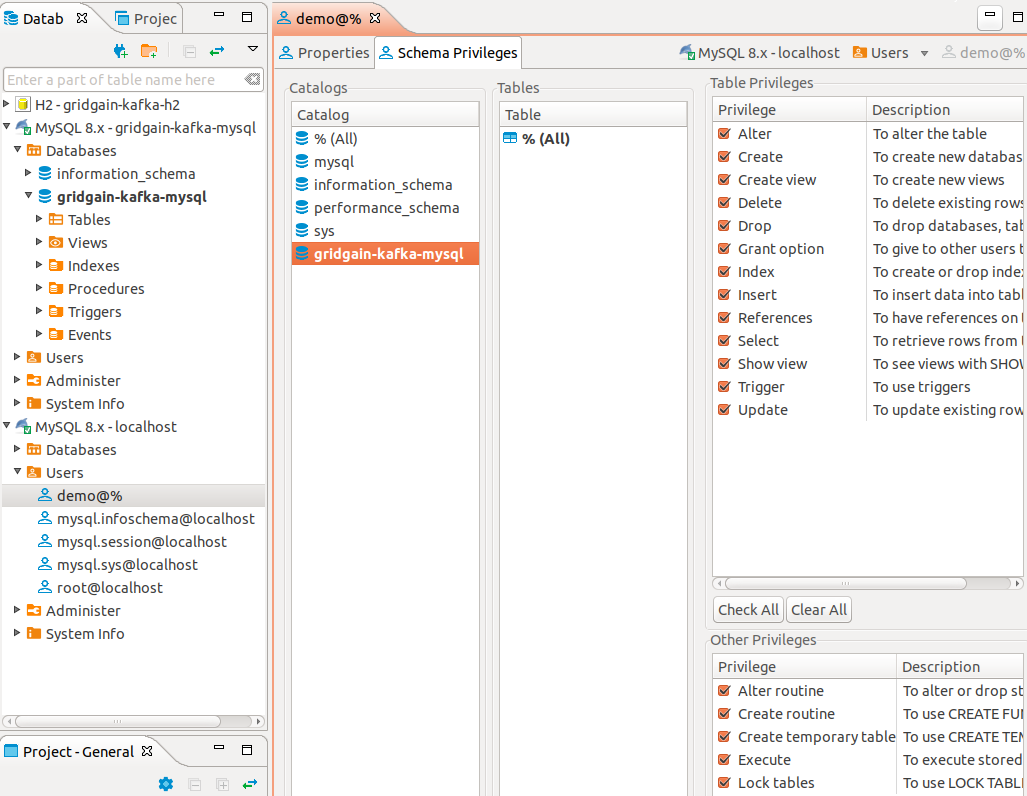
In DBeaver connect to MySQL as administrator and:
-
Create database gridgain-kafka-mysql
-
Create user demo with password demo
-
Grant the demo user full privileges to the gridgain-kafka-mysql database.
Step 6: Start Kafka Cluster
In this example we will start only one Kafka broker.
-
Start Zookeeper:
$KAFKA_HOME/bin/zookeeper-server-start.sh $KAFKA_HOME/config/zookeeper.properties ... [2018-10-21 18:38:29,025] INFO Using org.apache.zookeeper.server.NIOServerCnxnFactory as server connection factory (org.apache.zookeeper.server.ServerCnxnFactory) [2018-10-21 18:38:29,030] INFO binding to port 0.0.0.0/0.0.0.0:2181 (org.apache.zookeeper.server.NIOServerCnxnFactory) -
Start Kafka Broker:
$KAFKA_HOME/bin/kafka-server-start.sh $KAFKA_HOME/config/server.properties

...
[2018-10-21 18:40:06,998] INFO Kafka version : 2.0.0 (org.apache.kafka.common.utils.AppInfoParser)
[2018-10-21 18:40:06,998] INFO Kafka commitId : 3402a8361b734732 (org.apache.kafka.common.utils.AppInfoParser)
[2018-10-21 18:40:06,999] INFO [KafkaServer id=0] started (kafka.server.KafkaServer)
Step 7: Configure and Start Kafka Connect Cluster
In this example we will start only one Kafka Connect worker.
7.1. Configure Kafka Connect Worker
In this example we need data schema attached to data so make sure you have the following properties in your Kafka Connect worker configuration ($KAFKA_HOME/config/connect-standalone.properties for single-worker Kafka Connect cluster or $KAFKA_HOME/config/connect-distributed.properties for multiple node Kafka Connect cluster):
key.converter=org.apache.kafka.connect.json.JsonConverter
value.converter=org.apache.kafka.connect.json.JsonConverter
key.converter.schemas.enable=true
value.converter.schemas.enable=true
7.2. Configure GridGain Source Connector
Create the kafka-connect-gridgain-source.properties configuration file (replace IGNITE_CONFIG_PATH with a path to your ignite-server.xml):
name=kafka-connect-gridgain-source
tasks.max=2
connector.class=org.gridgain.kafka.source.IgniteSourceConnector

igniteCfg=IGNITE_CONFIG_PATH/ignite-server.xml
topicPrefix=quickstart-
7.3. Configure JDBC Sink Connector
Create the kafka-connect-mysql-sink.properties configuration file:
name=kafka-connect-mysql-sink
tasks.max=2
connector.class=io.confluent.connect.jdbc.JdbcSinkConnector
topics=quickstart-SQL_PUBLIC_PERSON,quickstart-SQL_PUBLIC_CITY

connection.url=jdbc:mysql://localhost:3306/gridgain-kafka-mysql
connection.user=demo
connection.password=demo
auto.create=true
7.4. Start Kafka Connect Worker
The following command assumes you are in the directory where the source and sink connector configurations are located:
$KAFKA_HOME/bin/connect-standalone.sh $KAFKA_HOME/config/connect-standalone.properties kafka-connect-gridgain-source.properties kafka-connect-mysql-sink.propertiesCheck the source and sink connectors status. If everything is OK, you will see each connector running two tasks.
For example, if you have curl and jq available on a Kafka Connect worker, you can run:
curl http://localhost:8083/connectors/kafka-connect-gridgain-source | jq; \
curl http://localhost:8083/connectors/kafka-connect-mysql-sink | jq
{
"name": "kafka-connect-gridgain-source",
"config": {
"connector.class": "org.gridgain.kafka.source.IgniteSourceConnector",
"name": "kafka-connect-gridgain-source",
"igniteCfg": "/home/kukushal/Documents/gridgain-kafka-h2/ignite-server.xml",
"topicPrefix": "quickstart-",
"tasks.max": "2"
},
"tasks": [
{
"connector": "kafka-connect-gridgain-source",
"task": 0
},
{
"connector": "kafka-connect-gridgain-source",
"task": 1
}
],
"type": "source"
}
{
"name": "kafka-connect-mysql-sink",
"config": {
"connector.class": "io.confluent.connect.jdbc.JdbcSinkConnector",
"connection.password": "demo",
"connection.user": "demo",
"tasks.max": "2",
"topics": "quickstart-SQL_PUBLIC_PERSON,quickstart-SQL_PUBLIC_CITY",
"name": "kafka-connect-mysql-sink",
"auto.create": "true",
"connection.url": "jdbc:mysql://localhost:3306/gridgain-kafka-mysql"
},
"tasks": [
{
"connector": "kafka-connect-mysql-sink",
"task": 0
},
{
"connector": "kafka-connect-mysql-sink",
"task": 1
}
],
"type": "sink"
}Step 8: Observe Initial Data Load
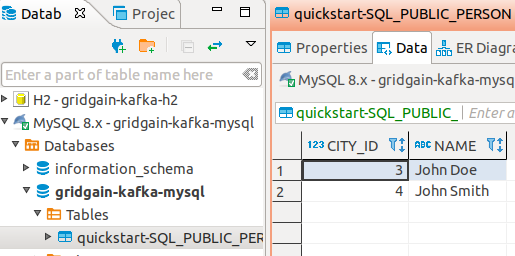
In DBeaver, connect to the gridgain-kafka-mysql database and see the Sink Connector created table quickstart-SQL_PUBLIC_PERSON that already contains 2 entries:
Step 9: Observe Runtime Data Load
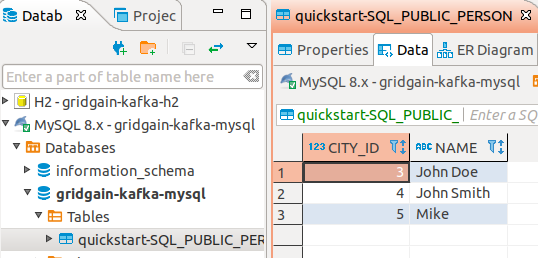
Add more person data to the source cluster. In GridGain Nebula, execute this query:
INSERT INTO Person (id, name, city_id) VALUES (3, 'Mike', 5);In DBeaver, get the latest quickstart-SQL_PUBLIC_PERSON table data and see the new entry appeared:
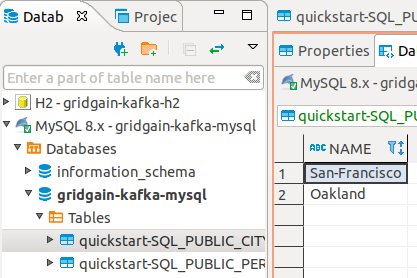
Step 10: Observe Dynamic Reconfiguration
Create a new table called City in the source cluster and load some data into it. In GridGain Nebula, execute the query:
CREATE TABLE IF NOT EXISTS City (id int, name varchar, PRIMARY KEY (id));
INSERT INTO City (id, name) VALUES (3, 'San-Francisco');
INSERT INTO City (id, name) VALUES (4, 'Oakland');
In DBeaver, see the Sink Connector created the new quickstart-SQL_PUBLIC_CITY table containing the 2 entries:
© 2025 GridGain Systems, Inc. All Rights Reserved. Privacy Policy | Legal Notices. GridGain® is a registered trademark of GridGain Systems, Inc.
Apache, Apache Ignite, the Apache feather and the Apache Ignite logo are either registered trademarks or trademarks of The Apache Software Foundation.