
 This article will walk through the steps required to get Kubernetes and Apache Ignite deployed on Amazon Web Services (AWS). The local computer operating system used was Ubuntu and if you follow the steps in this article, you may need to adjust the commands as appropriate for your operating system and environment.
Preliminaries
In order to use AWS, it is necessary to have an account. If you do not have an AWS account, you can create one.
It is also necessary to create ssh keys. For this article, public and private keys were created using ssh-keygen in Linux. Key content was copied to ~/.ssh and the public key was imported into Amazon EC2. It is important to make a note of the Amazon access and secret keys as these will be needed later. A directory called ~/Project was also created for this article.
Install Kubernetes
The Kubernetes web site provides details on running Kubernetes on AWS EC2. Under the supported procedure section, two options are described using wget and curl. Here we'll use curl:
export KUBERNETES_PROVIDER=aws; curl -sS https://get.k8s.io | bash
Depending upon the speed of your Internet connection, this may take a few minutes. Once completed, there is a helpful reminder:
Add '/home/demo/Project/kubernetes/client/bin' to your PATH to use newly-installed binaries.
Here demo is the user name, so you should adjust for your environment.
Let’s add this temporarily to PATH, as follows:
export PATH=$PATH:/home/demo/Project/kubernetes/client/bin
One of the command-line tools we need to use later is kubectl. This is used to control Kubernetes clusters. We can check that it is correctly installed by running:
kubectl --help
This should return detailed information on how to use this command.
Install kops
Next, we need a method to get Kubernetes working on AWS. A tool that can help do this is kops. The Kubernetes web site provides details on installing Kubernetes on AWS with kops.
From this guide, we will use the following installation instructions:
wget https://github.com/kubernetes/kops/releases/download/1.7.0/kops-linux-amd64
chmod +x kops-linux-amd64
mv kops-linux-amd64 /usr/local/bin/kops
The last step above may require sudo if there are insufficient permissions.
We can check that it is correctly installed by running:
kops --help
This should return detailed information on how to use this command. For the remaining setup and installation instructions, we’ll follow this guide, which provides a nice and clear set of instructions on what remaining installation steps are required.
Install AWS CLI Tools
The Amazon web site provides detailed instructions on installing the AWS CLI tools. We’ll use the bundled installer:
curl "https://s3.amazonaws.com/aws-cli/awscli-bundle.zip" -o "awscli-bundle.zip"
unzip awscli-bundle.zip
sudo ./awscli-bundle/install -i /usr/local/aws -b /usr/local/bin/aws
We can check that the CLI tools are correctly installed by running:
aws --version
This should return version information. Next, we need to run:
aws configure
and add the following:
AWS Access Key ID [None]:
AWS Secret Access Key [None]:
Default region name [None]:
Default output format [None]:
We’ll use the access and secret keys we saved earlier. For region name, we’ll use eu-west-1 but you should check the AWS regions more convenient for you. Finally, we’ll use text as the default output format.
Setup Dedicated kops IAM User
We’ll just follow the detailed instructions:
aws iam create-group --group-name kops

aws iam attach-group-policy --policy-arn arn:aws:iam::aws:policy/AmazonEC2FullAccess --group-name kops
aws iam attach-group-policy --policy-arn arn:aws:iam::aws:policy/AmazonRoute53FullAccess --group-name kops
aws iam attach-group-policy --policy-arn arn:aws:iam::aws:policy/AmazonS3FullAccess --group-name kops
aws iam attach-group-policy --policy-arn arn:aws:iam::aws:policy/IAMFullAccess --group-name kops
aws iam attach-group-policy --policy-arn arn:aws:iam::aws:policy/AmazonVPCFullAccess --group-name kops

aws iam create-user --user-name kops

aws iam add-user-to-group --user-name kops --group-name kops

aws iam create-access-key --user-name kops
We need to save the new access and secret keys and then run:
aws configure
We’ll use the new access and secret keys. The remaining information will remain the same.
We also need to export the keys for kops to use them:
export AWS_ACCESS_KEY_ID=<access key>
export AWS_SECRET_ACCESS_KEY=<secret key>
Configure DNS
This step is optional. We’ll keep things simple and use a gossip-based cluster. We just need to ensure that the cluster name ends with .k8s.local.
Create Cluster State Storage
We'll follow the recommended instructions and create:
aws s3api create-bucket --bucket my-kubernetes-example-state-store --region eu-west-1
Adjust the region to suit your needs.
Create Cluster
We’ll set-up some variables for the gossip-based cluster:
export NAME=my-first-cluster.k8s.local
export KOPS_STATE_STORE=s3://my-kubernetes-example-state-store
Let’s check the AWS availability zones:
aws ec2 describe-availability-zones --region eu-west-1
Now let’s generate a cluster configuration:
kops create cluster --zones eu-west-1a ${NAME}
This will use a single master and two worker nodes. By default, the master node is m3.medium and the worker node is t2.medium. For finer control, we can use:
kops create cluster --zones eu-west-1a --node-count=2 --node-size=t2.micro --master-size=t2.micro ${NAME}
However, with more constrained resources, this may limit our options later.
We can edit the description:
kops edit cluster ${NAME}
Finally, let’s create the cluster:
kops update cluster ${NAME} --yes
After a short time, the cluster should be ready and we can check it with the following command:
kops validate cluster
which should give output similar to the following (formatted for readability):
Using cluster from kubectl context: my-first-cluster.k8s.local

Validating cluster my-first-cluster.k8s.local

INSTANCE GROUPS
NAME              ROLE   MACHINETYPE MIN MAX SUBNETS
master-eu-west-1a Master t2.micro    1   1   eu-west-1a
nodes             Node   t2.micro    2   2   eu-west-1a

NODE STATUS
NAME                                        ROLE   READY
ip-172-20-32-224.eu-west-1.compute.internal node   True
ip-172-20-38-70.eu-west-1.compute.internal  master True
ip-172-20-57-172.eu-west-1.compute.internal node   True

Your cluster my-first-cluster.k8s.local is ready
We can check the nodes:
kubectl get nodes
which should give output similar to the following (formatted for readability):
NAME                                        STATUS AGE VERSION
ip-172-20-32-224.eu-west-1.compute.internal Ready  3m  v1.7.2
ip-172-20-38-70.eu-west-1.compute.internal  Ready  4m  v1.7.2
ip-172-20-57-172.eu-west-1.compute.internal Ready  3m  v1.7.2
Install Dashboard
To use the Dashboard, we can first check if it is installed correctly:
kubectl get pods --all-namespaces | grep dashboard
If it is missing, we can install it:
kubectl create -f https://git.io/kube-dashboard
Next, we can run a proxy to the Kubernetes API server as follows:
kubectl proxy
and then open the following in a web browser:
http://localhost:8001/ui
The output should be similar to Figure 1.
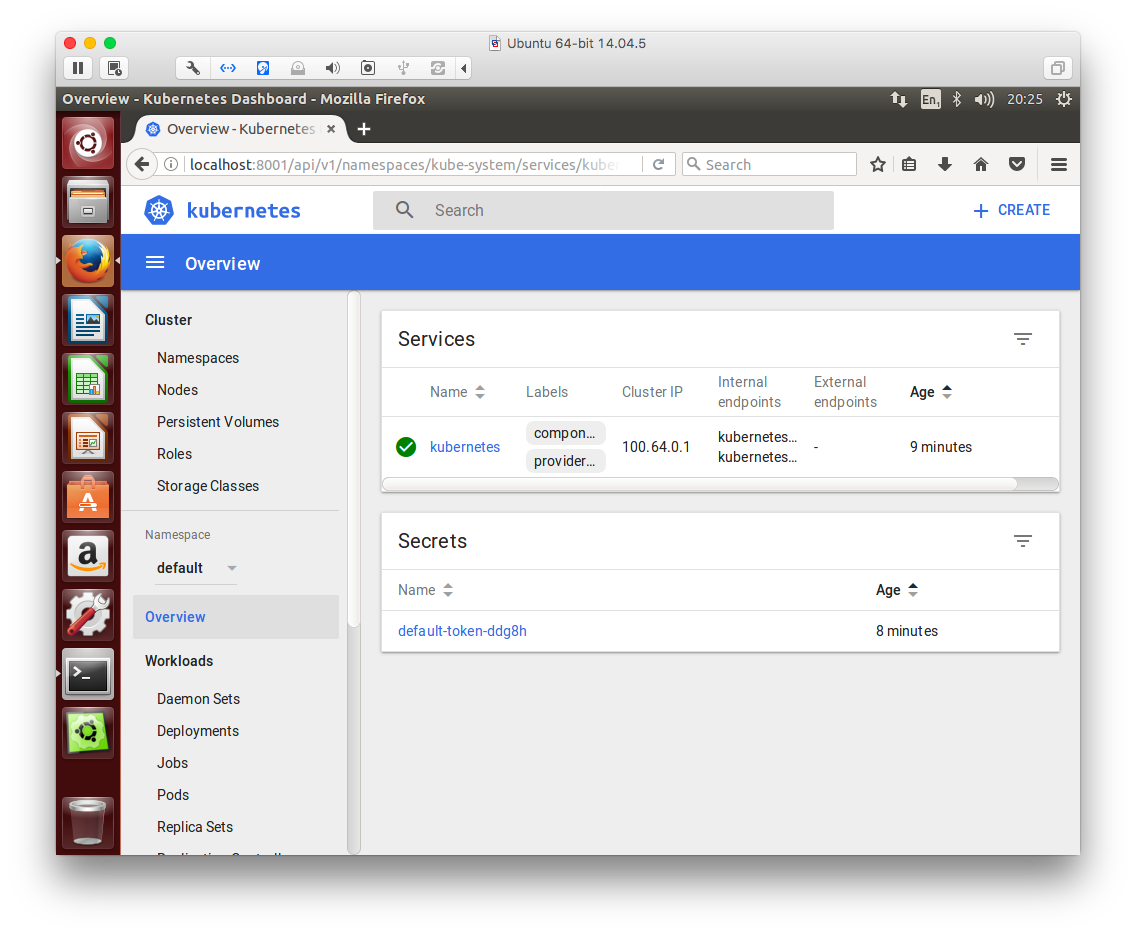
Figure 1. Dashboard Overview
Create Apache Ignite Service
In order to use Apache Ignite nodes, we need the Kubernetes IP finder to create a Kubernetes service that can get the IP addresses of Apache Ignite nodes. Whenever a new Apache Ignite node is started, the IP finder will connect to this special service to get the addresses of existing Apache Ignite nodes. Then, the new Apache Ignite node can find the other cluster nodes and join the Apache Ignite cluster.
To create this IP finder service, we can use the following ignite-service.yaml file:
apiVersion: v1
kind: Service
metadata:
  name: ignite
spec:
  clusterIP: None
  ports:
    - port: 9042 # custom value.
  selector:
    app: ignite
To start this service, we can use:
kubectl create -f ignite-service.yaml
We can check the status of this service from the Dashboard, as shown in Figure 2.
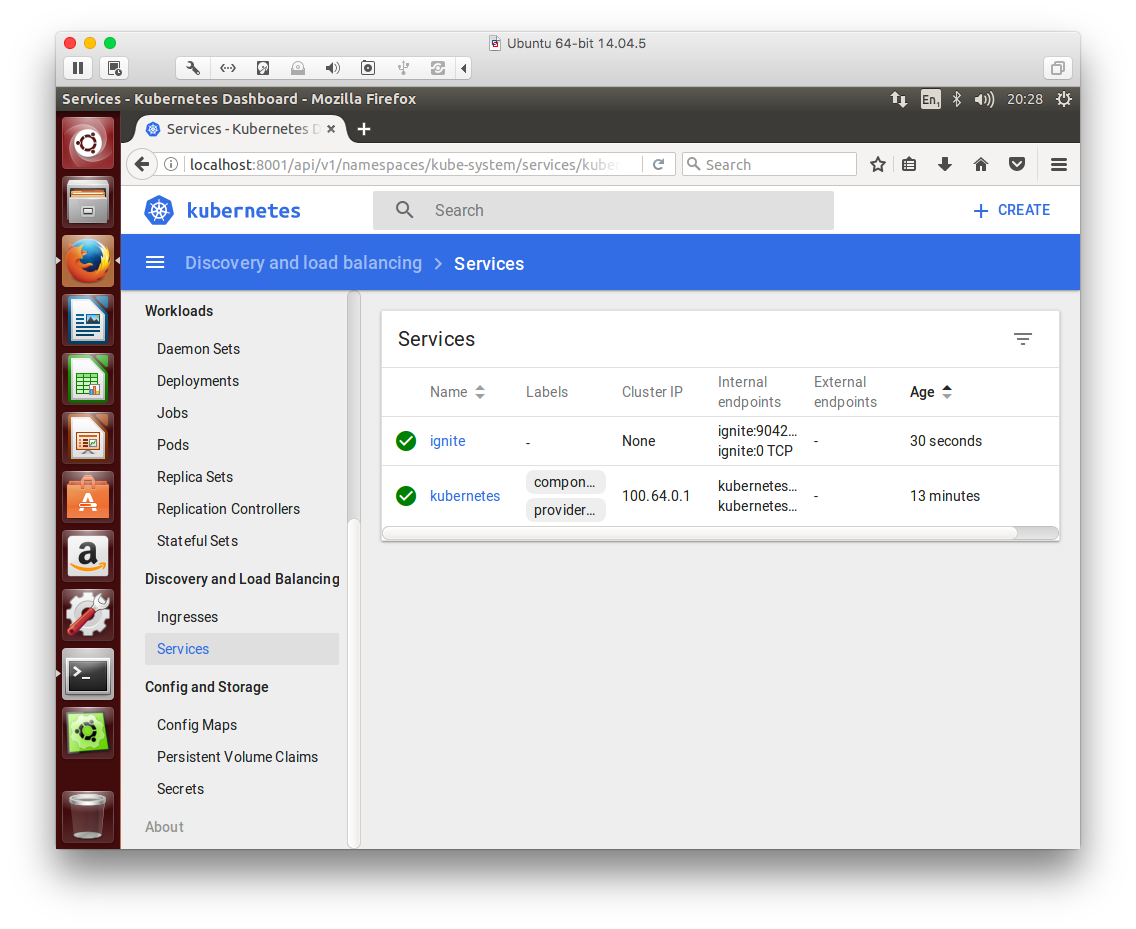
Figure 2. Ignite Service
Next, to deploy an Apache Ignite cluster, we need to do the following:
- Create an Apache Ignite configuration that uses the Kubernetes IP finder.
- Create a Kubernetes YAML configuration for Apache Ignite nodes.
For the first part, an existing Spring XML configuration is already available on GitHub. For the second part, we will create the following ignite-deployment.yaml file:
apiVersion: extensions/v1beta1
kind: Deployment
metadata:
  name: ignite-cluster
spec:
  # Start two Ignite nodes by default.
  replicas: 2
  template:
    metadata:
      labels:
        app: ignite
    spec:
      containers:
        # Custom Ignite pod name.
      - name: ignite-node
        image: apacheignite/ignite:2.1.0
        env:
        - name: OPTION_LIBS
          value: ignite-kubernetes
        - name: CONFIG_URI
          value: https://raw.githubusercontent.com/apache/ignite/master/modules/kubernetes/config/example-kube.xml
        ports:
        - containerPort: 11211 # REST port number.
        - containerPort: 47100 # communication SPI port number.
        - containerPort: 47500 # discovery SPI port number.
        - containerPort: 49112 # JMX port number.
To deploy the new Apache Ignite cluster, we can use the following command:
kubectl create -f ignite-deployment.yaml
Using the Dashboard, we can check that the nodes have been correctly deployed, as shown in Figure 3.
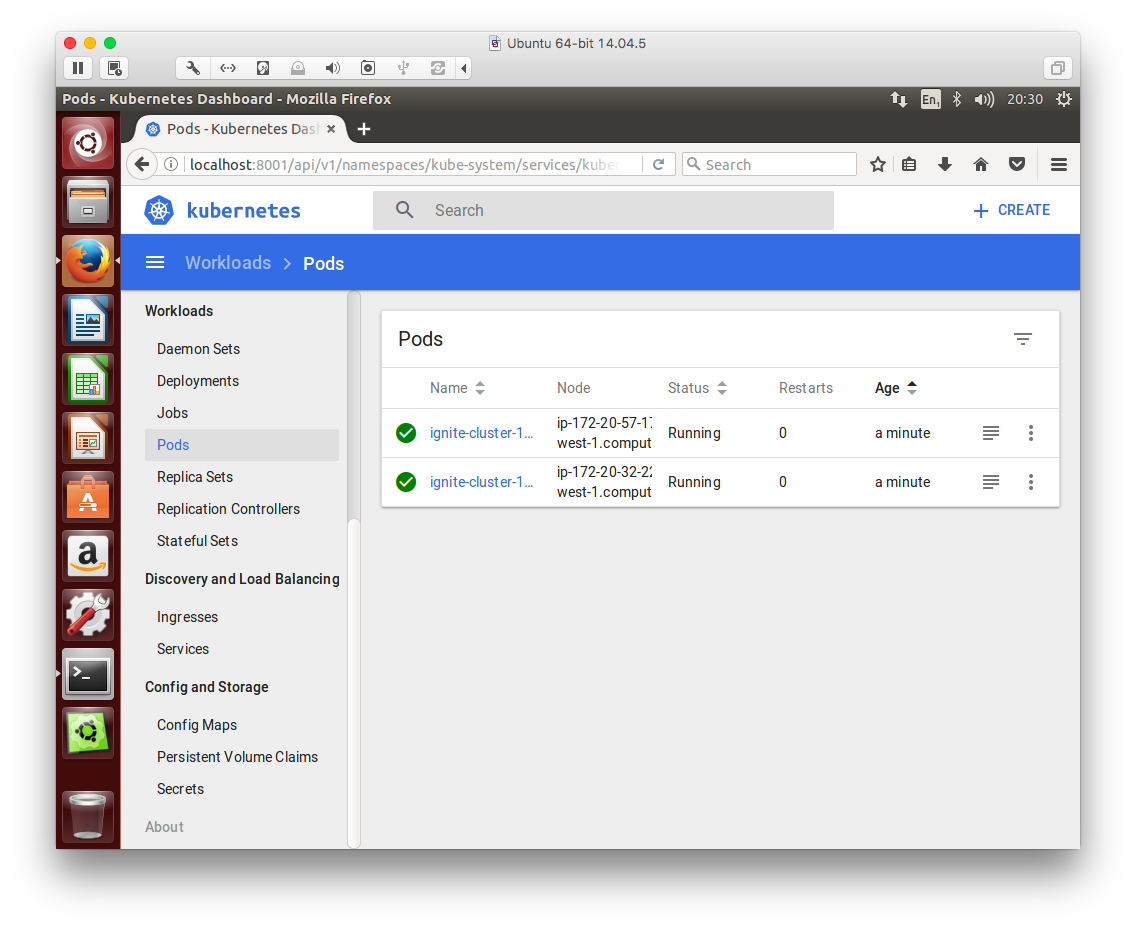
Figure 3. Apache Ignite Nodes
To check that the cluster is running correctly, we can check the log file for one of the nodes, as shown in Figure 4.
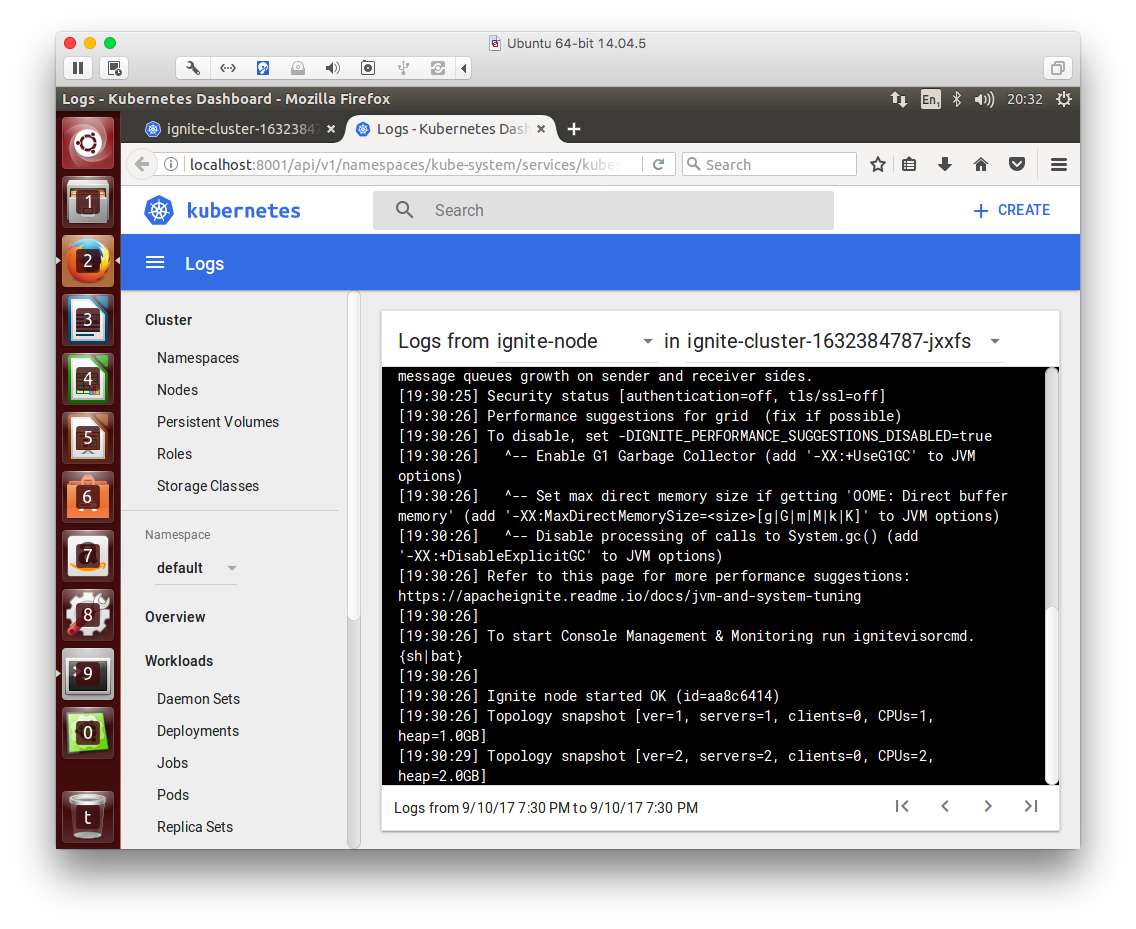
Figure 4. Apache Ignite Cluster
To scale the cluster to 5 nodes, for example, we can use the following:
kubectl scale --replicas=5 -f ignite-deployment.yaml
Delete Cluster
When we have finished, we can delete the cluster:
kops delete cluster --name ${NAME} --yes
Summary
A considerable part of this article has focussed on installing and configuring Kubernetes on AWS. However, once Kubernetes is up and running, we can quickly and easily deploy an Apache Ignite cluster. Ignite can also deployed on other cloud platforms, such as Google Cloud and Microsoft Azure. For example, my colleague Denis Magda has described how to deploy Apache Ignite using Kubernetes on Microsoft Azure.