
This tutorial walks you through the process of creating a Spring Cloud-based RESTful web service that uses Apache Ignite as a high-performance, in-memory database. The service is a containerized application that uses HashiCorp Consul for service discovery and interacts with an Apache Ignite cluster via Spring Data repository abstraction. For containerization, we use Docker.
Apache® Ignite™ is an in-memory computing platform for developing scalable, real-time applications. We can use Ignite as a database, a caching platform that accelerates data processing. For example, you can use Ignite to save data in high-performance storage and then stream and process the data.
Configuration and Setup
Configuring Consul Service Registry
For your convenience, you can use Consul's official Docker image (be sure to install Docker first).
Start the Consul docker image:
docker run -d -p 8500:8500 -p 8600:8600/udp --name=consul consul agent -server -ui -node=server-1 -bootstrap-expect=1 -client=0.0.0.0
Don't forget to stop and remove the containers that you no longer need!
Creating a Basic Spring Cloud Application
As Josh Long always says, start creating your application by visiting https://start.spring.io.
We want Spring Web and Spring Consul Discovery. Spring Web is one of the easiest tools to use for creating REST applications. Spring Consul Discovery enables you to combine multiple instances of a Spring application into one service.
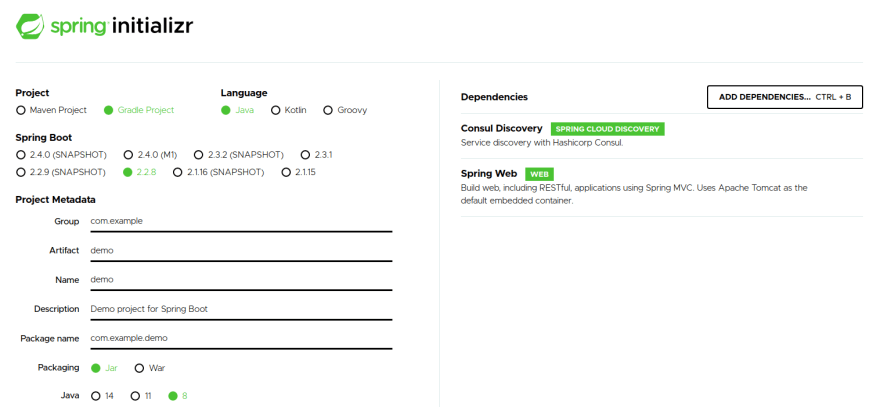
- Set up your project via Spring Initializr (as shown on screenshot).
- Press “Generate” and download the archive that contains your project.
- Open the archive via your preferred IDE (for example, Intellij IDEA).
- (Optional) Replace the application.properties file with application.yml. You can use properties format, but, for this tutorial, we use YAML format.
In application.yml, we add a basic configuration for Sprint Cloud so that our application is named and Consul Service Discovery is enabled:
spring:

  application:

    name: myapp

    instance_id: 1

  cloud:

    consul:

      enabled: true

    service-registry:

      enabled: true
Adding Apache Ignite Dependencies
Get the latest versions of Apache Ignite at Maven Central and add them to the build configuration:
implementation 'org.apache.ignite:ignite-spring-data_2.2:2.8.1'

compile group: 'org.apache.ignite', name: 'ignite-core', version: '2.8.1'

implementation 'org.apache.ignite:ignite-spring-boot-autoconfigure-ext:1.0.0'
Configuring Discovery of Apache Ignite Nodes
How do we make Apache Ignite nodes discover each other? Apache Ignite has an IpFinder component, which handles registration and discovery of nodes. For specific information, refer to Apache Ignite docs.
To integrate IpFinder and the Consul service registry, we use the Spring Cloud Discovery module. We can use the module with a multitude of discovery services (for example, Zookeeper).
There is a simple implementation of IpFinder for HashiCorp Consul, but there are many third-party implementations of IpFinder on GitHub.
Setting Up Spring Cloud and Apache Ignite
Because we use Ignite's autoconfigure module, the configuration is a relatively simple process. Put the following in your application.yml file:
ignite:

  workDirectory: /opt/ignite/
Apache Ignite stores its data and logs in the work directory.
Now we need to add support for Ignite Spring Data repositories. One of the ways to add support is via Java Configuration: Just add an EnableIgniteRepositories annotation with packages of repositories as a parameter.
@Configuration

@EnableIgniteRepositories(value = "com.github.sammyvimes.bootnite.repo")

public class IgniteConfig {
}
Before compiling the application, we need to resolve a few issues. Ignite does not support Spring Data’s version of H2. Therefore, to fix the compilation, we must manually overwrite H2’s version in the build configuration (whether Gradle or Maven):
ext {

        set('h2.version', '1.4.197')

 }
Also, Spring Cloud Consul has known issues with hystrix, so we’ll exclude it:
implementation ('org.springframework.cloud:spring-cloud-starter-consul-discovery') {

        exclude group: 'org.springframework.cloud', module: 'spring-cloud-netflix-hystrix'

 }
And, lastly, in regard to Spring Data BeanFactory, there is a problem: BeanFactory looks for a bean that is named igniteInstance, and autoconfiguration provides a bean that is named ignite. There is a pending pull request that fixes this problem.
For now, we’ll fix the BeanFactory problem by hacking our Java Config:
@Configuration

@EnableIgniteRepositories(value = "com.github.sammyvimes.bootnite.repo")

public class IgniteConfig {
@Bean(name = "igniteInstance")

    public Ignite igniteInstance(Ignite ignite) {

        ignite.active(true);

        return ignite;

    }
}
Creating Apache Ignite Spring Data Repositories and Services
We’ll create a CRUD service that is based on the Apache Ignite Spring Data repository.
We start with a model. Yes, this model is the most obvious example in the world, but here goes: the notorious Employee class:
public class Employee implements Serializable {
private UUID id;
private String name;
private boolean isEmployed;
        // constructor, getters & setters

}
Now, because we added a model, we must add a configurer bean to the configuration:
   @Bean

    public IgniteConfigurer configurer() {

        return igniteConfiguration -> {

            CacheConfiguration cache = new CacheConfiguration("employeeCache");

            cache.setIndexedTypes(UUID.class, Employee.class);
            igniteConfiguration.setCacheConfiguration(cache);

        };

    }
When the application starts, it deploys the employeeCache. The cache contains indexes that speed up queries for the Employee entity.
Next, as with any Spring Data storage service, we create a repository and a service:
@Repository

@RepositoryConfig(cacheName = "employeeCache")

public interface EmployeeRepository

        extends IgniteRepository<Employee, UUID> {

    Employee getEmployeeById(UUID id);

}
Notice the RepositoryConfig annotation. We connect our repository to the cache that will be backing it. Remember that we created a cache with "employeeCache" string as a name.
Next, we create the dead-simple service that will use our repository:
@Service

@Transactional

public class EmployeeService {
private final EmployeeRepository repository;
    // constructor injection FTW

    public EmpoyeeService(final EmployeeRepository repository) {

        this.repository = repository;

    }
    public List<Employee> findAll() {

        return StreamSupport.stream(repository.findAll().spliterator(), false)

                .collect(Collectors.toList());

    }
    public Employee create(final String name) {

        final Employee employee = new Employee();

        final UUID id = UUID.randomUUID();

        employee.setId(id);

        employee.setEmployed(true);

        employee.setName(name);

        return repository.save(id, employee);

    }

}
Two methods, create and findAll, are just what we need to showcase how to use Ignite with Spring Data.
Setting Up REST Controllers
Now, we’ll configure some endpoints, so we can access and modify our storage. A simple controller works just fine:
@RestController

@RequestMapping("/employee")

public class EmployeeController {
private final EmpoyeeService service;
    public EmployeeController(final EmployeeService service) {

        this.service = service;

    }
    @GetMapping

    public ResponseEntity<List<Employee>> employees() {

        return ResponseEntity.ok(service.findAll());

    }
    @PostMapping

    public ResponseEntity<Employee> create(@RequestParam final String name) {

        return ResponseEntity.ok(service.create(name));

    }
}
Congratulations, you've created your app!
Now, you can start your app, create data by sending a POST-request to /employee, and retrieve data by sending a GET-request to the URL that you used for the POST-request.
Of course, our application is very performant, but where is all the fun of distributed storage?
Deploying Applications in Docker
To create and manage application nodes, we use Docker.
First, in the root of the project, we create a Docker file for our application:
FROM adoptopenjdk:8-jre-hotspot

RUN mkdir /opt/app && mkdir /opt/ignite

COPY build/libs/bootnite-0.0.1-SNAPSHOT.jar /opt/app/app.jar

CMD ["java", "-jar", "/opt/app/app.jar"]
Dead simple: Get OpenJDK, create a directory for our app, copy the application’s binaries inside an image, and create a default command to start the application.
Now, in the root directory of the project, run gradle build and docker build -t ignite-test-app:0.1 -f .dockerfile .
Next, via Docker, we start two instances of our app simultaneously.
We wrote the following shell-script. The script will help us fire up the nodes:
For MacOS:
export HOST_IP=$(ipconfig getifaddr en0)

docker run -P -e HOST_IP=${HOST_IP} -e DISCO_PORT=$2 -p $2:47500 --name $1 ignition
For Linux:
export HOST_IP=$(ip -4 addr show docker0 | grep -Po 'inet \K[\d.]+')

docker run -P -e HOST_IP=${HOST_IP} -e DISCO_PORT=$2 -p $2:47500 --name $1 ignition
What we are doing here is getting a host IP address so we can use port forwarding and so the nodes can talk to each other. We use -p arguments to create port-forwarding rules for the Docker container and we use -e arguments to save the values of the outer ports in the container’s environment so we can use these values later in a configuration like the following:
spring:

  application:

    name: myapp

    instance_id: 1

  cloud:

    consul:

      enabled: true

      host: ${HOST_IP}

    service-registry:

      enabled: true
ignition:

  disco:

    host: ${HOST_IP}

    port: ${DISCO_PORT}
We added custom configuration parameters ignition.disco.host and ignition.disco.port, which we will use in our custom IP finder. Notice that we also changed the Consul configuration by adding the host IP address.
Now, after we change our Ignite java configuration, we'll be done:
@Bean

    public TcpDiscoveryConsulIpFinder finder(final ConsulDiscoveryClient client,

                                             final ConsulServiceRegistry registry,

                                             final ConsulDiscoveryProperties properties,

                                             @Value("${ignition.disco.host}") final String host,

                                             @Value("${ignition.disco.port}") final int port) {

        return new TcpDiscoveryConsulIpFinder(client, registry, properties, host, port);

    }
    @Bean

    public IgniteConfigurer configurer(final TcpDiscoveryConsulIpFinder finder) {

        return igniteConfiguration -> {

            CacheConfiguration cache = new CacheConfiguration("employeeCache");

            cache.setIndexedTypes(UUID.class, Employee.class);
            igniteConfiguration.setCacheConfiguration(cache);

            final TcpDiscoverySpi tcpDiscoverySpi = new TcpDiscoverySpi();

            tcpDiscoverySpi.setIpFinder(finder);
            igniteConfiguration.setDiscoverySpi(tcpDiscoverySpi);

        };

    }
To test that everything works as it should, we do the following:
- Fire up an application instance: ./starter/start.sh test1 30000
- Post some data to the instance; for example, curl -d 'name=admin' http://localhost:32784/employee. Different containers use different ports.
- Determine which port to use by executing “
docker ps” in your terminal and looking for the port forwarding rules of the container (a rule looks like 0.0.0.0:32784->8080/tcp). - Fire up another node: ./starter/start.sh test2 30001
- Stop the first node (you can use Ctrl+c, if you started the container from the terminal).
- Execute a get request to a second node and verify that the data that you obtained from this request and the data that you obtained from your first request are the same. curl http://localhost:32785/employee
Notice that the port in this curl command and the port in the previous curl command are not the same, because the two application instances occupy different ports.
Conclusions
As we saw, with a little effort, Ignite can be integrated into an existing Spring Cloud infrastructure. I hope that you were able to try the coding example and get a feel for the combined solution. Pay the most attention to port forwarding and to the host IP configuration. Also, to marry Spring and Apache Ignite, we used a couple of hacks. But, don’t worry – those were addressed in the latest release and are no longer necessary.