
With its latest release, Apache® Ignite™ 2.0 introduced support for DDL, redesigned off-heap memory architecture, distributed algebra, Spring data integration, support for Hibernate 5, Rocket MQ Integration, as well as plenty of improvements to the currently existing Apache Ignite feature set to enhance speed and performance. Another key feature rolled in is multi-cluster support for Apache Ignite Web Console; which means you can monitor and manage multiple Ignite clusters in parallel from a single instance of Ignite Web console deployed on your system.
In this tutorial, I will show you how to start two separate clusters on your system and connect it with an instance of Ignite Web Console deployed locally.
First, you need to deploy an instance of Ignite Web Console on your system environment. It’s a pretty straightforward process; you can follow the instructions here. I have it deployed on my laptop and this is how it looks in the browser at http://localhost:9000/

Notice that on the top right corner, it says- No clusters available
Starting Two Ignite Clusters on Single Host
After deploying the web console, let’s start two Ignite nodes on two separate clusters on the same machine. For this, we will need two configuration files both pointing to different ports. For example:
Cluster one configuration

Cluster two configuration
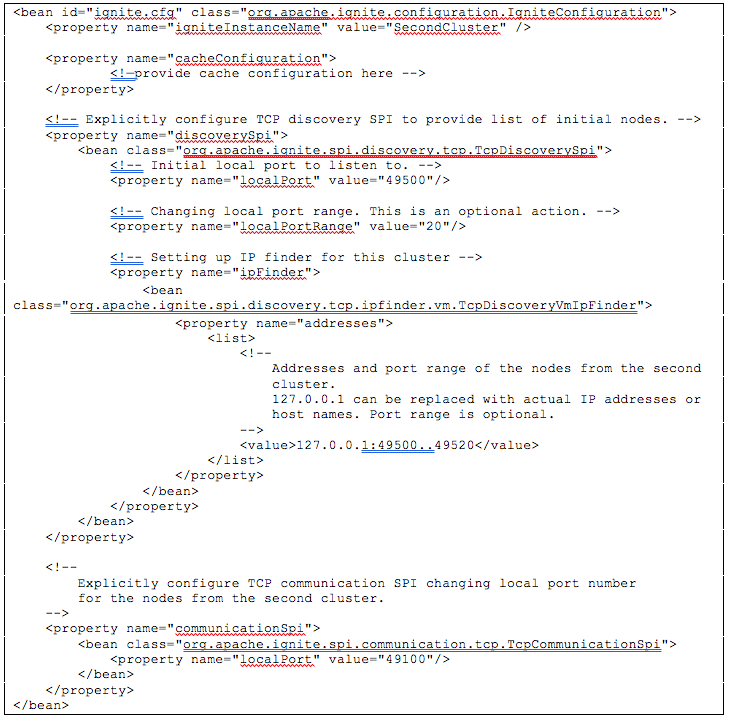
Notice the change in port range and local port value. Also note that for this example I have installed Apache Ignite version 2.0 and placed these configuration files in ${IGNITE_HOME}/examples/config/ directory.
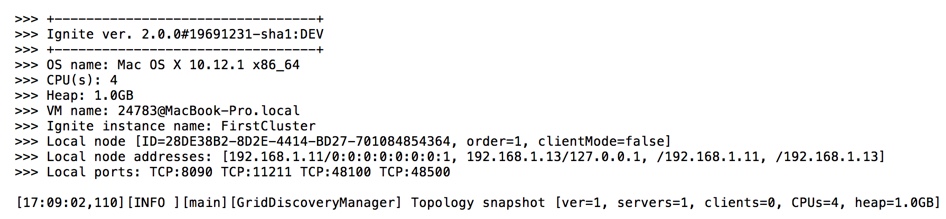
Start cluster one
In the terminal window of my laptop, l started my first Ignite cluster with the above configuration, using the following command:
./ignite.sh -v -J-DIGNITE_JETTY_PORT=8090 examples/config/first-cluster.xml
As you can see, I’ve started the first Ignite cluster with one node. You can start as many nodes as you like with the same command.
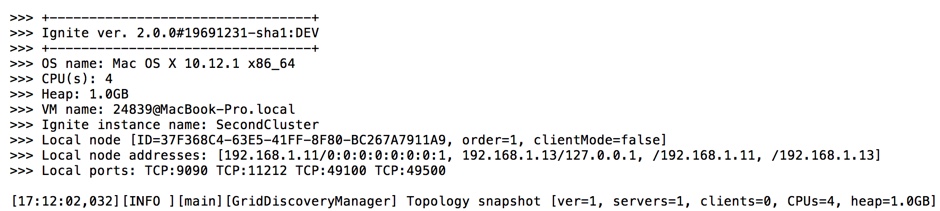
Start cluster two
Similarly, in another terminal window of my laptop, I’ve started my second Ignite cluster, using the following command:
./ignite.sh -v -J-DIGNITE_JETTY_PORT=9090 examples/config/second-cluster.xml
Note that we need to set different values for JETTY_PORT parameter because we are starting the nodes on a single host.
Connecting Web Console to Clusters
To connect the Web Console to Ignite clusters, we need to run Ignite Web Agent. Ignite Web Agent is a standalone Java application that acts as a proxy between the Web Console and the Ignite Cluster.
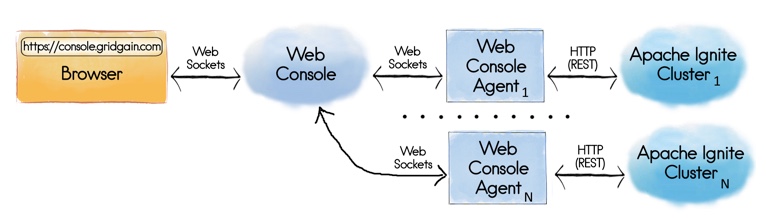
To enable multi-cluster support on a single host, I have started two web agents in the terminal windows of my laptop. Each web agent connects to a running cluster started above, as well as the Web Console. To do this, copy and unzip ignite-web-agent-2.0.0 from $IGNITE_HOME/modules/web-console/web-agent/target directory and in a new terminal window type the following:
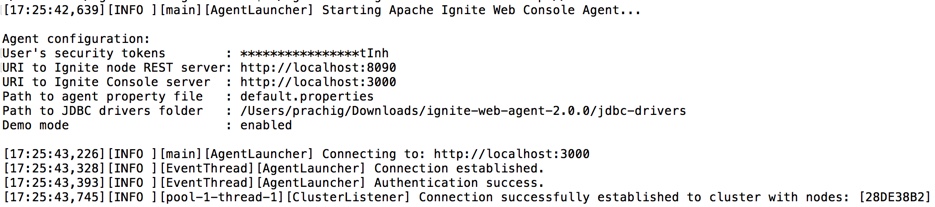
./ignite-web-agent.sh --node-uri http://localhost:8090
The above command will connect the web agent to the first cluster, as shown below:
Similarly, start the second web agent to connect to the second cluster:
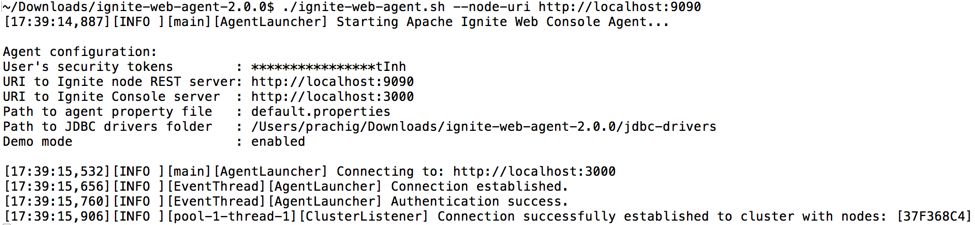
./ignite-web-agent.sh --node-uri http://localhost:9090
As you can see below, the second web agent is connected to the second cluster.
Now that the everything is up and running, go back to the Web Console page on the browser. You can see that now there are two clusters connected to the web console:
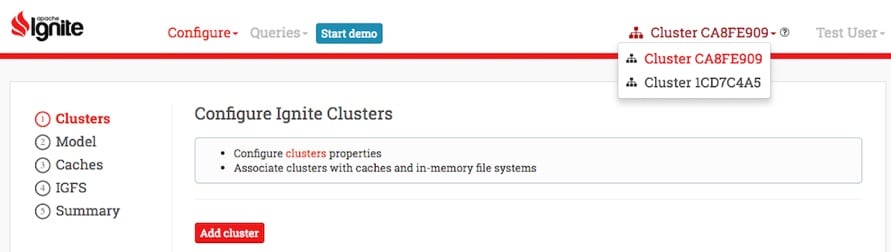
That’s it! Once the Web Console is connected to the clusters, you can monitor them, or run SQL queries on the data stored on these clusters and monitor their (queries’) performance – all through a single Ignite Web Console instance. For more information, see Apache Ignite Web Console documentation.