
I think all of us are familiar at this point, one way or another, with the phrase: “Moving to the cloud.”
 It seems to me that the development community is also hip to the new lingo, according to Gartner, they predict that over $1 Trillion Dollars in IT Spending will be affected by the cloud by the year 2020 alone. That’s an awfully large amount of purchasing power! Companies are shifting the way they spend away from Traditional IT offerings and moving to more Cloud-based SaaS models.
With the boom of DevOps, organizations want to give their development communities freedom of how they want to deploy infrastructure. The current landscape of Infrastructure/Platform as a Service doesn’t figure to be going anywhere anytime soon, as most industry leaders in every market have been early adopters of Cloud Computing and all the bells and whistles that come along with it.
I can assure you I am not here to talk about all of that though! My focus in this post is to talk about the value Apache® Ignite™ can bring in a Cloud Environment, specifically in this case, Amazon Web Services (AWS). Apache Ignite is an in-memory computing platform, it has everything you are looking for with traditional caching technology plus a whole lot more. It’s easy to see the advantages of moving traditional applications to a cloud computing model; organizations want the capability of scaling up and out easily, all while taking the IT administration out of the picture.
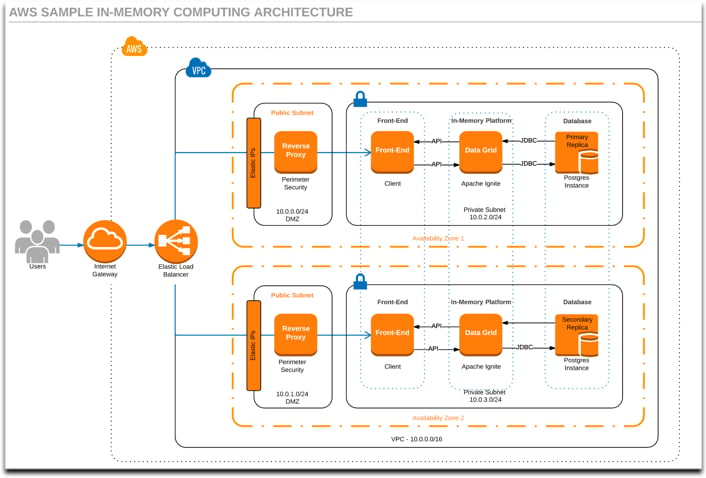
Similar drivers move folks to leveraging Apache Ignite, where speed and scaling of applications is paramount. You can see a sample architecture I have mocked up here... where Apache Ignite sits in between the front-end clients and the back-end database. Please Note: This is the most basic caching use case and does not scratch the surface of what Apache Ignite is capable of.
Alas, this is just a getting started post, so let’s set some expectations…
1.) We will be setting up a basic t2.micro instance (it’s free!). The image that we will utilize is the newest version of the Amazon Linux AMI although you have the choice to use whatever you like (Just make sure there’s Java installed!).
2.) We will not be using the Apache Ignite community AMI’s, we will start completely from scratch and do a scp of the files from local machine.
3.) My host machine will be CentOS (Note: Connection to the Instances is mostly via SSH via Linux or a PuTTY connection via Windows… sorry MacOS fans.
4.) We will kick off an Ignite Node only, in future posts we will talk about getting a multi-node cluster up and running example code.
5.) We will not be using Amazon S3 buckets in this use case.
6.) I assume everyone trying this out has their own Amazon account and at least some familiarity with EC2.
Let’s Get Started
Step 1: Choose the Amazon Machine Linux (again for the purpose of this post – lets go free tier). The main dependency that Apache Ignite requires is Java, so that is a main reason why we’re choosing to use Amazon Linux. Again, you can install any version of AMI, the steps will generally be the same.

Amazon offers you the capability of configuring the whole AMI, these configuration options very from the amount of CPU’s to the type of storage you’d like to utilize. If you’re lazy like me, you will see an option at the bottom of the bar to “Review and Launch”. This essentially gives you all the defaults for this image type, so you can just quickly get the image up and running.
Step 2: Create the Security Key Pair for your new image.
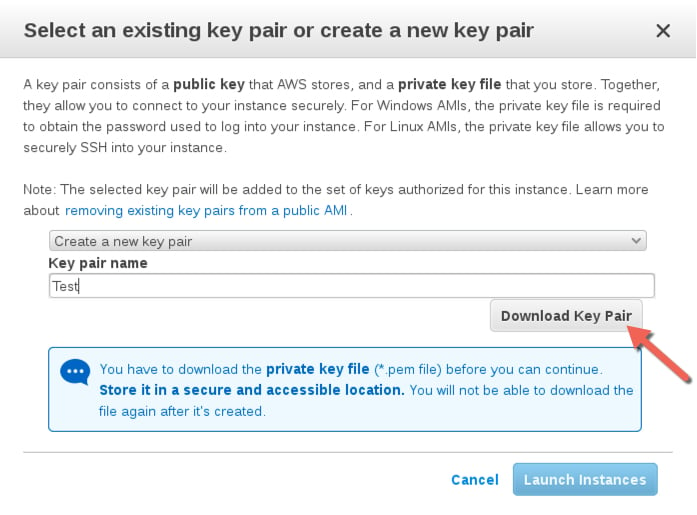 This key pair is needed before you connect to the Amazon instance, please make sure you download it to a directory that is readable from your current user’s permission level. When I set this up, I just placed the .pem file on my desktop. We will need to ensure that the key is not publically viewable for SSH to work, we will run this command in linux(make sure you use the name you gave to keypair):
chmod 400 Test.pem
Now that we have downloaded and set the proper permissions on the key file Amazon provided for us, we are now ready to connect to the instance.
Step 3: Download Apache Ignite.
The next step in the process is going to be to go to the Apache Ignite site and download the version of Apache Ignite you’d like to use. I personally will be installing version 2.1 for this blog series. Navigate to the Apache Ignite website here for the download. Once you download the package, we will be able to transfer the files onto our Amazon Cloud Instance.
Step 4: Transfer the Apache Ignite files from local to cloud.
Amazon allows a direct POSIX “scp” or secure copy command, that will allow you to place the zip file on the EC2 Instance(Note: You may have to unzip that folder). You need to make sure you include the key pair file (.pem) in the secure copy command. You will notice that you will connect to your instance using its Public DNS. You can find a sample snippet of the command run to copy below:
[foti@localhost Downloads]$ scp -i "Test.pem" /home/foti/Downloads/apache-ignite-2.1.0-src ec2-user@ec2-13-59-3-240.us-east-2.compute.amazonaws.com:
(Note: In Linux, you can include a colon at the end of the path for the ability to copy directly into the home directory of that server.)
Step 5: Navigate to the bin directory and run the ignite.sh file.
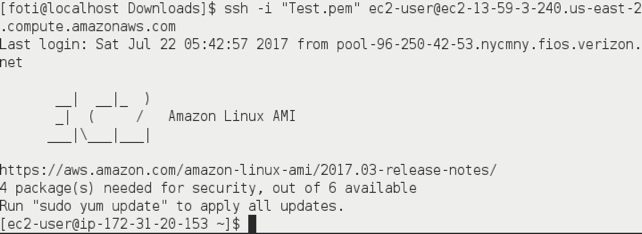 You will be able to connect to your newly created image using the simple ssh command (again if you are using Windows as your host machine, you can use an ssh client to achieve the same connectivity). You can find an example of how to connect to the instance on the Amazon EC2 console. You can find a sample below:
ssh -i "Test.pem" ec2-user@ec2-13-59-3-240.us-east-2.compute.amazonaws.com
Please note that in most cases the username above will be correct, however please ensure that you read your AMI usage instructions to ensure that the AMI owner has not changed the default AMI username (In our case, ec2-user).
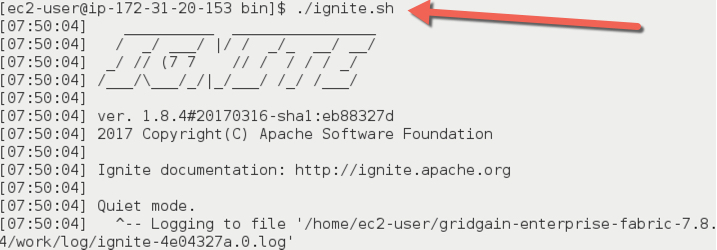
Step 6: Start Ignite Node.
Our last step in this process is to navigate into the bin directory of your Apache Ignite download directory inside your cloud instance. Once inside the bin, you can run the ignite shell script which starts an ignite node. The output if successful will display something similar below:
These are the steps needed to get an Ignite node up and running in the cloud. In the next part of this blog, we will talk about how to pass a configuration file to Ignite before we start it, so that we can pick up multiple Ignite nodes. Next time, we will attempt to add additional nodes to the cluster and run sample code via our Amazon Instance.