
In this second article of the three-part “Getting Started with Ignite Data Loading” series, we continue our review of data loading into Ignite tables and caches. However, we now focus on Ignite CacheStore.
CacheStore Load Facility
Background
Let’s review what was discussed about CacheStore in “Article 1: Loading Facilities.”
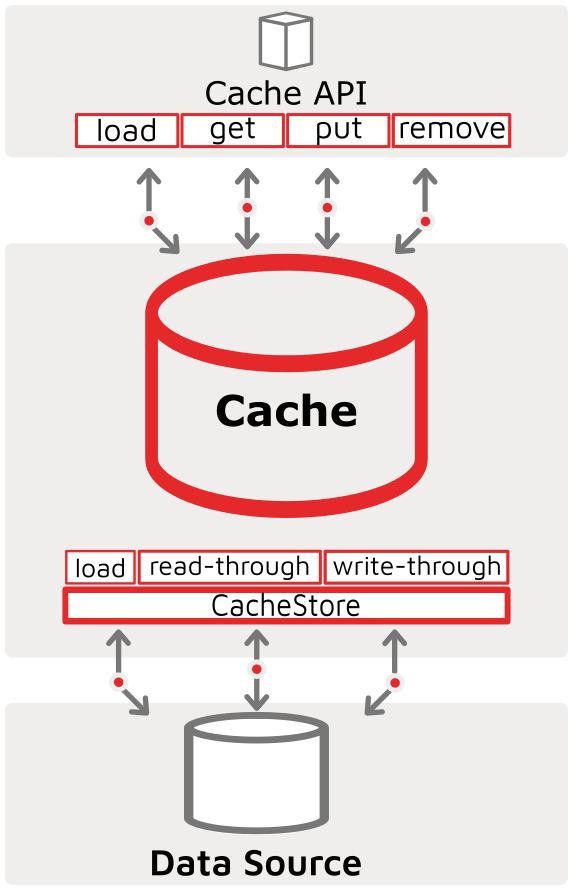
The CacheStore interface of Ignite is the primary vehicle used in the in-memory data grid (IMDG) scenario for synchronization with external, third-party persistence stores. The Ignite CacheStore interface implements the primary read-through and write-through features of the cache and of the cache’s underlying source. Additionally, Ignite has a CacheLoad interface that is used for hot-loading the cache at initialization time (although hot-loading is not limited to initialization-time execution). The diagram illustrates the relationship among the cache, its API, the CacheStore, and the 3rd party data source. It is important to understand that CacheStore implements the read-through, write-through, and cache-load functionality that is inherent to the Cache API.
When a key entry is not found in a cache the cache uses the CacheStore to read-through to the back-end data source to get the entry. Similarly, when updates (i.e. puts) or deletes (i.e. removes) happen to the cache entries, the CacheStore is used to write the changes to the underlying data source.
Finally, when signalled to do so, the node uses the cache’s registered CacheStore to load data from the underlying data source into the cache.
In this article we focus on loading data into caches from data sources using a CacheStore.
For the third part of the blog series that discusses how to use the Ignite Data Streamer facility to load data in large volume and with highest speed, click here.
CacheStore in the Ignite IMDB Pattern
In the article “Getting Started with Ignite Patterns,” we talked about the architectural patterns that relate to data loading. In this article, we use a horizontal pattern that leverages Ignite as an IMDB that supports the Data Integration Hub architecture. The diagram for the pattern is as follows:
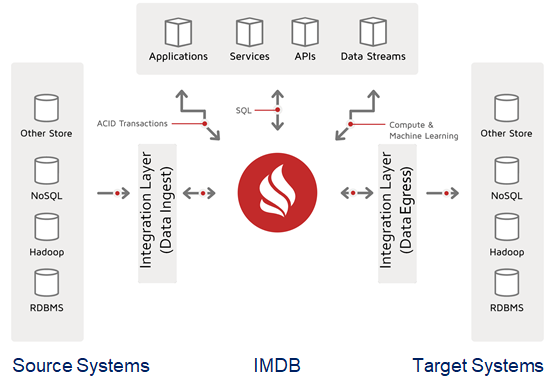
Because we are using an IMDB pattern, not an in-memory data grid (IMDG) pattern, data is not being synchronized to third-party persistence. We have a full-fledged database, we are ingesting the data that we will manage, and we are forwarding relevant data events to upstream, target systems.
CacheStore can be used for synchronization to a third-party data store. However, in this scenario, we use only the CacheStore data-loading capabilities. In fact, a utility adapter (called the “CacheLoadOnlyStoreAdapter”) is used for the express purpose of building a LoadOnly CacheStore instance. The following diagram depicts the LoadOnly type of CacheStore and its position in the horizontal data pattern for data ingest:

The red ellipse in the diagram indicates that the data-ingest function is performed by a LoadOnly type of CacheStore. The following diagram shows the data-load flow that happens with a CacheStore loader:
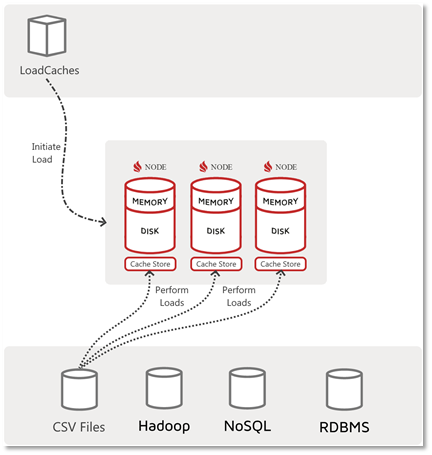
In the CacheStore case, the initiator is an Ignite client application that signals the cluster to effect the load of the data. The initiator may also provide arguments for what to load and where, but it does not itself touch, read or write the actual data.
LoadOnly CacheStore Project
In this article, we document how to create a LoadOnly CacheStore project for data ingestion into Ignite caches and tables. The process for constructing the project is discussed in sections 1 through 6. A detailed version of the project can be downloaded from GitHub: https://github.com/GridGain-Demos/ignite-sales-data-loading-demo
1. Standard Web Console Maven Project
When we look at the default Ignite Maven project that the GridGain Web Console generates, we see a well-organized structure and the set of components that we will use as a starting point to build our LoadOnly CacheStore and our load client. I created a video tutorial on how to use the Web Console to build a CacheStore-based project based on a MySQL/MariaDB Sales database. The tutorial explains how the GridGain Web Console can generate a fully formed Maven Java project. The project has a complete Ignite configuration, with cluster configuration and cache configurations that are patterned on what is found, through introspection, in the targeted data source.
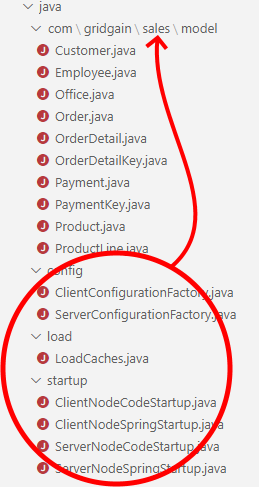
A few interesting elements of the default Web Console project are:
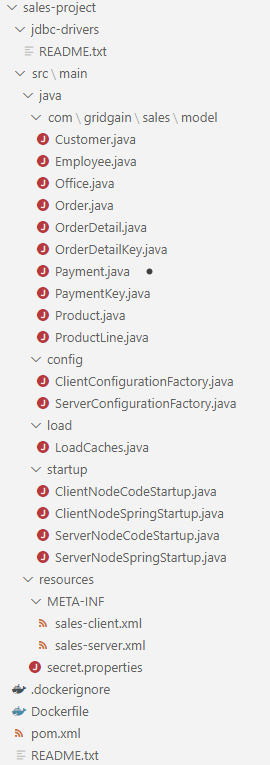
- The model folder holds the Java object model representation of the caches and tables that you “imported” via the Import Wizard.
- The Config folder holds the cluster-configuration factory classes.
- The load folder holds a client application that uses CacheStore to initiate the data load.
- The Startup folder holds classes that start a server or client node by using the configuration loaded from code or XML Spring Bean.
- The Resources folder holds the XML Spring bean server/client configurations and a properties file, which is used to externalize configuration parameters.
- The Docker/.dockerignore files support the initiation of a docker image that is extended to the project.
- The pom.xml file instructs Maven on how to build the project and what external libraries to include.
- The Jdbc-drivers folder holds jar files that are included for compilation into the project.
- The README.txt text file describes the project.
2. Modify for Reusability and Shared Use
We will perform the following changes to the standard Web Console Maven project, to make the project more independent and to make it usable for other purposes:
a. Adjust Maven pom.xml.The Maven pom.xml file is the blueprint for building the project. We will adjust it to parameterize it (for ongoing use and re-use) and make some customizations:
Add the following reusable properties to the file, which are referenced later in the file:
<properties>
    <ignite.version>2.8.1</ignite.version>
    <java.version>1.8</java.version>
</properties>
We can use the reusable properties to change from hard-coded values, as per the configuration wizard, to values that may change with the project over time, such as:
<version>${ignite.version}</version>
Add additional libraries referenced in the project:
<!-- https://mvnrepository.com/artifact/org.apache.commons/commons-csv -->
<dependency>
    <groupId>org.apache.commons</groupId>
    <artifactId>commons-csv</artifactId>
    <version>1.5</version>
</dependency>
<!-- https://mvnrepository.com/artifact/mysql/mysql-connector-java -->
<dependency>
    <groupId>mysql</groupId>
    <artifactId>mysql-connector-java</artifactId>
    <version>5.1.48</version>
</dependency>
For our project, we may want to leverage existing libraries (for example, in this case, CSV and MySQL libraries).
b. Rename the properties file. We will rename the file, from a generic “secrets.properties” name to a project-specific name. Renaming enables us to separate the properties files that are deployed to Ignite runtime, so they do not interfere with each other. For example, assume that both a Sales project and an HR project have a secret.properties file (for example, sales-1.0.0.jar and hr-1.0.0.jar) in their deployed jar files. In this case, the Java runtime does not have visibility to both properties files. The runtime can read only the properties file that is loaded first (dependent on the class loader, the order of jar- file loading, and so on).
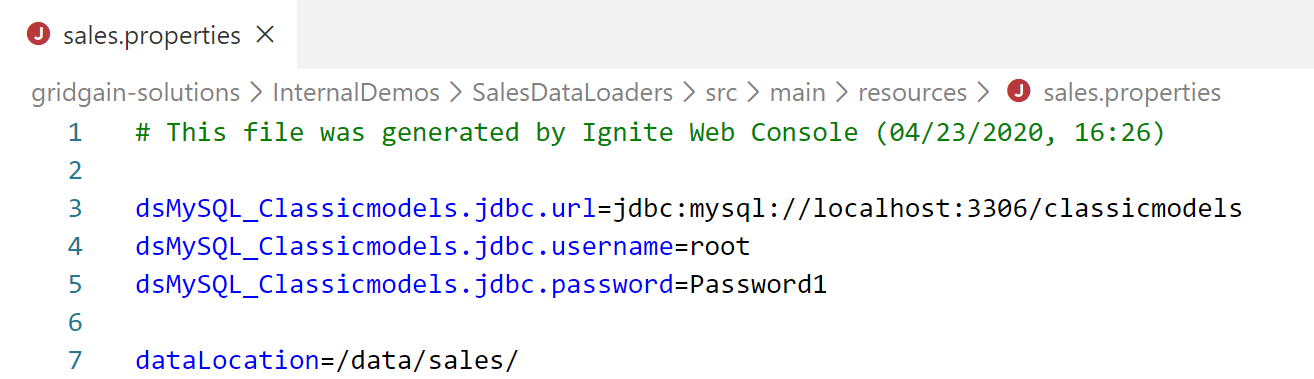
Here, we changed the name to “sales.properties” (to reference the business area that we are working with) and added a property (dataLocation). The property, which can be used in our configuration, eliminates the need for hard-coding a location.
c. Move packages. In the out-of-the-box Web Console Maven project, the config, load and startup packages and associated classes are defined at the package root. This placement may interfere with deployments of other projects, because their classes will have the same package and class name and thus conflict with those here in the Sales project. To avoid this problem, we move the config, load and startup packages to our Sales package (com.gridgain.sales).
d. Utilities. One of the most common tasks for loading data is parsing from one format to another, or to facilitate empty-value handling. This project includes a ParseTypes utility class that can be used anywhere parsing functionality is required, no need to rewrite code each time it is used.

As you see, there are utility methods for converting from string values that are read from a data source that is not strongly typed (for example, from a CSV file) to data types that can then be loaded directly into an Ignite cache’s key or value field.
We’ll choose one method to examine in more detail. We’ll see how a string is converted to a BigDecimal object:
public static BigDecimal parseBigDecimal(String strNumber) {
    BigDecimal retVal = null;
    if (strNumber != null && strNumber.length() > 0) {
        try {
            return BigDecimal.valueOf(new Double(strNumber));
        } catch(Exception e) {
            System.out.println("parseBigDecimal - value: " + strNumber + "; Parsing ERROR: " + e );
            return retVal;
        }
    }
    else return retVal;
}
The code handles a case in which we are unable to understand (parse) the stringified BigDecimal. A null ReturnValue (retVal) is returned, and an error is printed. You may want your loaders to behave differently.
3. Create LoadOnly CacheStore
The core deliverable of this project is the LoadOnly type of CacheStore. You can write CacheStore from scratch. However, Ignite provides a CacheStoreAdapter, which you can use as a starting point.
a. Class Definition
This example uses the CacheLoadOnlyStoreAdapter:
/**
* Sales CSV LoadOnly CacheStore data loader
*
* @param
* @param
*/
public class SalesCacheLoadOnlyStore
extends CacheLoadOnlyStoreAdapter We named this instance “SalesCacheLoadOnlyStore,” because it will be specific to the Sales caches of our schema. It is important note that the generic CacheLoadOnlyStoreAdapter class needs to be specified with the <Object, Object, CSVRecord> types to indicate the the key, the value, and the iteration type (CSVRecord for Iterator, discussed in the following section).
There are also several private variables to hold references for later use.
b. Class Constructor Methods
The class has two constructor methods for creating the CacheStore. The first method includes the necessary information for referencing the source CSV file name:
public SalesCacheLoadOnlyStore(String csvFileName) {
    System.out.println(
            ">>> SalesCacheLoadOnlyStore (LoadOnly type) with csv FileName " + csvFileName + " constructed.");
    this.csvFileName = csvFileName;
}
With this constructor, the cache configuration would look like this with a constructor-arg element:
<property name="cacheStoreFactory">
    <bean class="javax.cache.configuration.FactoryBuilder" factory-method="factoryOf">
    <constructor-arg>
        <bean class="com.gridgain.sales.load.SalesCacheLoadOnlyStore">
            <!-- Inject csvFileName. -->
            <constructor-arg value="${dataLocation}customer.csv"/>
        </bean>
    </constructor-arg>
    </bean>
</property>
An alternate approach uses an empty constructor, and a property setter method:
public SalesCacheLoadOnlyStore() {
    System.out.println(">>> SalesCacheLoadOnlyStore (LoadOnly type) null constructor...");
}

public void setCsvFileName(String csvFileName) {
    System.out.println(">>> SalesCacheLoadOnlyStore: setCsvFileName(" + csvFileName + ")...");
    this.csvFileName = csvFileName;
}
With the associated cache configuration using a bean property:
<property name="cacheStoreFactory">
    <bean class="javax.cache.configuration.FactoryBuilder" factory-method="factoryOf">
    <constructor-arg>
        <bean class="com.gridgain.sales.load.SalesCacheLoadOnlyStore">
            <property name="csvFileName" value="${dataLocation}customer.csv"/>
        </bean>
    </constructor-arg>
    </bean>
</property>
c. Iterator inputIterator() Method
When the The inputIterator method of CacheStore is called at the start of the load-cache method and is responsible for delivering an iterator to the source data. It may be more accurate to say that the method delivers “an iterator through the source data.
i. Method Signature
The inputIterator method is defined as as follows:
@Override
protected Iterator inputIterator(@Nullable Object... args)
          throws CacheLoaderException {
Where:
- The calling argument, “args,” is a collection of nullable objects.
- Generic Iterator is typed to a CSVRecord object type. Therefore, the inputIterator method returns a CSVRecord every time the Iterator next() method is called for more data from the data source}.
- The Iterator type (in this case, CSVRecord) is the agreed-upon contract between the inputIterator and the subsequent parse() method. The subsequent method must then be able to take a CSVRecord and process it for each iteration.
ii. Argument Handling
We see that the iterator method is called with an Object argument collection. The argument allows for a Load() runtime parameter option. For example, this call syntax in the client initiator calling the load() method:
ignite.cache("CustomerCache").loadCache(null, "Customer.csv");The Customer.csv argument in the loadCache call is delivered to the inputIterator method and to the parse method. We can use the argument to customize the Load action. In this implementation, we use the argument to change the name of the file that is to be loaded from the name that was defined during cacheStore construction:
if (args != null && args.length != 0) {
    // if a parameter is supplied to the cache.load() method, handle this
    csvFileName = args[0].toString();//only supported arg is a new csvFileName
iii. Filename to FileType Logic
There is a fair bit of code to figure out what the cache type is based on the file name. In short, the approach is as follows:
Take csvFileName, which can be a fully pathed value.
Parse into one or more optional folders, a file name and file extension.
csvFileNameTokens = csvFileName.split(Matcher.quoteReplacement(System.getProperty("file.separator")));Take the lowercase value of the file component and set as the fileType (for future parse logic)
file = csvFileNameTokens[(csvFileNameTokens.length - 1)];
fileType = (file.split("\\.(?=[^\\.]+$)"))[0].toLowerCase();
iv. Iterator from CSV
The Iterator return value that this method must return leverages the CSVParser class, so we first create a basic csvIterator from our CSV file name:
setReader(csvFileName);
CSVParser csvParser = new CSVParser(reader, CSVFormat.DEFAULT
    .withEscape('\\')
    .withQuoteMode(QuoteMode.NONE)
    .withFirstRecordAsHeader()
    .withTrim());
Iterator csvIterator = csvParser.iterator();
When we created the CSVParser, we made decisions about how the component operates. For example, we indicated that the CSV files have header rows and that elements are to be trimmed, to eliminate any possible ending space.
v. Extended Iterator Logic
We implement the methods that are required of the Iterator interface in our case:
return new Iterator() {
    @Override public boolean hasNext() {
        if (!csvIterator.hasNext()) {
            try {
                reader.close();
            } catch (IOException e) {
                e.printStackTrace();
            }
            return false;
        }
        return true;
    }
    @Override public CSVRecord next() {
        if (!hasNext()) {
            throw new NoSuchElementException();
        }
        return (CSVRecord)csvIterator.next();
    }
    @Override public void remove() {
        throw new UnsupportedOperationException();
    }
};
d. IgniteBiTuple parse() Method
After the iterator is defined and executed, the Ignite node infrastructure iteratively gets a value from the our custom CSV-based iterator. This record must be parsed. For our project, the iterator returns a CSVRecord, so the parse method processes the pieces of the CSVRecord into our object types, and generates the Ignite Tuple for method return. IgniteBiTuple is a key-value tuple that can be modified and loaded later into a cache.
We use the fileType determined earlier in the above inputIterator() method to determine how we will parse the supplied CSVRecord object:
Object key = null;
Object value = null;

switch (fileType) {
    case "customer" :
        Integer  customerK = ParseTypes.parseInteger(csvRecord.get(0));
        Customer customerV = null;
        try {
            customerV = new Customer(
                ParseTypes.parseString(csvRecord.get(1)),
                ParseTypes.parseString(csvRecord.get(2)),
                ParseTypes.parseString(csvRecord.get(3)),
                ParseTypes.parseString(csvRecord.get(4)),
                ParseTypes.parseString(csvRecord.get(5)),
                ParseTypes.parseString(csvRecord.get(6)),
                ParseTypes.parseString(csvRecord.get(7)),
                ParseTypes.parseString(csvRecord.get(8)),
                ParseTypes.parseString(csvRecord.get(9)),
                ParseTypes.parseString(csvRecord.get(10)),
                ParseTypes.parseInteger(csvRecord.get(11)),
                ParseTypes.parseBigDecimal(csvRecord.get(12))
            );
        } catch (NumberFormatException e) {
            System.out.println(">>> SalesCacheLoadOnlyStore parse(" + fileType + ") exception: " + e);
            e.printStackTrace();
        }
        key = customerK;
        value = customerV;
        break;

    case "employee" :
    // next case implementation
It is interesting to note that we are using the parseString() method for parsing the textual data that is read from the CSV file, even though we will go to String. We use the parseString() method in order to take advantage of the Null handling that is built into ParseTypes.parseString(). So, instead of each field checking for an empty string and creating a null value, the parseString() method checks for empty strings and creates null values.
4. CacheStore to Definition on Cache
A CacheStore is attached or defined on a cache. This action may be performed with either Ignite configuration code or SpringBean Ignite configuration injection.
a. Ignite CacheConfig Code
CacheConfiguration ccfg = new CacheConfiguration();

ccfg.setName("CustomerCache");
ccfg.setCacheMode(CacheMode.PARTITIONED);
ccfg.setAtomicityMode(CacheAtomicityMode.ATOMIC);
ccfg.setBackups(1);
ccfg.setReadFromBackup(true);
ccfg.setCopyOnRead(true);
ccfg.setSqlSchema("SALES");

SalesCacheLoadOnlyStore cacheStoreFactory = new
    SalesCacheLoadOnlyStore();
ccfg.setCacheStoreFactory(FactoryBuilder.factoryOf(cacheStoreFactory));
Here we see the regular CacheConfig being defined. However, on the final two lines we see:
- An instance of SalesCacheLoadOnlyStore is created, labeled “cacheStoreFactory”
- To the CacheConfig variable, labeled ccfg, we set the CacheStoreFactory to the newly created “cacheStoreFactory”.
b. Ignite Cache SpringBean Config
As described above in the section “Class Constructor Methods” there are two approaches for defining the cacheStoreFactory property:
FactoryBuilder SalesCacheLoadOnlyStore constructor-arg
<property name="cacheStoreFactory">
    <bean class="javax.cache.configuration.FactoryBuilder" factory-method="factoryOf">
    <constructor-arg>
        <bean class="com.gridgain.sales.load.SalesCacheLoadOnlyStore">
            <!-- Inject csvFileName. -->
            <constructor-arg value="${dataLocation}customer.csv"/>
        </bean>
    </constructor-arg>
    </bean>
</property>
Here we set CacheStoreFactory in the CacheConfiguration bean and use FactoryBuilder with the SalesCacheLoadOnlyStore parameter.
FactoryBuilder SalesCacheLoadOnlyStore Property
<property name="cacheStoreFactory">
    <bean class="javax.cache.configuration.FactoryBuilder" factory-method="factoryOf">
    <constructor-arg>
        <bean class="com.gridgain.sales.load.SalesCacheLoadOnlyStore">
            <property name="csvFileName" value="${dataLocation}customer.csv"/>
        </bean>
    </constructor-arg>
    </bean>
</property>
Here we set a property of SalesCacheLoadOnlyStore bean class.
5. LoadCache Initiation: Program or Web Console
A cluster run based on this project and configuration has caches associated with our Sales-specific LoadOnly CacheStore. However, a LoadOnly CacheStore does not load data until it is signaled to load. We can signal the cache to be loaded either through the cache API in an “initiator program” that signals the cluster and the cache to perform data loading through the CacheStore, or via the Web Console under the Cache Action menu.
Load via GridGain Web Console

Load via Initiator Program
The following Java API syntax initiates loading on the CustomerCache:
ignite.cache("CustomerCache").loadCache(null));package com.gridgain.sales.load;
import org.apache.ignite.Ignite;
import org.apache.ignite.Ignition;
/** This file was generated by Ignite Web Console (04/23/2020, 16:26) **/
public class LoadCachesFromCacheStore {
public static void main(String[] args) throws Exception {
try (Ignite ignite = Ignition.start("sales-client.xml")) {
ignite.cluster().active(true);
System.out.println(">>> Loading caches...");
System.out.println(">>> Loading cache: OfficeCache");
ignite.cache("OfficeCache").loadCache(null);
System.out.println(">>> Loading cache: ProductLineCache");
ignite.cache("ProductLineCache").loadCache(null);
System.out.println(">>> Loading cache: ProductCache");
ignite.cache("ProductCache").loadCache(null);
System.out.println(">>> Loading cache: EmployeeCache");
ignite.cache("EmployeeCache").loadCache(null);
System.out.println(">>> Loading cache: CustomerCache");
ignite.cache("CustomerCache").loadCache(null);
System.out.println(">>> Loading cache: OrderCache");
ignite.cache("OrderCache").loadCache(null);
System.out.println(">>> Loading cache: OrderDetailCache");
ignite.cache("OrderDetailCache").loadCache(null);
System.out.println(">>> Loading cache: PaymentCache");
ignite.cache("PaymentCache").loadCache(null);
System.out.println(">>> All caches loaded!");
}
}
}6. Build, Deploy, and Run
As with any Maven project, our customized Ignite Maven project needs us to do the following:
- Compile. Compile the source code of the project.
- Package. The compiled code and resources are packaged into a distribution format (usually a jar file).
- Install. Install the package into the local repository.
- Deploy. Copy the package to a remote repository.
- Run. Run an Ignite cluster with the deployed package in its runtime classpath.
We do not have time to discuss the intricacies of the Maven lifecycle or the Maven definition of “install” and “deploy.” For this article, we think of “deploy” as a task that sends build components to a remote repository, and we think of “install” as a task that occurs on the local machine. We will use the install task to copy the file to our local runtime. To perform the copy, we will leverage the maven-dependency-plugin and its “copy” goal. So, by adding the following block to the existing pom file, we enable a seamless “copy” to runtime for our runtime uses:
<plugins>
  <plugin>
    <artifactId>maven-dependency-plugin</artifactId>
      <executions>
      ...
        <execution>
            <id>copy-installed</id>
            <phase>install</phase>
            <goals>
                <goal>copy</goal>
            </goals>
            <configuration>
                <artifactItems>
                    <artifactItem>
                        <groupId>${project.groupId}</groupId>
                        <artifactId>${project.artifactId}</artifactId>
                        <version>${project.version}</version>
                        <type>${project.packaging}</type>
                    </artifactItem>
                </artifactItems>
                <outputDirectory>/apps/ignite-${ignite.version}/libs/</outputDirectory>
            </configuration>
        </execution>
*** Note: outputDirectory must match your runtime installation location and its libs subfolder.
The five build-deploy-run steps can be simplified to the following to command line instructions:
mvn clean installThis command performs all clean-up, compiling, building and, with the added copy plugin, copying of the built jar to your Ignite runtime. Alternatively, you can manually copy the target jar to a runtime destination folder of your choosing.bin/ignite.sh -v sales-server.xmlon macOS, Linux, zOS, or WSL orbin/ignite.bat -v sales-server.xmlon Windows, starts an instance node of your cluster.
Once your cluster is running, you can kick off the load by telling the cluster to perform its cache.load() method:
MAIN_CLASS=com.gridgain.sales.load.LoadCachesFromCacheStore && bin/ignite.sh -v sales-server.xmlon MacOS / linux / zOS / WSL or
set MAIN_CLASS=com.gridgain.sales.load.LoadCachesFromCacheStore && bin/ignite.bat -v sales-server.xmlon Windows, starts a instance node of a client node and initiates the loading of all 8 cluster caches.
*** Note: Both versions of the command set an environment variable (MAIN_CLASS).
The variable instructs the ignite.sh/.bat start script to use a program class other than the default start class.
&& is a logical operator that instructs the command shell to issue the second part of the command only if the first part was successful.
There are four included scripts (salesdataload-server.bat/sh and salesdataload-load.bat/sh) in the GitHub project that run the server and run the load program. When you run the load program (script), you see the following client-output messages:
>>> Loading caches...
>>> Loading cache: OfficeCache
>>> Loading cache: ProductLineCache
>>> Loading cache: ProductCache
>>> Loading cache: EmployeeCache
>>> Loading cache: CustomerCache
>>> Loading cache: OrderCache
>>> Loading cache: OrderDetailCache
>>> Loading cache: PaymentCache
>>> All caches loaded!
On any server node, you see messages that indicate parsing.
>>> SalesCacheLoadOnlyStore inputIterator called with args: []
>>> SalesCacheLoadOnlyStore inputIterator; csvFileNameTokens: [C:, data, sales, office.csv]
>>> SalesCacheLoadOnlyStore inputIterator: csvFileName:C:\data\sales\office.csv; fileType: office
>>> SalesCacheLoadOnlyStore inputIterator called with args: []
>>> SalesCacheLoadOnlyStore inputIterator; csvFileNameTokens: [C:, data, sales, productline.csv]
>>> SalesCacheLoadOnlyStore inputIterator: csvFileName:C:\data\sales\productline.csv; fileType: productline
>>> SalesCacheLoadOnlyStore inputIterator called with args: []
>>> SalesCacheLoadOnlyStore inputIterator; csvFileNameTokens: [C:, data, sales, product.csv]
>>> SalesCacheLoadOnlyStore inputIterator: csvFileName:C:\data\sales\product.csv; fileType: product
>>> SalesCacheLoadOnlyStore inputIterator called with args: []
>>> SalesCacheLoadOnlyStore inputIterator; csvFileNameTokens: [C:, data, sales, employee.csv]
>>> SalesCacheLoadOnlyStore inputIterator: csvFileName:C:\data\sales\employee.csv; fileType: employee
>>> SalesCacheLoadOnlyStore inputIterator called with args: []
>>> SalesCacheLoadOnlyStore inputIterator; csvFileNameTokens: [C:, data, sales, customer.csv]
>>> SalesCacheLoadOnlyStore inputIterator: csvFileName:C:\data\sales\customer.csv; fileType: customer
>>> SalesCacheLoadOnlyStore inputIterator called with args: []
>>> SalesCacheLoadOnlyStore inputIterator; csvFileNameTokens: [C:, data, sales, order.csv]
>>> SalesCacheLoadOnlyStore inputIterator: csvFileName:C:\data\sales\order.csv; fileType: order
>>> SalesCacheLoadOnlyStore inputIterator called with args: []
>>> SalesCacheLoadOnlyStore inputIterator; csvFileNameTokens: [C:, data, sales, orderdetail.csv]
>>> SalesCacheLoadOnlyStore inputIterator: csvFileName:C:\data\sales\orderdetail.csv; fileType: orderdetail
>>> SalesCacheLoadOnlyStore inputIterator called with args: []
>>> SalesCacheLoadOnlyStore inputIterator; csvFileNameTokens: [C:, data, sales, payment.csv]
>>> SalesCacheLoadOnlyStore inputIterator: csvFileName:C:\data\sales\payment.csv; fileType: payment
These output traces show the actual configured or called csv file name and the type dispatched to the parser.
Summary
In this article, we built a custom LoadOnly CacheStore that the cluster’s servers use to load CSV files into the cluster caches. With Ignite deployed as an IMDB, the LoadOnly CacheStore implements the data-ingestion, integration part of the “horizontal” data pattern of a Data Integration Hub. We saw that we can modify the well-defined structure of a Web Console project to build an extensible project. We used CacheLoadOnlyStoreAdapter (provided by Ignite) to minimize the coding required to build a high-performance, server-based, CSV file loader that requires a minimal number of elements (an iterator and a record splitter/parser). In the next article, we return to a more traditional pattern of building a client application (an Ignite thick client), a method that actually does the loading, rather than signalling the server to do it.
Enjoy and see you in the next one!
Cheers,
Glenn